Cyber Kill Chain vs. MITRE ATT&CK: An Insightful Comparison

Cyber Kill Chain vs. MITRE ATT&CK: An Insightful Comparison

There are two challenges we in cybersecurity face when it comes to communicating what we do the rest of the business (and the rest of the world). For many people, computers, networks, and Information Technology in general are opaque, and most businesspeople know how to use tech to get their job done, but not how it works “under the hood”. Hacking that technology to subvert it for malicious purposes is another level of mystery.

Hollywood doesn’t help much either, with most on-screen depiction of hacking in movies and TV shows being radically different from reality (with the exception perhaps of Mr Robot).

The first challenge is communicating the technology and basic understanding of how it works to then show how it can be misused. But the second challenge is then imparting how the criminals carry out their attacks. Most people think a hack is just a single “thing” that happened – “we got hacked” and then all the bad stuff happened, when it’s actually a set of steps.

In this article we’ll look at two different frameworks that are used to communicate hacking processes, both to the wider business and within the cyber security community – the Cyber Kill Chain, and the MITRE ATT&CK framework. We’ll look at the advantages and challenges of each of them, how they compare and how you can use them to fortify your organization’s cyber defenses.

Meet the Cyber Kill Chain

This is the older of the two approaches, having its roots in military kill chains such as the Four F’s from the US military during World War II: Find the Enemy, Fix the enemy, Fight the enemy and Finish the enemy. A more modern version is F2T2EA: Find, Fix, Track, Target, Engage and Assess; it’s called a chain because an interruption at any step can stop the whole process.

Kill Chain Attack

Cyber Kill Chain

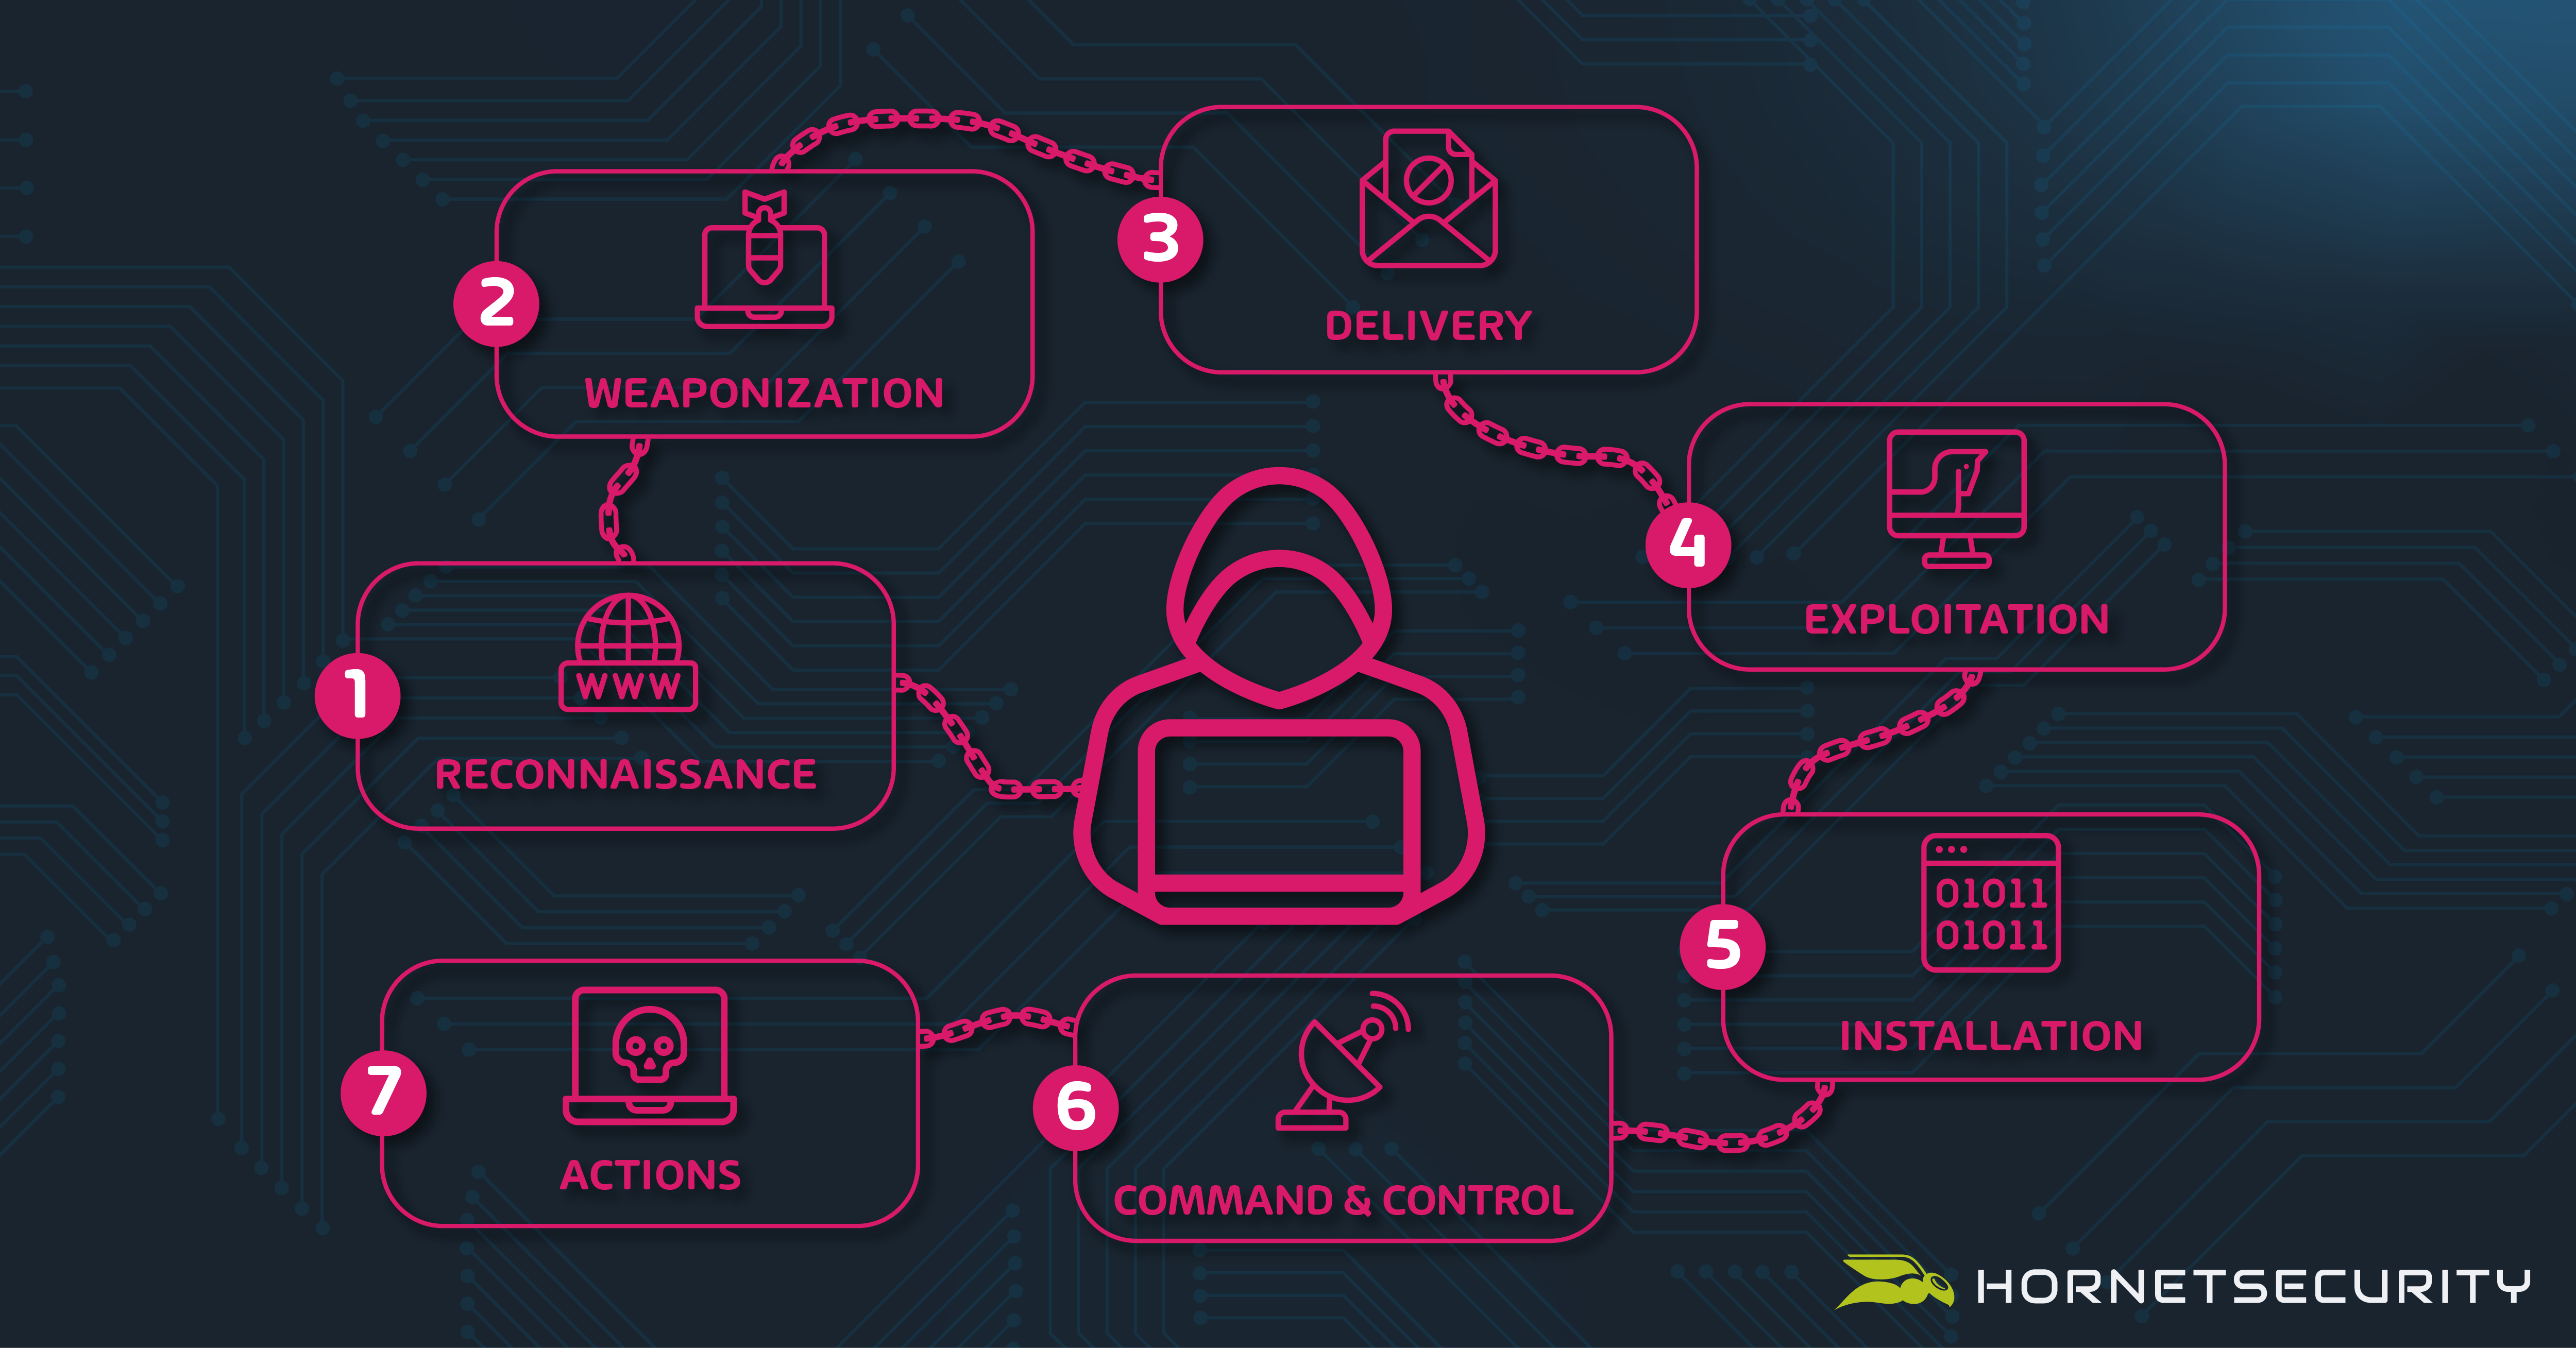
Not surprisingly, it was Lockheed Martin, a large military manufacturer in the US that took this chain approach and transformed it into the Cyber Kill Chain, with seven steps (and a very different result at the end compared to the literal kill chains mentioned above).

  1. Reconnaissance
  2. Weaponization
  3. Delivery
  4. Exploitation
  5. Installation
  6. Command and Control (often shortened to C2)
  7. Actions on objectives

As a communication tool for showing business leaders that there are steps in an attack, and that you want budget to interrupt or make each layer more difficult for the criminals, this is a good approach.

Cyber security after all always comes down to business risk. When you put it those terms, the CEO, CFO, and the board are more likely to pay attention. If you start talking about technical details, you’ll soon lose them, but business risk is something they’re used to dealing with, and cyber-attacks is just one of the many risks businesses faces.

Be aware that attackers may not perform every step, depending on their goals, their target, and any changes along the way, and that “attackers” might refer to different sets of people, where the early steps might be performed by an Initial Access Broker (IAB), who then sells the access to another group to actually run the ransomware and negotiate the payment.

In step one the attackers will gather information about your company and any employees of interest. This could be cursory, if they’re simply after a company with enough turnover to pay the ransom they might look at your financials, and who to target with their spear phishing emails.

It could also be more in-depth, when the scattered spider group went after the helpdesk at the MGM casino, they knew a great deal about the staff they were impersonating to ensure that the helpdesk would help them reset their credentials.

Phase two is taking advantage of the reconnaissance, to start exploiting a found weakness or packaging a payload, whereas step three is delivering the malicious bundle to the victims, via email, web etc.

Once the initial foothold has been established (someone clicked the link in a malicious email for example), step four starts the exploit to run code on the victims system, which may then continue with step five, further installations on other systems. This is often called lateral movement, as the attackers continue exploiting systems in your networks, to gain full Domain access.

They’ll also establish persistence (so they can come back in if you’re trying to expel them from your environment) and Command and Control (C2) in step six for covert communication with their external control systems. The final step, seven, involves the attackers springing their trap and encrypting all your files, after having corrupted your backup systems or perhaps exfiltrating all your sensitive data (or both).

The ”other side” of the cyber kill chain are the defensive actions your organization should take to deal with each phase:

  1. Detect – having sensors throughout your environment that trip when an attacker is present.
  2. Deny – control access and prevent information leakage.
  3. Disrupt – malicious processes and outgoing traffic to the attacker’s infrastructure.
  4. Degrade – means counter attacking the attackers C2 systems.
  5. Deceive – is about interfering with the C2 infrastructure.
  6. Contain – using network segmentation so that a single breached system or identity doesn’t have full access to every other system on the network.

This approach does have its detractors but as a conversation to start looking at different phases of an attack, whether your organization has security controls in place to detect it, disrupt it and contain it, it’s a good start. It also leads neatly in the modern approach of Zero Trust:

  1. Assume breach – work on the assumption that attackers will gain access and work on detecting it, containing it, and disrupting it.
  2. Verify explicitly – authenticate and authorize both human and workload identities at each access point in the infrastructure.
  3. Use least-privilege access – only grant identities access to the systems, data, and applications they need to do their job.

The challenges with the cyber kill chain is that it doesn’t work well for insider risks, the first couple of steps happen outside of the defenders control (unless you stop all staff from having LinkedIn profiles and posting anything, anywhere online) and it’s also quite focused on malware, some attackers now use Living Off the Land methods, only using built in administrative utilities in the systems, thereby often avoiding detection.

The MITRE ATT&CK Framework

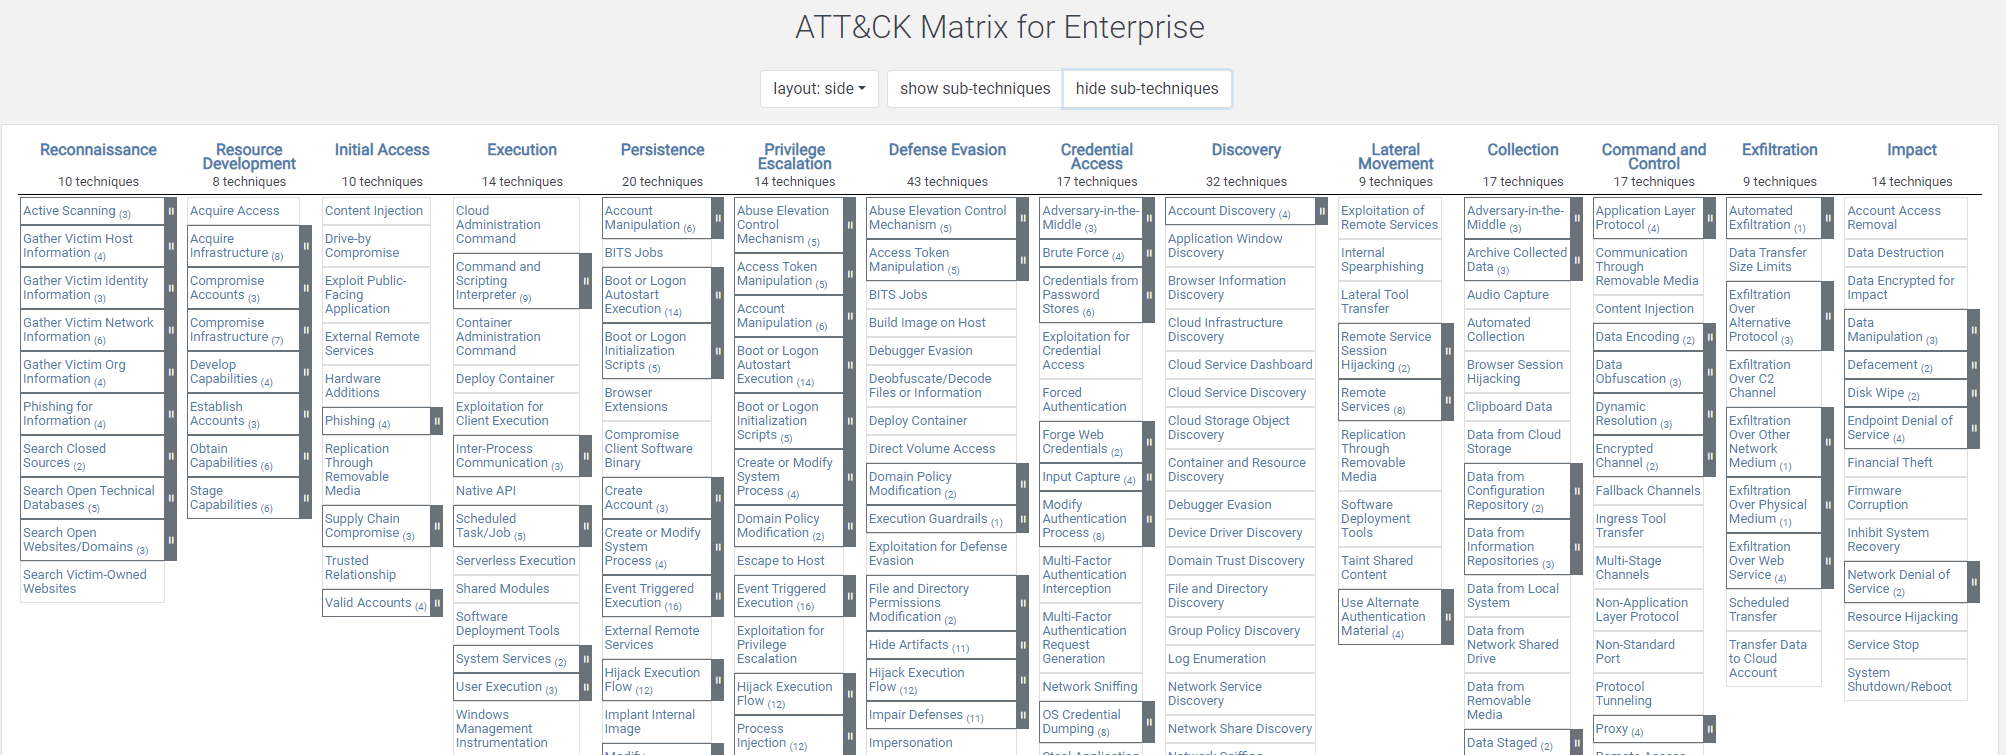
MITRE is a not-for-profit company that works for the common good in the areas of security writ large, but for this conversation we’ll focus on their enterprise matrix (there’s also one for Mobile and one for Industrial Control Systems, ICS). The weird acronym comes from Adversarial Tactics, Techniques and Common Knowledge and it was initially released in 2013.

ATT&CK framework matrix

ATT&CK framework matrix

There are 14 tactics (the “why” of the attack):

  1. Reconnaissance
  2. Resource Development
  3. Initial Access
  4. Execution
  5. Persistence
  6. Privilege Escalation
  7. Defense Evasion
  8. Credential Access
  9. Discovery
  10. Lateral Movement
  11. Collection
  12. Command and Control
  13. Exfiltration
  14. Impact

And each of them has Techniques (and sub-techniques), the “how” of an adversary, so while you can see some overlap with the simpler cyber kill chain in the list above, this is much more comprehensive. I like to think of it as a common language we in the cyber security industry can use to communicate about different attack techniques. There’s also tracking of 143 threat groups and which Tactics, Techniques and Procedures (TTPs) they use.

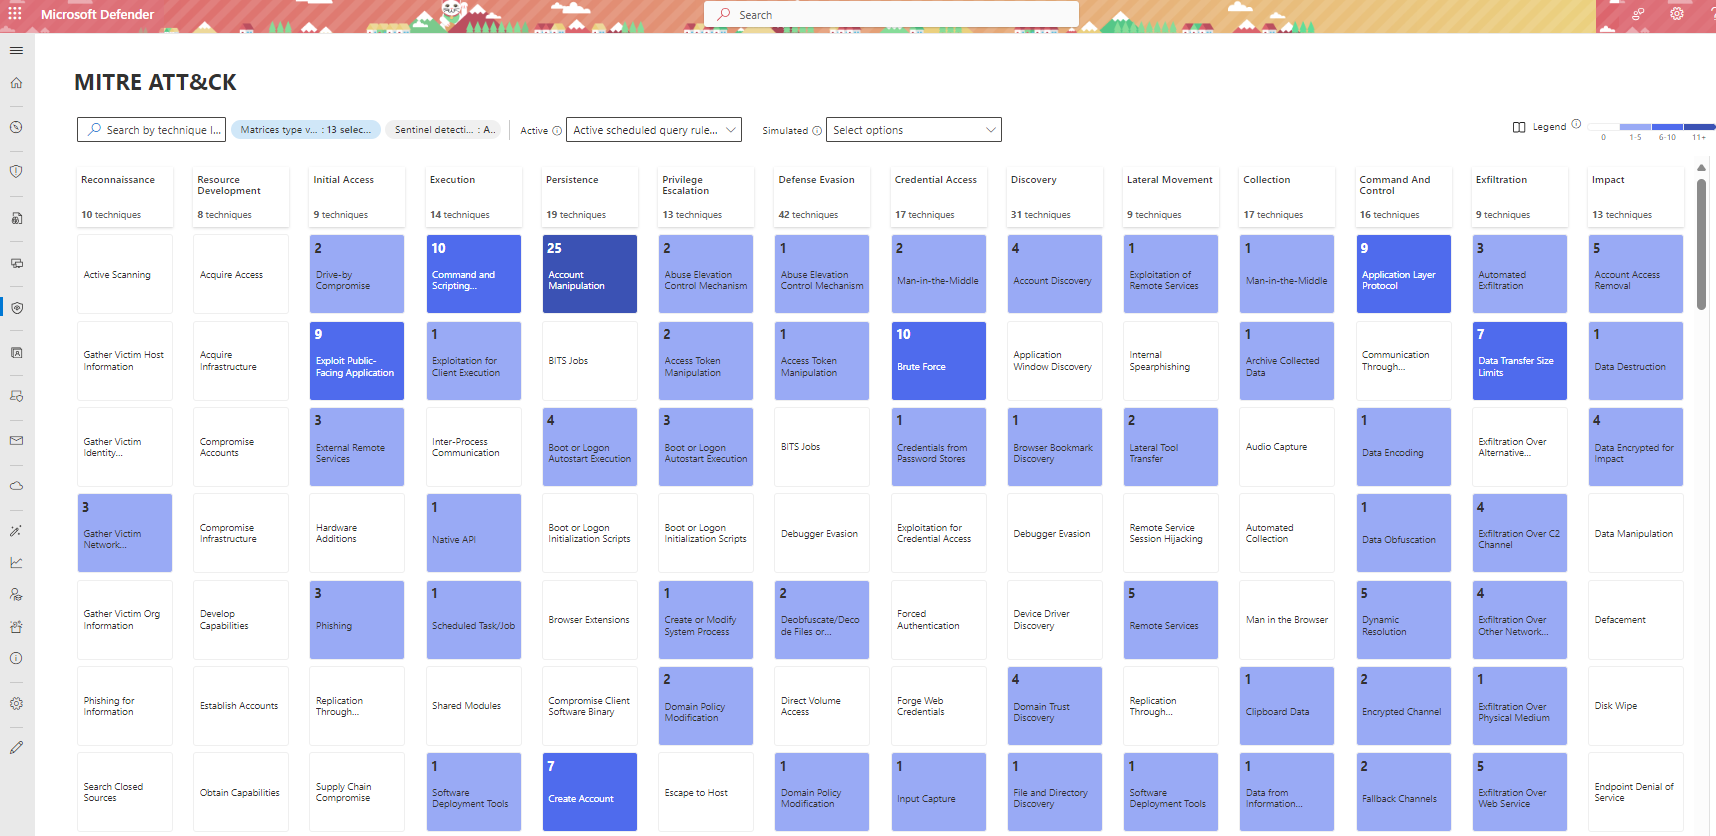
As you can appreciate the matrix encapsulates all the different techniques, making this a tool to ensure that you’ve got coverage “across the board” in your cyber security strategy. Here’s an example from one client, using the Microsoft Sentinel SIEM, and the analytics rule detection coverage across the techniques.

MITRE ATT&CK Technique Detection Coverage in a SIEM

MITRE ATT&CK Technique Detection Coverage in a SIEM

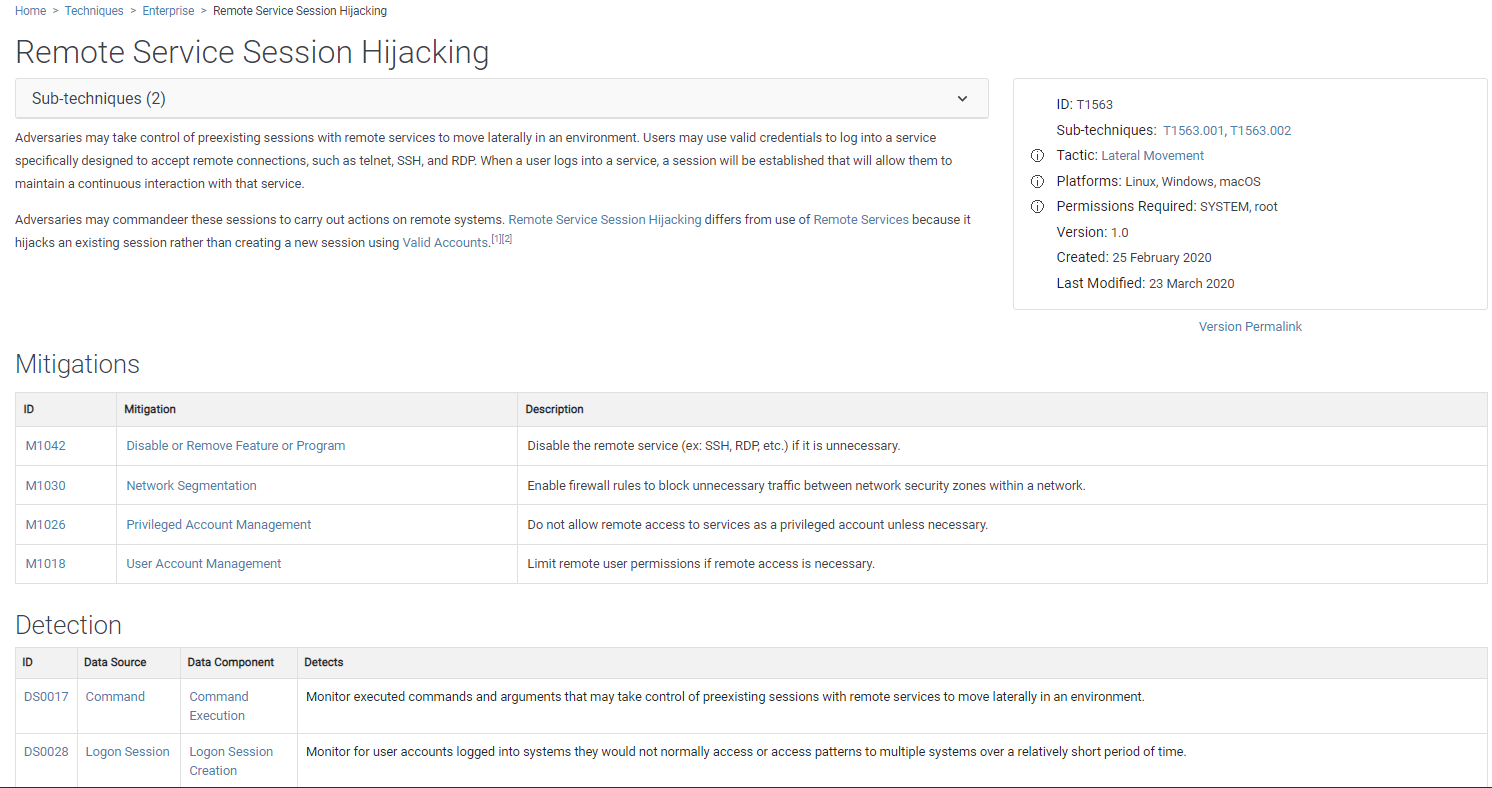
Each Technique is described in detail, here’s T1563, Remote Service Session Hijacking, in the Lateral Movement Tactic, which has two sub-techniques (SSH Hijacking and RDP Hijacking) as an example. It has four mitigations that you can implement, and four detections that you can use to alert you if this is happening on your network. Most techniques also list Procedures which are the actual technical tasks applying that technique to a specific application or operating system.

Technique T1563 Remote Service Session Hijacking

Technique T1563 Remote Service Session Hijacking

While the matrix is very useful, it can be overwhelming with so many techniques and procedures. It’s also important to avoid thinking of the matrix as a long list of mitigations / detections – even if you have a “tick in every box”, for every technique you can still be compromised. Remember – “Attackers think in graphs, defenders think in lists” (John Lambert), so just implementing long lists of security controls isn’t the right approach, instead use MITRE ATT&CK with the context of your business priorities and unique network environment to build cyber resilience.

Comparing the Cyber Kill Chain and MITRE ATT&CK

The two are related in that they describe the steps in different cyber-attacks, but they have different aims. The cyber kill chain is more generic and is an excellent introduction to the idea of hacking occurring in stages, and it’s a chain that you can interrupt with security controls. I find it very useful when communicating with non-IT and non-security people in business to get that basic understanding of the phases and how it works.

The ATT&CK matrix on the other hand is overwhelming for a non-technical audience (there are over 200 techniques) but is an excellent tool for understanding the technical steps attackers can take during a breach. And it can be used as a tool for evaluating coverage across the entire spectrum – “do we have detections for every technique in every tactic”, whilst not losing sight of the fact that even if you do, you may still be compromised.

It’s also interesting to see how these two fit into the larger landscape of regulatory framework that mandate certain cyber security controls, and other approaches such as the Center for Internet Security (CIS) benchmarks. CIS offers benchmarks for different operating systems, SaaS cloud services (including Microsoft 365) and IaaS / PaaS cloud platforms, and much more, for free.

These cover all the controls that you should implement as a baseline for security controls for that particular technology. Microsoft offers CIS benchmarks for both Azure and Microsoft 365 in their Compliance Manager app. And the upside is that if you implement all these controls you’ll have covered most, if not all, of the MITRE ATT&CK techniques.

Enhance employee awareness and safeguard critical data by leveraging Hornetsecurity’s Security Awareness Service for comprehensive cyber threat education and protection.

To keep up to date with the latest articles and practices, pay a visit to our Hornetsecurity blog now.

Conclusion

For beginners in cyber security, I recommend studying the MITRE ATT&CK framework, it’s like a common language for talking about different types of attacks.

I warmly recommend the free courses offered by AttackIQ, they’ve got one on Threat-Informed Defense which goes in detail on the MITRE ATT&CK framework. And use the Cyber Kill Chain phases when talking to the rest of the business.

Both have their place and are useful in their own right in helping you build a more cyber-resilient business.

FAQ

What is the main difference between MITRE ATT&CK and Cyber Kill Chain?

The Cyber Kill Chain in a useful communications tool when conveying cyber security concepts to non-technical people, and a basis for an overall IT security strategy for a business. MITRE ATT&CK on the other hand exhaustively lists every attack technique, grouped by tactics, and mapped to different threat actors, allowing an organization to identify detection gaps.

What are the types of a cyber kill chain?

There are a few different versions of the Cyber Kill Chain, FireEye (now part of Mandiant, which is now part of Google) proposed their variant which also has seven steps but which focuses more on the persistence of threats, whereas the Unified Kill Chain has 18 unique phases and attempts to marry the best of the original Cyber Kill Chain and MITRE ATT&CK.

What are the types of MITRE frameworks?

Generally, when people mention MITRE ATT&CK they’re referring to the enterprise matrix, but there’s also one for Mobile and one for ICS. Furthermore, there’s the D3FEND matrix of cybersecurity countermeasures which is sort of the other side of the attack techniques, all the different controls that an organization can implement to mitigate the attacks outlined in ATT&CK.

Microsoft 365 Permissions and Copilot – a ticking time bomb for Security and Compliance

Microsoft 365 Permissions and Copilot – a ticking time bomb for Security and Compliance

File sharing in business is one of those technologies that mostly happens “under the radar”. New SharePoint sites are spun up for projects or groups, or new Teams are created with lots of files shared.

This sharing can be both with internal users and external users. And mostly, no one thinks twice about it, until sensitive documents and data end up in the wrong hands.

In this article, we’ll look at the challenge of data governance, document sharing in Microsoft 365 and how it applies to compliance regulations and getting your business ready for Copilot for Microsoft 365 – all with the help of Hornetsecurity’s 365 Permission Manager.

The Dangers of Unmanaged File Permissions

As CISOs and IT admins know – file sharing, both with internal groups and external collaborators is designed to be as easy and frictionless as possible to cater for the reality of the modern, mobile, collaborative digital workplace.

From a compliance point of view however, this approach can be a ticking time bomb, plus there’s a new player on the scene that might accelerate the timer on that bomb – Copilot. Microsoft is keen to push the value of Copilot for Microsoft 365 (at $360 USD per user, per year, you can’t pay per month) and here’s the rub – Copilot has access to the same documents as the user has.

Remember Delve? That was Microsoft’s earlier tech for suggesting documents to you, created by people you collaborated with that you might find valuable. Except sometimes business got a shock when they realized which documents were shared with different groups of people.

The Copilot situation is worse, because you won’t necessarily know which documents it has accessed to answer your prompt or create a new draft of a document for you.

Easy Sharing

Teams file sharing is possibly one of the most easily misunderstood avenues – when you share a file in a Teams channel, it’s actually stored in the team’s site in SharePoint. Whereas if you upload a file to a one-on-one or group chat, it’s stored in the Microsoft Teams Chat Files folder in your OneDrive for Business (which is actually a SharePoint site underneath the hood).

If you have a private channel, it gets its own, separate SharePoint site with a document library that only the members of the private channel have access to. So, the documents are all stored in various SharePoint sites, rather than in Teams itself.

And if you share a file with an external collaborator, depending on the settings your IT department has set in SharePoint online, this might send them an email with an invitation to create a guest account in your tenant.

YouTube

Mit dem Laden des Videos akzeptieren Sie die Datenschutzerklärung von YouTube.
Mehr erfahren

Video laden

If you’re a CISO, you’re probably concerned at this point. Business data is easily shared internally, possibly with staff that shouldn’t have access to it, and you have limited control over this sharing.

It’s also (likely) shared with external collaborators, and you don’t have a lot of insight into this sharing either. But you must thread carefully, a knee jerk reaction of locking down file sharing completely, with no external sharing and default tight permissions for internal sharing will just lead to users looking for an alternative way to get their job done.

Sensitive documents might then be shared via third party cloud storage, where you have even less visibility into the risks.

On the other hand, if you’re an IT admin, tasked with managing file sharing (on top of all your other duties) this can seem like an overwhelming challenge.

Where do you even begin? Even if you can produce reports on permissions granted, and files shared externally, you don’t know what’s oversharing and what’s legitimate business. You’ll have to work with various business departments to identify this, on a site-by-site basis.

Finally, if you’re an end user, understanding what control you have over sharing documents internally and externally (which will depend on the tenants configuration), and how you can inventory your own role in oversharing is near impossible to do with the built in tools.

Data Governance

Getting a handle on your current file sharing situation (in most businesses this is something that’s been part of the landscape for so long, that no one has the full overview to see just how bad it is), using the built in tools is challenging.

Auditing hundreds of sites manually is impossible, and even scripting PowerShell reports to gather the data is difficult.

Certainly, take a look at your current settings and the options you have in the SharePoint admin center which we covered in this article. But even if you tighten those settings today (they’re tenant wide), they only apply to new sharing, not existing shared sites, and files.

Remember that one of the tenets of Zero Trust (and it has been around long before that) is least privilege access. In other words, only give users access to the data they need to do their job, no more. And keep this up to date as they change roles in the organization or are promoted.

This rarely happens, instead people keep existing access and just accumulate more permissions. And inventorying exactly who’s got access to what documents is hard to do with the built-in tools.

Different regulations that you might have to comply with have varying approaches to controls around file sharing, in ISO 27001:2022, “Information security, cybersecurity and privacy protection” there’s A.8.12 Prevent the sharing of sensitive information within business communication platforms and under A.8.3 there’s Block access to files for specific users and Create and manage access reviews.

In HIPAA, the Health Insurance Portability and Accountability Act in the US, under § 164.308(a)(4) Standard: Access control you have Review user groups and applications with access to ePHI for example.

In the US, organizations doing business with the Department of Defense need to comply with CMMC, Cybersecurity Maturity Model Certification with a new version v2.0 in the works, here for example, SC.L2-3.13.16 has controls for Data at rest, and AU.L2-3.3.1 has System auditing.

As a last example, the CCPA, California Consumer Privacy Act, control 1798.150(a)(1) Data Security Breaches involves audit logging and Data Loss Prevention policies.

These are just a few examples, depending on where your business is located, and what vertical you’re in and the type of data you store and process, different regulations will apply.

What’s common across many of them is that you not only must control access to data with least privilege access, and audit access, often with regular access reviews – you must also be able to demonstrate to an auditor that you’re doing so. It’s not enough to say you are, you must collect and present evidence for how you’re doing it.

365 Permission Manager

What’s needed is a scalable tool that can span large tenants with thousands of SharePoint sites, which is easy to use and gives you a centralized management interface to apply policies, find deviations from those and remediate over permissioned access in bulk.

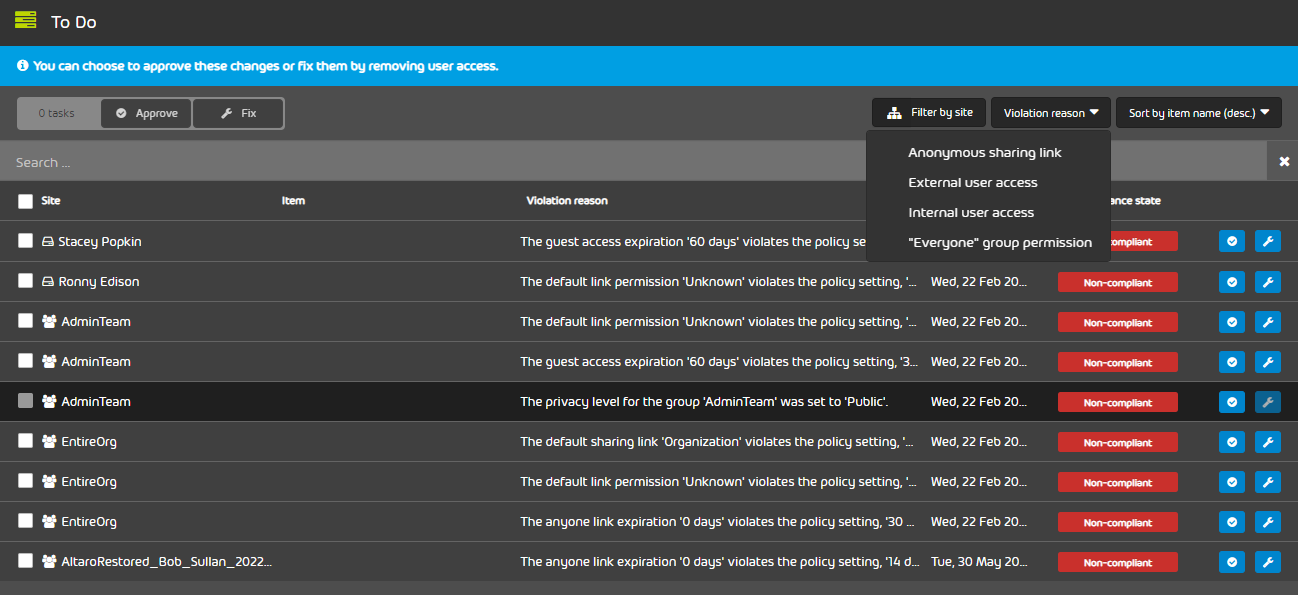
We looked at the basics of how 365 Permission Manager works here and this great video animation shows it visually. Instead of having to visit several different portals in Microsoft’s native tools, an IT administrator has a single console, and a single most important page – the To Do list.

This lists all the violations of the policies applied to every SharePoint Online site and let’s you remediate in bulk, as well as provide exceptions when there’s a business justification.

To do list - the IT administrators best friend

To do list – the IT administrators best friend

There are a number of built in compliance policies that you can apply to SharePoint sites, and you can also create your own customized ones.

This is a fundamental difference between the native approach and 365 Permission Manager, instead of having a single tenant wide default for all sites, that you must then further customize for each site, you apply a policy to each site, out of a library that you have adapted to your business.

The concerned CISO we mentioned above, he’s going to love the three reports that’ll show Full Site Permissions, User & Group Access and External Access.

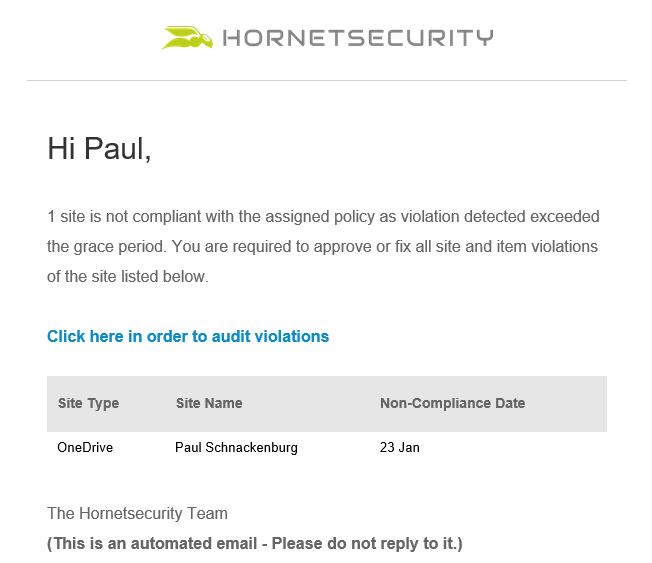
And end users are also involved, receiving regular emails if their sites are violating policy, with links to 365 Permission Manager to remedy issues.

End user email notification

End user email notification

365 Permission Manager was initially built at Hornetsecurity to manage our own SharePoint file sharing challenges, and our CISO, Olaf Petry, loves having such a powerful tool, saying:

It is critical for a CISO to effectively oversee the company’s strategy and programs to ensure adequate protection of information assets and technologies, and yet this process can be very complicated. My peers often discuss what a great pain point it is for them. Hornetsecurity’s new 365 Permission Manager will set CISO’s minds at rest by enabling security and compliance managers and administrators to efficiently and easily control Microsoft 365 permissions, and help prevent critical data from getting into the wrong hands.

The ability to enter a username and see exactly what sites and documents a user has access to also really helps with preparing for an audit.

YouTube

Mit dem Laden des Videos akzeptieren Sie die Datenschutzerklärung von YouTube.
Mehr erfahren

Video laden

To effortlessly manage Microsoft 365 permissions, enforce compliance policies, and monitor violations with ease, utilize Hornetsecurity’s 365 Permission Manager. Protect your Microsoft 365 environment and make admin tasks a breeze.

Conclusion

Whether you’re working towards compliance with a regulation, preparing your business for users with Copilot for Microsoft 365 or just want to make sure sensitive data isn’t shared too widely, the answer is simple – 365 Permission Manager.

FAQ

What are the risks associated with unmanaged file permissions in Microsoft 365?

Unmanaged file permissions pose a significant risk to data security and compliance. While file sharing is designed to facilitate collaboration, it can lead to sensitive documents ending up in the wrong hands. With the introduction of Copilot for Microsoft 365, the risks are further exacerbated, as it has access to the same documents as users, potentially compromising data privacy.

How does Teams file sharing contribute to data governance challenges?

Teams file sharing, although convenient, adds complexity to data governance efforts. Files shared in Teams channels are stored in SharePoint sites, while those uploaded to chats are stored in OneDrive for Business. Managing permissions for these shared files, especially when collaborating with external users, can be daunting for IT administrators, leading to oversight and potential data breaches.

How can businesses address data governance and compliance issues related to file sharing?

To address data governance and compliance challenges, businesses need effective tools like Hornetsecurity’s 365 Permission Manager. This tool offers centralized management of SharePoint permissions, allowing administrators to apply policies, identify violations, and remediate over-permissioned access. It provides customizable compliance policies, comprehensive reports, and end-user notifications to ensure data security and regulatory compliance.

Cyber Insurance: A Shield for Your Business in the Digital Age

Cyber Insurance: A Shield for Your Business in the Digital Age

In an increasingly interconnected world, where businesses rely heavily on technology, the risk of cyberattacks is ever-present.

As cybercriminals continue to evolve and become more sophisticated, the need for robust cybersecurity measures is greater than ever. Cyber insurance has emerged as a vital tool to protect your company from the financial and reputational fallout of a cyber incident.

In this article, we’ll explore why companies should consider taking out cyber insurance and how 365 Total Protection can make this process even more advantageous.

The Evolving Cyber Threat Landscape

The digital age has brought about a myriad of opportunities for businesses, but it has also given rise to new and constantly evolving risks. Cyberattacks, including data breaches, ransomware attacks, and phishing scams, are becoming more prevalent, targeting organizations of all sizes.

As a result, companies face the risk of financial loss, legal liability, and damage to their reputation.

The Case for Cyber Insurance

Here are compelling reasons why your company should strongly consider cyber insurance as part of its risk management strategy:

  1. Financial Protection: Cyber insurance covers the financial costs associated with a cyber incident, including expenses for investigating and mitigating the breach, notifying affected parties, and recovering lost data.
  2. Legal Liability: In the event of a data breach, your business may be liable to customers, suppliers, and partners due to data protection law violations. Cyber insurance can help cover legal expenses and compensation.
  3. Business Continuity: A cyber incident can disrupt your business operations, resulting in revenue loss. Cyber insurance can provide financial compensation to help your company maintain its stability during and after an attack.
  4. Assistance Services: Many cyber insurance policies offer assistance services, such as access to IT security experts, crisis PR specialists, and data protection lawyers. These professionals act as an extension of your team in navigating the complex aftermath of an attack.
  5. Data Protection: Cyber insurance can also cover the costs associated with the loss, misuse, or compromise of physical and electronic data, ensuring that your valuable information is safeguarded.

The Challenges of Cyber Insurance

While the benefits of cyber insurance are evident, it’s essential to acknowledge the challenges that come with it. To give some perspective: The global cyber insurance market reached $7.8 billion in 2020 and is expected to grow to $20 billion by 2025.

In recent years, the cyber insurance landscape has seen premiums rise globally by an average of 20% per year, driven by the increasing frequency and severity of cyberattacks. Insurers are also imposing higher minimum IT security requirements on policyholders. These changes can be particularly burdensome for small and medium-sized businesses.

The 365 Total Protection Advantage

To help our customers overcome these challenges and secure comprehensive cyber insurance on favorable terms, we’ve partnered with Hiscox, a leading cyber insurance company in Germany. This partnership offers special conditions exclusively for Hornetsecurity customers using 365 Total Protection or any of its components. The special conditions include:

  • Discount on Premiums: Enjoy a discounted insurance premium, ensuring cost-effective coverage for your business.
  • Reduced Deductible: Benefit from a lower deductible, making it more manageable in the event of a claim.
  • Higher Indemnity Limit: Receive a higher indemnity limit to cover potential losses during a business interruption.
  • Simplified Application Process: We’ve streamlined the application process for our customers. All you need is proof that you are using 365 Total Protection or just one of its included services, making the process hassle-free.

Conclusion

As the digital landscape continues to evolve, the importance of protecting your business from cyber threats cannot be overstated.

Cyber insurance is a critical tool that provides financial protection, legal assistance, and peace of mind in the face of cyber incidents.

With our partnership with Hiscox, 365 Total Protection customers can enjoy special conditions, making the process of obtaining cyber insurance more advantageous than ever before.

Don’t wait until a cyber incident threatens your business – take proactive steps to safeguard your digital assets and secure comprehensive cyber insurance.

Reach out to us today to learn more about the exclusive benefits of our cooperative agreement with Hiscox and how 365 Total Protection can help you protect your company in the digital age.

Learn more about 365 Total Protection and request a free trial: https://www.hornetsecurity.com/en/services/365-total-protection-compliance-and-awareness/

FAQ

What is cyber insurance, and why do businesses need it?

Cyber insurance is a type of insurance that helps protect businesses from financial losses resulting from cyberattacks and data breaches. It can cover costs associated with data recovery, legal fees, and reputation management. As cyber threats continue to evolve, businesses need this insurance to mitigate the financial impact of potential cyber incidents.

What types of cyber threats does cyber insurance typically cover?

Cyber insurance policies can vary, but they often cover a wide range of cyber threats, including data breaches, ransomware attacks, DDoS attacks, social engineering, and insider threats. Some policies, like Hiscox’s, may also cover third-party liability, such as claims from affected customers or partners.

What factors influence the cost of cyber insurance?

The cost of cyber insurance can vary based on several factors, including the size and industry of the business, its cybersecurity practices, the amount of coverage needed, and the location of the company. Companies with strong cybersecurity measures in place may pay lower premiums than those with weaker protections.

Does cyber insurance cover the full cost of a cyberattack?

Cyber insurance policies typically do not cover the full cost of a cyberattack. They provide coverage up to the policy limit, and there may be deductibles or waiting periods before coverage kicks in. It’s essential for businesses to carefully review their policy terms and limits to ensure they have adequate coverage.

Can small businesses benefit from cyber insurance?

Yes, cyber insurance is not limited to large corporations. Small businesses are often more vulnerable to cyber threats due to limited resources for cybersecurity. Cyber insurance can help them recover from the financial impact of an attack and provide peace of mind. Many insurance providers offer policies tailored to the specific needs of small businesses.

Protecting Your Business: The Importance of Cyber Insurance

Protecting Your Business: The Importance of Cyber Insurance

In today’s digital age, the threat of cyberattacks looms larger than ever, and businesses are increasingly becoming targets of sophisticated cybercriminals. In this landscape, safeguarding your company against potential risks is paramount.

One crucial aspect of this protection strategy is investing in comprehensive cyber insurance. But simply having cyber insurance isn’t enough; it’s equally essential to ensure that you meet the stringent requirements set by insurers to secure favorable terms.

One way to achieve this is by employing an all-encompassing IT security solution like 365 Total Protection. In this article, we’ll explore the reasons why your company should consider cyber insurance and how 365 Total Protection can help you obtain favorable terms on your policy.

The Rising Cyber Threat Landscape

Cyberattacks have surged in frequency and sophistication over recent years. Hackers are targeting businesses of all sizes, seeking to exploit vulnerabilities in digital infrastructure, steal sensitive data, disrupt operations, and cause financial and reputational damage.

As a result, companies are exposed to a growing array of risks, including data breaches, financial loss, legal liability, and reputational damage.

According to the Hiscox Cyber Readiness Report 2023, the median cost of a cyber-attack has reached in Germany 16.000 Euro, down 32.4% from 2021. Although this is a welcome development for Germany, the average cost of a cyber-attack to a company is still considerable. And who can guarantee that it will be just one attack?

For other countries in the Western Hemisphere, things don’t look quite so favorable. In the UK, the average cost of a cyberattack was 24,200 euros in 2023, and 20,000 euros in the US.

The Importance of Cyber Insurance

To mitigate these risks effectively, businesses should consider investing in cyber insurance. A robust cyber insurance policy can offer comprehensive protection against the financial and legal ramifications of a cyberattack. Here’s why purchasing cyber insurance is a wise decision:

  1. Coverage for Incurred Damages: Cyber insurance typically covers the costs associated with defending against a cyberattack, restoring data and systems, and mitigating the impact of the attack on your business.
  2. Liability Protection: In the event of a data breach or cyber incident, your company may be liable to customers, suppliers, and partners due to data protection law violations. Cyber insurance can help cover the costs associated with legal liability and compensation.
  3. Business Interruption Support: Cyber insurance may provide financial compensation in case of a business interruption resulting from a cyberattack, helping your business maintain stability during challenging times.
  4. Assistance Services: A good cyber insurance policy includes assistance services such as IT security experts, crisis PR specialists, and data protection lawyers. These professionals act as an outsourced cyber crisis department to help you navigate the aftermath of an attack effectively.
  5. Data Protection: Cyber insurance can also offer protection for both physical and electronic data, including laptops, smartphones, and paper files. If data is lost, compromised, or misused, your policy can provide coverage.

The Challenges of Cyber Insurance

However, there’s a catch. As the frequency and severity of cyberattacks continue to rise, insurers are adapting to the changing landscape. They are striving to make their cyber insurance products profitable again. This translates to increasing deductibles, higher premiums, and more stringent minimum IT security requirements for policyholders.

According to the World Economic Forum, cyber insurance premiums have increased globally by an average of 20% per year over the past five years. For small and medium-sized businesses, these rising premiums and stricter security requirements can become a substantial financial burden.

How 365 Total Protection Can Help

This is where 365 Total Protection comes into play. 365 Total Protection is a comprehensive IT security solution that offers a multitude of benefits, including:

Email Security: Protect your business from email-based cyber threats, including phishing, malware, and spam. 365 Total Protection ensures that your communication remains secure; and thanks to a self-learning AI-based service, it ensures that email recipients are validated so that even outgoing emails don’t fall into the wrong hands.

Backup & Recovery: In the unfortunate event of a cyberattack, 365 Total Protection provides a robust backup and recovery system, ensuring that your data is safe and can be quickly restored.

Compliance for Permission Management: 365 Total Protection helps your organization comply with data protection laws, ensures that you effectively protect sensitive data in Microsoft 365 thanks to clear permissions management, and reduces the risk of data loss and legal liability.

Security Awareness Training & Phishing Attack Simulation: Educate your employees about the importance of cybersecurity. Well-informed staff can be your first line of defense against cyber threats.

With the Security Awareness Service included in 365 Total Protection, you can train your employees at the touch of a button to recognize and report even advanced spear phishing attacks and learn safe behaviors to build a sustainable security culture. The Security Awareness Service runs continuously and fully automatically.

It includes advanced spear phishing simulation to continuously measure the security behavior of all employees, and then automatically manages the right level of training for each employee.

By implementing 365 Total Protection, your company can substantially enhance its cybersecurity posture, which, in turn, can lead to more favorable terms when purchasing cyber insurance. When insurers see that your organization has taken significant proactive measures to protect against cyber threats, they may be more inclined to offer competitive rates.

In Conclusion

In an era when cyberattacks are becoming increasingly prevalent and severe, cyber insurance is an essential component of your business risk and continuity management strategy. To secure favorable terms on your cyber insurance policy, invest in an all-encompassing IT security solution like 365 Total Protection.

By taking proactive steps to protect your digital infrastructure and educate your employees, you can demonstrate to insurers that your company is a responsible and secure entity, potentially leading to more cost-effective coverage.

Don’t wait until it’s too late – protect your business today with a combination of robust cyber insurance and 365 Total Protection’s comprehensive IT security offerings.

Learn more about 365 Total Protection and request a free trial: https://www.hornetsecurity.com/en/services/365-total-protection-compliance-and-awareness/

FAQ

What are the benefits of having cyber insurance?

Cyber insurance can help businesses to:

  • Recover from a cyberattack more quickly and efficiently
  • Protect their reputation
  • Avoid financial losses
  • Comply with regulatory requirements

How much does cyber insurance cost?

The cost of cyber insurance varies depending on the size of the business, the industry it is in, and the level of coverage it needs. Other factors included in the insurance premium are:

  • Risk assessment and deductibles
  • Type of information and data a company stores and processes
  • The type and quality of security measures implemented, such as security awareness training for employees
  • The company’s cyber history
  • Any global presence the company may have. Companies with a global presence typically pay higher premiums for cyber insurance because they are exposed to a broader range of risks.

What can businesses do to lower their cyber insurance costs?

Businesses can lower their cyber insurance costs by:

  • Implementing strong cybersecurity controls
  • Conducting regular risk assessments
  • Training employees on cybersecurity best practices
  • Having a comprehensive incident response plan in place
Protecting your data in M365 with Information Protection

Protecting your data in M365 with Information Protection

A few years ago, the expression was “data is the new oil,” and that might be true, but when it comes to your organization’s documents stored in the cloud, I think a more apt description would be “data is radioactive.” Yes, you can do good things with it (generate electricity), but it’s dangerous stuff, and you shouldn’t keep it around for longer than you need to.

For most IT pros, data security is NTFS, share permissions, and SharePoint access levels. Turns out that doesn’t work so well anymore. Even when documents are stored in OneDrive for Business, SharePoint, and Exchange Online, they don’t stay there. They’re shared via Teams, third-party collaboration, and cloud storage services, via email, and even stored on USB sticks now and then. And when everyone is working from home or anywhere, you quickly lose what little control you used to have over where these documents are and who has access to them.

This is a serious problem for businesses, both big and small, and I think it is going to come much more into focus over the next few years. But there are actually technical solutions to this that you may already have paid to license for but are not using today, in the form of Microsoft Information Protection, sometimes called Azure Information Protection. This article will show you how it works, how to start using it, how to ensure the business is onboard, and what you can do at the different licensing levels.

The Basics


Before discussing protection, let’s talk about labeling, the foundation of M365 Information Protection. A document is labeled with a classification, such as “Sensitive” or “Highly Confidential,” and this label follows it wherever it goes. Then you apply policies that say that “Public” documents aren’t protected at all, but “Highly Confidential” ones have a watermark applied on each page (or a footer or a header) and are encrypted and that a user has to designate the specific internal or external users that should have access to it. 

The labeling names are up to you; with some suggestions, you can have different labels scoped to different groups and have nested labels such as “Highly Confidential/All employees” and “Highly Confidential/Executives.” Again, the protection follows the document, and the recipient must prove who they are at the time of access and either give a few days grace period after the initial authorization to access the document offline or have to authenticate every single time. 

Access can be time-limited, and specific permissions can be assigned, such as read-only, or you can’t print it, etc. For emails, you can apply “Do not forward,” “no printing,” etc. Many file types are supported out of the box, including the Office ones and PDF, with third-party add-ins on offer to protect CAD engineering files for instance.

Microsoft 365 E3 and Business Premium offer manual labeling of documents, relying on staff training (more below) and judgment, whereas Microsoft 365 E5 can automatically identify sensitive information and label documents for you.

Rather than relying on where a document is stored (file share, cloud storage, USB stick, etc.) and trying to control access there, M365 Information Protection embeds the protection in the document itself. This means that if you try to open a protected/encrypted document in a third-party application instead of Microsoft Office or a compatible PDF reader (Adobe Reader works), it won’t open.

Note that this isn’t an anti-hacker technology; it’s a way to ensure control over documents and help good people do the right thing. If I have read access to a document and I’m determined to steal the content, I can take photos of it with my smartphone, pop my laptop on the photocopier and hit print, or simply memorize the information. None of those actions can be claimed to be accidental if you’re caught, though. In contrast, if you have no information protection in place, you don’t even know if a copy of the text is pasted into another file or forwarded to a personal email address.

A building block of M365 Information Protection is Sensitive Information Types (SITs), which are built-in ways to spot different types of data. At the time of writing, there are 264 types, including classics such as credit cards and SWIFT codes, and adding bank account numbers, passport, and identification card numbers for many countries worldwide. There are also more recent additions such as IP addresses, disease IDs, names and physical addresses, Azure Storage Account keys, and many, many others. You can also create your own SITs for organization-specific terms.

Data classification dashboard

Data classification dashboard

For more complex document types, where a string of numbers and corroborating evidence words aren’t sufficient (16 numbers in groups of four, with the words CC, MasterCard, etc. next to it), you can use Trainable classifiers that rely on Machine Learning models to identify data. There are 19 built-in ones (for English, a total of 49 when Japanese, German, French, etc. are included) for Agreements, Finance, HR, Intellectual Property, Legal, Resume, Source Code, Profanity, Targeted Harassment, and Threats, plus several others.

If you have E5 licensing, you can also create your own by feeding it many documents of the type you’re seeking to classify (Australian Legal Contracts, for example) and then refine the model by feeding it the right kind of documents, as well as wrong ones, and manually marking each batch when it gets it right and wrong. When the model is accurate enough, you can publish it to your tenant and then use it in your policies.

If you have a database of terms or codes (say employee IDs or project numbers), you can use Exact Data Match (EDM) to spot these when they show up in documents or emails.

To see the SITs and other sensitive information types, go to compliance.microsoft.com, log in with an administrator account, and go to Data Classification in the menu on the left.

But how do you know what sensitive data you’ve already got in your tenant so you know where to start? That’s where Content Explorer comes in; as long as you’ve been assigned the extra roles (on top of Global Admin) of Content Explorer List Viewer and Content Explorer Content Viewer, you can browse and see what’s already stored in your tenant. Here’s my tenant:

Content Explorer in M365 Information Protection

Content Explorer in M365 Information Protection

As you can see, many names across email and OneDrive for Business make sense, as does Australian Business Number, while the disease identification is a false positive. I can then drill down to individual documents, and if I have the Content Viewer role, I can even preview the documents themselves (obviously, be careful with this permission). This should give you a good starting point for understanding what sensitive data you have stored.

Documents identified in Content Explorer

Documents identified in Content Explorer

On the other hand, Activity Explorer shows you what users are doing with documents when you start using labels and protections and how they’re being used.

Activity Explorer in M365 Information Protection

Activity Explorer in M365 Information Protection

Nowadays, it’s not just files and emails that can be labeled; you can also apply your classifications to SharePoint sites and M365 groups (this is in preview at the time of writing and requires manual steps to enable). Note that today, that doesn’t mean that the documents inside those containers are automatically labeled (they don’t work as NTFS permissions, in other words); it means that you can control the external sharing of documents from those locations.

Finally, you can also apply M365 Information Protection labels and policies to data other than documents using Microsoft Purview (up until very recently called Azure Purview). This extends the whole concept of labels to databases (SQL, Cosmos DB, Amazon RDS, Cassandra, DB2, Google BigQuery, and others), cloud storage, data lakes, etc.

Scoping a sensitivity label in M365 Information Protection

Scoping a sensitivity label in M365 Information Protection


Applying the labels


OK, you have worked out what labels to use (see below), at least for your first pilot project. Now, you need to create your policies to actually apply them. Still, in the compliance portal, go down to Solutions – Information Protection. Here, you create your labels based on the SITs and other classification options covered above and then publish them using Label policies.

Pick the label(s) to publish and scope it to users and groups (you can select All for a companywide policy) and then select Policy Settings.

Policy settings for a Sensitivity label policy

Policy settings for a Sensitivity label policy

Here you can make it so that users must provide a business justification when removing a label or lower it to a less sensitive one, requiring users to always apply a label (be very careful with this setting; see below), requiring labeling for PowerBI content and offer a link to a custom, inhouse help page. Make sure that you give your policy a descriptive name that fits neatly into the flyout under the button in the Office apps and a longer description as well. This might seem trivial, but it is actually crucial in helping users understand what label to use for each type of content.

Realistically, though, asking users to manually label documents and emails (hopefully without enforcing it) is only going to take you so far, and only with new documents. To really get a handle on and label all your data, you must use Auto-labeling policies. These are available in E5 licensing (for a good breakdown of what’s available in each licensing tier – see here).

These will scan through existing documents in OneDrive for Business and SharePoint online and label documents based on sensitive data found, optionally applying markings and encryption based on your label settings. When you first create one, you can run it in simulation mode to ensure that it’s going to work as you expected.

If you have documents on-premises, in file shares / SharePoint server, you can use the Azure Information Protection scanner to do the same for all that data. Managed from the cloud, once the agents are deployed on-premises, they will scan SMB or NFS (preview) shares and SharePoint 2013 to 2019 servers.

Another important step to take is to designate a group of highly trusted users as super users so that they can unencrypt documents that were protected by an end-user who’s no longer with the company, for instance.

I haven’t gone into it, but M365 Information Protection has had many names over the years, so if you see references to Azure Information Protection, Azure Rights Management Services, etc., they’re all talking about the same thing. The current product is also unified within Microsoft 365, and the client agent is built into Apps for Business / Apps for Enterprise, which the rest of the world calls Office – i.e., Word, Excel, and so forth on your desktop, on a smartphone or the web version in a browser.

Working with the business


This is the most important part of this article – the technology isn’t the crucial bit, even though it’s cool – it’s engaging with the rest of the business. Successfully implementing M365 Information Protection in your business relies on you being able to get executive sponsorship – it’s got to be something that the business leaders understand and see as aligned with business outcomes. If it’s something IT is trying to “enforce” for compliance reasons on their own, it’s unlikely to succeed.

After the executives are onboard and lead by example (as they often handle the most sensitive data in the business), you need to train your users. Start small, perhaps with a group of users in the legal, finance, or HR department who understand the need more than other staff. Gather feedback and really understand how adding extra steps to their daily workflow impacts productivity. Ensure that the labels are crystal clear and that there are as few as possible.

When you first start out, especially in a large business, you can end up with dozens of labels, with each department insisting that their Highly Confidential classification is different than in another department. Be ruthless – to have any chance of success. You must get everyone to agree on a small set of labels that are clear to everyone. If required, you can have different labels for different groups of users; just be aware of the potential management and maintenance overhead. 

Just like file permissions can be straightforward on a new file server, over time, minor changes and exceptions can make maintenance hard, so plan for quarterly meetings to go back over labels and usage and impacts in the business to ensure that you can adjust as M365 Information Protection is more and more adopted by the organization (Activity Explorer really helps with this).

Also – make it fun! Have competitions to see who can label as many documents as possible or who used the most labels in a week.

To properly protect your Microsoft 365, use Office 365 backup by Altaro to securely backup and replicate your crucial Microsoft Office 365 data. We work hard perpetually to give our customers confidence in their Office 365 backup for MSPs strategy.

Conclusion


M365 Information Protection ties in nicely with several other governance features such as Data Loss Prevention (DLP), which is now available on Windows and MacOS endpoints as well as in the cloud. It’s also related to Retention policies and Records management and is part of an overall strategy to secure your Microsoft 365 tenant.

As you can appreciate, Information Protection is a huge area of Microsoft 365 and one that is constantly evolving; a good place to catch the latest as well as ask questions is the Information Protection public Yammer community.
How will Microsoft Entra Change your Identity Security?

How will Microsoft Entra Change your Identity Security?

Out of the blue, and after the Build conference, Microsoft released a “new” service called Entra. In this article, we’ll look at what it is, why you should care, and how it will change how you do identity security.

Many security pundits have said many times over the last few years: “Identity is the new perimeter,” “Identity is the new firewall,” and strong identity authentication is a cornerstone of a Zero trust strategy. Certainly, Azure Active Directory (AAD), as Microsoft’s central identity directory, has been adapting more security features over the last few years, and indeed, AAD is one-third of Entra.

The second part is Microsoft Entra Permissions Management (MEPM? EPM?), based on the recent CloudKnox acquisition, and finally, there’s Microsoft Entra Verified ID for decentralized identities.

Let’s dig into what each of these offers and why you should consider using them.

Incidentally, if you’re wondering about the name, it’s an allusion to Entrance / gaining entry, and it ties in with two other name changes a little while ago – all the privacy-focused services in Microsoft 365 are now under the “Priva” name, and all the compliance features are under the Purview name.

Microsoft Entra Permissions Management


This cloud-based service is a Cloud Infrastructure Entitlement Management (CIEM) solution. It’s multi-cloud and can be connected to Azure’s, AWS’s, and GCP’s cloud identity and permissions systems. The basic premise is that there are so many permissions (40,000 across the three clouds, according to Microsoft) that tracking them manually is impossible to ensure that each assignment is privileged. 

Instead, EPM (I’m going to stick with that) gives you a Permissions Creep Index (PCI), showing you the difference between assigned and used permissions for each user account, workload, or group. You can then easily right-size permissions to the required ones, lowering the gap between assigned and used permissions. There’s also an option to request permissions for those one-off situations where an administrator needs higher permissions for a particular task.

I set it up for one of my clients (who only uses Azure), and it’s fairly straightforward to start with. Obviously, it’ll appeal to larger businesses with many administrators, especially when they’re using two or three clouds. The problem EPM helps address is definitely an issue (ever heard of a breach of a cloud instance due to lax permissions?), and it’s nearly impossible to do manually. Having this automated tool gives you a visual way to see the gap between granted and used permissions, and that’s very helpful:

Permission Creep Index heatmap

Permission Creep Index heatmap

EPM is free during the preview – note that it’s not GDPR compliant at the moment and hence is not available in the EU, something that Microsoft will fix before it becomes generally available.

Azure Active Directory


Take a deep breath; your cheese is about to be moved –the Azure AD portal will disappear (I suspect). It’ll be replaced with the new Entra portal:

Microsoft Entra portal

Microsoft Entra portal

Currently, this portal is in preview, but eventually, it’ll be the home for all identity-based UI actions. On the left, we have the three pillars of Entra, starting with AAD. Predictably, there are a lot more blades under AAD, which mirror most of the options in the current portal (legacy? classic?).

Azure Active Directory Menu

Azure Active Directory Menu

Although it’ll take some time to re-learn where everything is, I do feel like this is a cleaner and more logical layout (although that’s often true when you make something new, and then as more features are added over time, more menu options shows up and it gets messy again).

If you’re used to the current Azure AD portal, there are no real surprises here. The External identities area, for instance, has links to the new Cross-tenant access settings and External collaboration settings. Once you open one of these blades, the menu layout is the same as in the AAD portal. Interestingly, Sign-in, Audit and Provisioning logs are now under Monitoring & health, and under Hybrid management, we find Azure AD Connect Health monitoring, including Active Directory DC monitoring.

Active Directory monitoring in the Entra portal

Active Directory monitoring in the Entra portal

Another recent addition to Entra is protection for workload identities. Until now, there’s been a strong focus on user identity (MFA, passwordless) but less on application/automation/service, i.e., workload identity. This was brought into sharp focus in the SolarWinds hack, as the Russians used these types of identities to compromise their victims further. Sometimes, you’ll see these types of identities being referred to as non-human, which always makes me think of Klingons and Vulcans, but that’s probably just me.

For user identities, we have Identity Protection in Azure AD (Premium P2) which identifies anomalous behavior of user accounts and each sign-in (using Machine Learning). This is now extended to workload identities as well. Furthermore, we have Access Reviews where group owners or the users themselves regularly attest that they still need particular permission; again, this is now available for applications (by designated reviewers). Finally, Conditional Access is also available for workload identities.

Conditional Access Policy for workload identities

Conditional Access Policy for workload identities

There’s another preview currently for Lifecycle workflow, which manages the whole lifecycle of joining an organization, changing roles, and then eventually leaving through entitlement management.

Verified ID


This is possibly the part of Entra that will have the most impact on your work as an IT Pro going forward (it’s also in preview at the moment). It’s the result of a technology that Microsoft has been discussing for a few years now – decentralized identity.

Today, our identity is “owned” to a large extent by tech giants Google, Microsoft, Apple, and Facebook. For example, many users simply use an FB account to sign in to sites and services. But you’re not in control of your identity and can’t control exactly what data about you is being shared with various sites and services. 

On the business side (where verified ID as part of Entra sits), consider the challenges of new hires joining your organization. How do you identify them, what documents do they need to show your HR department (and how do you do that in a work-from-home setting where they’re not physically present), and how do you authenticate those documents?

Setting up Verified ID in the Entra portal

Setting up Verified ID in the Entra portal

Imagine if they had a verifiable identity that they could share with you, with exactly the right information you need (and no more), and that you could trust that identity because it’s cryptographically secured. That, in a nutshell, is a verifiable identity. There are many other scenarios, such as access to high-value resources and self-service account recovery, where a strong identity would be beneficial. 

Microsoft has a click-through site that steps through an employee onboarding scenario, demonstrating the power of verifiable credentials and showing how much easier it is than today’s manual processes.

The current preview allows you to both issue and verify identities. The setup is fairly straightforward: you need to create an Azure KeyVault to store signing keys, etc., and you need to register an app in Azure AD.

Create a key vault for verified ID

Create a key vault for verified ID

Several verifiable credential organizations are currently supported, such as Acuant, Clear, Jumio, and others, covering 192 countries and over 6000 identification documents.

Conclusion


The cynic in me looks at this new portal and wonders if it’s a subtle way of “selling” the new CIEM solution – although the final licensing cost hasn’t been announced yet, we know it’s not going to be part of Microsoft 365 E5 or Azure AD Premium P2 licensing. 

By moving everyone to the Entra portal, more users will be exposed to Permissionless’s Management, be curious as to what it can do, and eventually become paying customers. But maybe that’s too cynical a view. Maybe having one portal for identity, one for security, and one for compliance makes sense.

No matter what, Entra is here (at least in the preview). It’ll change some of your processes around workload identities, permissions management across clouds, and how you onboard new hires, plus other areas where decentralized identities will make your life easier. It’s exciting, and I can’t wait to see these services come out of preview so we can get a clearer picture of the licensing cost, scope, etc.