How to Manage Multiple Office 365 Tenants with M365 Lighthouse

How to Manage Multiple Office 365 Tenants with M365 Lighthouse

If you’re an MSP, there’s a big change coming in how you manage your client’s Office 365 tenants and Microsoft 365 tenants. Microsoft 365 Lighthouse is a modern way to manage multiple clients’ users and devices in a single pane of glass. This article will show you how to set up the preview, how to make sure your clients appear, and how to manage settings and policies across all of them. 

Note that Microsoft 365 Lighthouse is a different service than Azure Lighthouse, which lets an MSP manage resources in their client’s Azure subscriptions securely. It makes sense to name the services similarly since the concept of a “service provider managing a client’s cloud service” is the same, but it’s bound to cause some confusion. We’ve looked at Azure Lighthouse here:

Just as Azure Lighthouse has been a game-changer for the business model of MSPs, Microsoft 365 Lighthouse will be a turning point for MSPs as well, with the difference that every MSP I know has all their clients on Office / Microsoft 365, while not everyone uses Azure.

Signing up for the preview


Before we get to the requirements to use Microsoft 365 Lighthouse, let’s get it activated in your MSPs M365 tenant. It’s a straightforward process. But it can take up to 24 hours; in my case, it only took a few hours.

Sign into your tenant at admin.microsoft.com, go to Billing > Purchase services > Other services, search for Microsoft 365 Lighthouse public preview, and buy a single license for $0. There’s no cost for Microsoft 365 Lighthouse during the preview or after General Availability, just like Azure Lighthouse.

Purchase Lighthouse public preview

Purchase Lighthouse public preview

After some time, you’ll receive an email to let you know that your tenant has been enabled for the preview.

Microsoft 365 Lighthouse enabled

Microsoft 365 Lighthouse enabled


Microsoft 365 Lighthouse requirements


There are a few things that need to be in place for you to take advantage of Microsoft 365 Lighthouse. First, your MSP must be enrolled in the Cloud Solution Provider (CSP) program as an Indirect Reseller or Direct Bill partner. Secondly, each client must provide Delegated Admin Privileges (DAP) to your MSP. Thirdly, at this time, each client must have at least one Microsoft 365 Business Premium license and fewer than 500 licensed users. I suspect some of these limitations will be lifted after General Availability (GA). I’m sure many businesses larger than 500 users are already using an MSP to manage their Office 365 tenant, just as many smaller businesses rely on the advanced security features in Microsoft 365 E5, for instance. 

Still, their MSP would like to manage them using Lighthouse. With no inside information, I suspect Microsoft is focusing on this market segment to start with because it’s the one many MSPs focus on, and converging on Business Premium only also makes sense as it gives a common set of features to manage using Lighthouse.

Fourth, if you want to manage tenant devices, they must be enrolled in Microsoft Endpoint Manager (MEM).

Fifth, for user account data to appear in reports, the client’s tenants must have Azure Active Directory Premium P1, which is included in Microsoft 365 Business Premium.

Sixth, to see devices on the threat management pages, they must be running Microsoft Defender Antivirus (built into Windows). This one could be a bit tricky; many MSPs rely on their favorite AV tool and may not want to move to the built-in solution, but (if you’re stuck in the past) know that Defender AV is quite capable these days and is also a stepping stone to the excellent Microsoft Defender for Endpoint (MDE).

The last three on the list won’t stop you from using Microsoft 365 Lighthouse but will limit the functionality as mentioned.

In summary:
  1. Enroll in the Cloud Solution Provider program
  2. Invite each client to Delegated Admin Privileges
  3. Ensure the clients have at least one Microsoft 365 Business Premium license
  4. Enroll devices in Microsoft Endpoint Manager
  5. Make sure the clients have Azure Active Directory Premium P1
  6. Enable Defender Antivirus


Enrolling in the Cloud Solutions Provider program


I suspect most Microsoft-based MSPs have already completed this step, and my MSP took this step a few years ago, so I don’t have screenshots to show you the process, but here’s the official documentation.

Your primary choice is between being an indirect reseller, where you buy Azure / Microsoft 365 and on-premises licensing through CSP via a distributor, or being a direct bill partner. The latter requires you to provide the first level of support for your clients, fully manage customer billing and provisioning, and generate at least 300,000 USD revenue in cloud sales in a 12-month period. Here’s the page to get started as an indirect reseller. 

Once enrolled, the CSP area in the Partner Center lights up, and you can manage clients here.

CSP in Partner Center

CSP in Partner Center


Invite a client to Delegated Admin Privileges


I suspect there’s a bit of dirty laundry in most MSPs’ cupboards (including mine) where they don’t have delegated access to their client’s tenants but instead have Global Admin accounts to log in directly to each tenant to do any administration. If that’s the case, please ensure that those Admin accounts have MFA enabled.

To use Microsoft 365 Lighthouse, you need to set up your MSP with delegated admin rights to each tenant. Start by clicking the link “Request a reseller relationship” in the CSP portal. Pick your indirect provider, make sure “Include delegated administration privileges” is selected, and edit the email before sending it to your client. Note that the recipient must be a Global Administrator in the tenant to be able to action it.

Request a reseller relationship in the CSP partner portal

Request a reseller relationship in the CSP partner portal

When a global admin for the tenant clicks the link in the email, they’re greeted with this screen and simply click the Authorize button.

Authorize client for Delegated Admin Privileges

Authorize client for Delegated Admin Privileges

They should now show up under customers in your CSP portal, in my case, this was nearly instantaneous.

Exploring the Microsoft 365 Lighthouse portal


Logging on to the Home page


Go to https://lighthouse.microsoft.com and sign in with an account in your MSP tenant with Global Admin credentials and MFA enabled. If the account doesn’t have MFA enabled, you’ll need to enable it before being able to sign in. 

In case you find this burdensome, understand that you’re effectively accessing all your tenants in one place using Lighthouse, so enforcing MFA is a must. I would also suggest that access to Lighthouse should be limited to approved, locked-down admin workstations, something you can do using Conditional Access in AAD.

According to Microsoft, it can take up to 48 hours before client data starts showing up in the portal. Again, in my experience, it took less than two hours.

Home in the Microsoft 365 Lighthouse Portal

Home in the Microsoft 365 Lighthouse Portal

On the Home page is an overview of my clients, with tiles for threats (Defender Antivirus), devices with it installed, risky users, and device compliance. You can filter this view with the Tenants button in the top left.

User account pages

When I drill into the Risky user’s tile, I’m taken to the Users part of Lighthouse, where four tabs show accounts that have been flagged as risky and their current status (At risk or remediated). Clicking View risk detections for an individual account takes me to the AAD portal for that tenant to investigate the risk.  The Multi-Factor Authentication tab shows the tenant’s status for MFA enablement and users not registered for MFA. In contrast, the Password reset tab shows the tenants’ state and accounts for Self-service password reset (SSPR). I can also search across all usernames, and when I find a particular user, I can reset their password or block sign-in. Particularly, password reset is a very common action for MSP helpdesk staff. Instead of signing into a client’s tenant, finding the user, and then resetting their password, you can do it here for any user.

Risky users bladeRisky users blade


Antivirus and Threats

Clicking either the Threat or Antivirus tile takes me to the Threat management area, where an overview tab shows me threats (active / mitigated / resolved), devices missing Defender AV, and devices overdue for scans. The Threats tab shows a list of active, mitigated, resolved, and allowed threats, whereas the Antivirus protection tab shows me a list of devices, their state, if the AV is up to date, real-time protection state, and if any scheduled quick or full scans are due.

Antivirus status across each device

Antivirus status across each device


The orange warnings in the screenshot show quick scans that are overdue. Clicking on an individual device brings up its details, plus options to run a quick or full scan, update the signatures and reboot the device.

Device details in Antivirus view

Device details in Antivirus view

Note that you can also multi-select several devices and run scans on all of them or even reboot all of them in one fell swoop. You can also filter the view of the devices based on device state, threat protection, update status, and any overdue scans.

Devices & Tenants

The Device area has four tabs: Overview shows devices managed by compliance policies in MEM, whereas the Devices tab shows the compliance status for each device with the ability to filter the view based on whether the device is corporate or personal, the OS it is running, and its status. 

The Policies tab syncs from MEM, whereas the Settings tab shows non-compliant settings across tenants. In this area of Lighthouse, I noticed that the data on some tabs were missing, possibly due to the 48 hours not having passed after adding the tenant. You can also click an individual device to see details and click a link there to see it in the full Endpoint Manager console.

Device compliance with MEM policies view

Device compliance with MEM policies view

The Tenants view shows tenants, including ones ineligible for Lighthouse (missing license for Microsoft 365 Business Premium, for instance) or ones that don’t yet have Delegated Administrative privilege. You can create and assign tags to different tenants as a way to organize them.

Security and Baselines


There are two specific role-based access control (RBAC) roles associated with the Microsoft 365 Lighthouse: Admin Agent and Helpdesk Agent. The former has permission to change most settings, whereas the latter can view everything but only reset passwords, block sign-ins, and update customer contact / website details.  Microsoft recommends using Privileged Identity Management (PIM), a feature in AAD Premium P2 (in the partner tenant) to enforce the principle of least privilege so that a Helpdesk Agent can be eligible to be an Admin Agent but must go through a PIM workflow, which can include entering a service ticket, being approved by a supervisor and perform an MFA to elevate to that permission, for a restricted time of a few hours. Security baselines are a key feature in Microsoft 365 Lighthouse. Today, you can’t edit them; there are six default baselines:
  • Require MFA for admins (CA report only policy)
  • Require MFA for end users (CA report only policy)
  • Block legacy authentication (CA report only policy)
  • Enroll devices in MEM & Azure AD Join
  • Antivirus policy – a Device Configuration profile
  • Windows 10 Compliance policy
In the baseline area, I can see the Default baseline and apply it to groups of clients. Note that the three Conditional Access policies are reported only and thus won’t actually enforce the setting. Just give you reports on where it would have been applied. This is a good way to get a grip on the state of MFA and legacy authentication usage across your tenants but in today’s security-challenged business landscape, it’s vital to move to enforcing MFA and disabling the legacy protocols as soon as possible. There are two other areas in Microsoft 365 Lighthouse: Windows 365 gives a view of any Cloud PCs in your client’s tenants and their network connections to on-premises. I don’t have any clients using Windows 365 yet, but it makes great sense to surface this information in Lighthouse. The final area is Service health, which shows advisories and incidents across Teams / Microsoft 365 / Exchange Online and another 20 services. It’s the same view as in the Microsoft 365 Admin Centre, but having it handy in this portal makes sense.

Conclusion


This is a public preview, and both the functionality and requirements are a bit limited, but I suspect this will change as feedback comes to Microsoft, particularly now that it’s in public preview.

I think Microsoft 365 Lighthouse will be a game-changer for MSPs. It’s a shift in how you manage your clients’ digital estates at scale, and I suspect that it’ll find fans in both large and small MSPs. At this stage, I have questions about the shared MSP model, which works in Azure Lighthouse, where you can have one MSP managing your backups and IaaS VMs and another MSP handling your databases. Today, that’s not supported in Microsoft 365 Lighthouse.

Another concern is the overlap with third-party MSP management tools, and my initial take is that I’m far more likely to trust Microsoft to get security right rather than the RMM software vendors of today (especially given recent news), plus a first-party provided tool is always preferable to me personally. Full disclosure – I don’t use an MSP tool in my business, but I do rely on N-Able Take Control for remote access to devices.

Microsoft 365 Lighthouse isn’t replacing a Remote Monitoring and Management (RMM) tool today. Once the functionality is expanded, I can see this being one of the main tools in your MSP toolbox.
How to Onboard Customers in Azure Lighthouse

How to Onboard Customers in Azure Lighthouse

This blog post will show you how to onboard your customers’ Azure resources in Azure Lighthouse.

Azure Lighthouse is a new collection of technologies that allows Managed Service Providers (MSPs) and software developers (ISVs) to centrally manage their tenants and monetize hosted services. These providers are able to use the Azure Marketplace as a web portal to post public offerings that are available worldwide, similar to an app store. MSPs can list IT services they can offer to deploy, manage, optimize, secure or make compliant their customers’ cloud infrastructures and ISVs will include their Azure software with additional services. The providers can use Azure Delegated Resource Manager (ADRM) and Azure Active Directory (AAD) to centrally manage all of their tenants from a single interface. For more information, check all from a single interface. Check out the Altaro blog series about the Azure Lighthouse solutions, its foundational technologies using ADRM and AAD, Azure integration, and the go-to-market strategy.

There are three ways that a tenant can subscribe to a service from the MSP, which changes that way that the customer grants the MSP access to their environment.

The most common way is for a provider to publish a service to the Azure Marketplace, and this can be configured to be public or private. A public service is accessible to everyone, but there is not any way to restrict the subscribers by location, size nor any other factor. These customers who purchase a public service will automatically grant access to the MSP automatically during the onboarding process. It is important to realize that there are multiple ways that a tenant can subscribe to a service from the MSP. The most common way is for them to publish a service to the Azure Marketplace, and this can be configured to be public or private. A public service is accessible to everyone, but there is not any way to restrict users by location or size and they are onboarded automatically as described in how to publish a managed service on the Azure Marketplace.
  • To make a service private and only accessible to certain predefined users (“private”), a specific list of tenant subscription IDs must be defined when the offering is created in the Azure Marketplace provided. Once the private customer has purchased an Azure Lighthouse service, the service provider must onboard their tenant which requires delegating resources through Azure Active Directory (AAD).
  • Alternatively, the entire Azure Marketplace process can skipped and a MSP can onboard a tenant through the same series of steps which are described in this blog using the following steps:
    • Collect Details for the Tenant and their Subscription
    • Either
      • Create Azure AD User Groups and Define Permissions
      • Create Service Principals and Define Permissions
    • Create an Azure Resource Manager (ARM) Template
    • Deploy an Azure Resource Manager (ARM) Template
    • Confirm Successful Onboarding for Both Parties
For either scenario, make sure that you’ve associated the tenant’s subscription ID with your Microsoft Partner Network (MPN) ID so that you get credited for consumption. While this guide is written from the perspective of an MSP, these same best practices are also applicable to ISVs who are offering managed services to deploy their software.

Step 1) Collect Details for the Tenant and their Subscription

When you are onboarding a customer you have to know some of their unique identifier information so that you add the correct user and their subscription information. Make sure that have the following information:
  • Your Tenant ID (as an MSP or ISV). This can be found in the Azure Portal by hovering over your account name in the upper-right corner in the Azure Portal.
  • The Tenant ID of the customer. This can be found in the Azure Portal by asking the tenant to hover over their account name in the upper-right corner in the Azure Portal.
  • The Subscription ID of the customer for the subscription of every resource that you will be managing. If you are managing multiple resources that are in different subscriptions then you will need each of these subscription IDs. This can be found by searching for the subscription(s) in Azure Active Directory. This will also create a new resource provider (Microsoft Managed Services) to be registered for the selected subscription(s).
Next, you need to set up the security framework using either Azure AD user groups, service principals or individual Azure user accounts (not recommended). Whenever you manage tenants’ accounts, especially if you have multiple tenants, you should never assign access to any individual user. This is because your staff may change over time, so as you need to add or remove certain administrators you can do this at the group level, instead of on each individual resource group. Not only does this provide centralized and simplified management at scale, but it also makes you look better to your tenants as they are not seeing your company’s turnover.

Steps for the user groups and service principals are described below. First, you must connect to the Azure subscription which is done using the following PowerShell cmdlet:
PS C:> Select-AZSubscription

Step 2) Create Azure AD User Groups and Define Permissions

Configuration for AAD user groups is fairly easy. It requires creating a new group for each role or task and then adding the appropriate administrators. You will then assign the type of administrative role that that group has from the 70+ Azure user roles. You should also use a friendly name to help you and your tenants understand what that resource group is used for.

Next, you will get the object ID and role definitions for each Azure AD group, which can be determined through the following PowerShell queries:

PS C:> (Get-AzADGroup -DisplayName ”).id
PS C:> (Get-AzRoleDefinition -Name ”).id
Instead of using AD User Groups for user account access you can create an Azure service principal for application access..

Or: Step 2b) Create Service Principals and Define Permissions

An Azure service principal is an alternative type of identity used for tools, services, and applications to provide role-based access control (RBAC) rather than user accounts. It only supports a subset of the Azure roles to restrict a single application from having too much control. 

Also, you should pick the role which provides the minimum access that your staff needs. You want to ensure that you do not request more than is necessary, as potential clients could view this negatively, and you may get the perception of not being trustworthy.


You will also need to know the object ID and role definitions for each Azure service principle which can be determined through the following PowerShell queries:
PS C:> (Get-AzADApplication -DisplayName '').objectId
PS C:> (Get-AzRoleDefinition -Name '').id
Whenever you manage tenants’ accounts, especially if you have multiple tenants, Microsoft recommends:

“using Azure AD user groups for each role, allowing you to add or remove individual users to the group rather than assigning permissions directly to that user. You may also want to assign roles to a service principal. Be sure to follow the principle of least privilege so that users only have the permissions needed to complete their job, helping to reduce the chance of inadvertent errors.”
For more info, see Recommended security practices.

3) Create an Azure Resource Manager (ARM) Template

An ARM template lets administrators deploy an Azure-managed resource or resources group the exact same way every time. The template provides the framework to ensure consistency, which is critical so that you can automate and scale the management of this resource across multiple tenants. Your ARM template should include the following fields:
  • MSPName: This is your service provider name
  • MSPOfferDescription: This is a short description of your offer
  • ManagedByTenantID: This is the ID of your tenant
  • Authorizations: This describes the access needed, which can include:
    • RoleDefinitionID: This is the level of access needed for the resource template
    • PrincipalID: This the ID for either your Azure group or Azure service principal
    • PrincipalDisplayName: This is the display name which your tenants see for your Azure group or Azure service principal
Since ARM templates can be tricky to create for inexperienced service providers, Microsoft provides code samples for different scenarios. These include both the template file along with a parameter file which are found here: https://github.com/Azure/Azure-Lighthouse-samples/. Here are the links to onboard:
  • Subscription (through the Azure Marketplace)
    • Template: MarketplaceDelegatedResourceManagement.json
    • Parameter file: MarketplaceDelegatedResourceManagement.parameters.json
  • Subscription (without the Azure Marketplace)
    • Template: DelegatedResourceManagement.json
    • Parameter file: DelegatedResourceManagement.parameters.json
  • Resource Group
    • Template: RGDelegatedResourceManagement.json
    • Parameter file:RGDelegatedResourceManagement.parameters.json
  • Multiple Resource Groups in a Subscription
    • Template: MultipleRgDelegatedResourceManagement.json
    • Parameter file:MultipleRgDelegatedResourceManagement.parameters.json

4) Deploy an Azure Resource Manager (ARM) Template

The hardest step is usually deploying the ARM template within the customer’s environment because either the MSP needs to do it on the tenant’s behalf or the tenant must grant the MSP the correct permissions. And since a Guest account cannot be used, it makes it tougher for a novice customer. Every subscription needs a separate deployment. However, you can do this in a single deployment if you have multiple resource groups within a single subscription. Once the correct permissions are configured, the following PowerShell cmdlets can be used for a remote deployment:

PS C:> New-AzDeployment -Name `
-TemplateUri `
-TemplateParameterUri `
-Location <AzureRegion> `
-Verbose

5) Confirm Successful Onboarding for Both Parties

Now that the ARM template has been deployed, testing that the MSP can effectively manage it within the tenant’s environment is important. The MSP and the tenant should be able to see the connected subscription and ARM resources. After the template has been initially deployed, it could take a few minutes to appear while the portal refreshes.

The tenant can see the connected service(s) by navigating to the Service Providers Page, selecting Service Providers Offers, and seeing the subscription(s) with the correct offer name.


As the MSP, you can see this by going to the My Customers page, clicking on Customers, and verifying that you can see the tenant’s subscription(s).


Using these steps, you will have successfully onboarded a tenant by knowing the security identifiers, creating the appropriate security groups, creating an ARM template, deploying the template, and verifying that both parties can see it. Remember that when doing this at scale, consistency is critical so that the same ongoing management processes and scripts can be replicated on identical templates. 


Remember that with Azure Lighthouse, one of your greatest assets is the operational efficiency you can achieve through consistent global management. So, if you change your template after deploying it for several tenants, be sure to update their versions so that every template in production is identical to avoid any challenges with version control. With the steps you have learned, you can streamline deployment and management for all of your Azure Lighthouse tenants. 
How to Publish Managed Services Through Azure Lighthouse

How to Publish Managed Services Through Azure Lighthouse

Azure Lighthouse provides Managed Service Providers (MSPs) and software developers (ISVs) with a centralized management portal to view their customers’ resources. Additionally, it makes it easy for the MSPs and ISVs to find new customers by https://azuremarketplace.microsoft.com/marketplace/apps/company.servicename publishing their offerings on the Azure Marketplace. 

The Azure Marketplace web portal functions like an app store for Azure applications. It also lets MSPs publish IT services they can offer, and ISVs can publish deployment or management services for their software. These managed services let the publishers maximize their revenue by monetizing from their specialized skills to help Azure users deploy, manage, optimize, and even secure their cloud infrastructure. 

Check out the Altaro blog series about the Azure Lighthouse solutions, its foundational technologies using ADRM and AAD, Azure integration, and the go-to-market strategy. This blog post will walk you through publishing a managed service in the Azure Marketplace, allowing you to use Azure Delegrated Resource Management (ADRM) to access that customer’s cloud resources. While it refers to publication from the perspective of an MSP, these same best practices are also applicable to ISVs.

Prerequisites to Publishing a Managed Service


First, you must have access to publish to the Azure Marketplace, which means that you need to have a Microsoft Partner Account. To set this up, follow these instructions from Microsoft: https://docs.microsoft.com/en-us/azure/marketplace/partner-center-portal/create-account. You will need to have a Microsoft Partner Network (MPN) ID, which means that you have passed the requirements to be a certified partner. 

By linking your MPN account to your Azure Lighthouse offering, you will automatically be credited for consuming any customers who subscribe to your service(s). This is helpful for MSPs trying to move to a high certification tier, which requires proof of higher consumption.

You must also offer a standardized service to all possible customers, which is known as a public offering. In its current release, it is not possible to make a service offering only available to certain classes of customers based on their geography or other factors. Customized services must be provided through a private offering that uses an Azure Resource Manager (ARM) template, which is a topic we’ll be covering in detail in a future blog post.

It is also important to evaluate the marketplace to see what offers are already out there. Being the hundredth organization to offer basic Azure VM management may not be of much value. Take time to think about your team’s unique skill set and any IP that you have developed.  Which scripts have you created that scale up and secure workloads faster? How can you add greater resiliency or faster recovery to a service?  

Do you have expertise within a regulated industry and can ensure that your tenants will be compliant? Can you offer better Tier 1 support or SLAs?  Make sure that you are going to offer something to stand out from the crowd so that customers will select you over your competitors.

Also, consider asking your company’s search engine optimization (SEO) expert to help you build and define compelling keywords to increase your discoverability.  This is known as App Store Optimization (ASO). You can use publicly available tools like Google Keyword Planner or Bing Keyword Research to filter through organic search traffic. 

While these tools are designed for Google and Bing’s respective search engines rather than the Azure Marketplace, they can provide good guidelines for how customers may be searching for your types of services. And since any offer listed on the Azure Marketplace will get propagated to Google and Bing, this will also maximize your chance of getting more hits. Also, request that any of your customers who have subscribed to your offer give you a review. This will increase your visibility on the Azure Marketplace as positive recommendations increase your ranking.

Step 1) Create the Managed Service Offer & Settings


Once you have determined the public service to offer through the Azure Marketplace, you will go into the Cloud Partner Portal and select New Offer > Managed Services. You will then provide the following information:
  • Name: This is the friendly name that customers will see when they access the offer details. Make sure to include your company name and a clear description. This is limited to 50 characters.
  • Offer ID: This unique identifier for your offer appears in the billing reports and product URLs. Since product URLs are indexed by search engines and increase discoverability, including your company name and keywords here is helpful. This string is also restricted to 50 characters, but only lowercase letters, numbers, underscores, and dashes. Once this is created, it cannot be changed.
  • Publisher ID: You will select your publisher ID. This option is only provided since some partners have multiple publishing accounts.
After saving this information, you will create a new plan.

Step 2) Create a Plan


A plan is a variation of your offering, similar to an SKU. Consider using standard terms for the different tiers, like Bronze/Silver/Gold or Basic/Premium/Enterprise. Customers can browse and select the best plan for their requirements and budget. For each plan, you will select New Plan and complete the following information:
  • Plan ID: This is a unique identifier for your offer, which has the same uses and restrictions as the Offer ID from Step 1. It also cannot be changed.
  • Public / Private: By default, all plans are public and accessible to everyone in the marketplace. You can select a private plan if you want to restrict your plan to specific users. However, this cannot be changed. If you wish to limit the plan to certain users, you can provide a list of unique customer IDs that are whitelisted to subscribe to this plan. You can enter these manually (currently limited to 10 subscriptions) or upload a CSV file (up to 20,000 subscriptions). It is also a good idea to include the subscription ID of your own test accounts to validate that the offering is published and working as expected.
  • Title: This is the friendly name that customers will see when they browse the plan’s details. Include your company name, a clear description, and any optimized search keywords. This is limited to 50 characters.
  • Summary: This lets you add a short description of the plan. Include your company name, a clear description, and any important keywords. This is limited to 100 characters.
  • Description: Here, you can add a long description, which lets you go into details of what you are offering and how to differentiate yourself. Here, you should include the following information:
    • Specific services that are included
    • Onboarding steps
    • Costs and billing process
    • Technical support and SLA
    • Company profile and experience
  • Billing Model: This option is a little confusing. As for managed services, you must always select Bring your own license. This is because Microsoft will not bill you for any expenses directly. Rather, you will bill your customers directly for any associated costs.
After you Save, you’ll move on to the manifest details section.

Step 3) Configure the Manifest Details


The manifest defines exactly which of your tenants’ resources you will have access to and what permissions will be assigned. One of the fundamental technologies powering Azure Lighthouse is ADRM, which allows granular role-based access control (RBAC) that is requested by the MSP and approved by the customer.  Any Azure resource managed by Azure Resource Manager (ARM) can be granted access to any of the 70+ Azure user roles. Remember that with a public plan, all users will be required to assign identical access to the MSP. It is best to minimize what you are requesting to avoid unnecessarily exposing any of your potential customer’s infrastructure or scaring them off since they do not yet know or trust you. For the manifest, you will provide the following information:
  • Version: Provide a version number in the format x.y.z, such as 2.1.1.
  • Tenant ID: Enter the GUID which is linked to your organization’s Azure Active Directory account. You can find this identifier for your directory from the upper right-hand corner of the Azure Portal.
  • A list of Authorizations: These define each of the resources which your staff can access for every customer who subscribes to the plan. These include:
    • Azure AD Object Display Name: This assigns a friendly name for each Azure resource which will be placed under management by the MSP. Make this clear and descriptive so that your customers understand the usage.
    • Azure Object ID: This provides the Azure AD GUID of the MSP’s admin, an MSP-managed Azure AD group, or the application which will be granted access to the customer’s resource group. If you are providing access to users, a best practice is to assign this to a group, rather than individual admin(s). This simplifies management as it lets you add and remove admins from that group as your staff changes, instead of having to make updates to every tenant’s workload each time someone joins or leaves your organization.
    • Role Definition: You will select which of the 70+ Azure AD built-in roles to assign to this Azure AD Object. This designates the permissions of that role to the specific object.
      • Assignable Roles: This option will only appear if you select the User Access Administrator role definition. In this case, you will define a list of different possible roles that the user can select and designate for their MSP.  This is helpful if you do not require one specific type of access to a resource group, want to build trust, and empower your users to specify the level of access themselves.
Click Save, then you can add more details about your offering in the Marketplace section.

Step 4) Provide Marketplace Details


Next, you will enter the details that get published in the Azure Marketplace. These are publicly displayed and picked up by search engines.  Use your SEO/ASO best practices here with descriptive keywords to maximize your discoverability. Some of these fields are repetitive from details that you have previously entered, so you may wish to go back to earlier menus in a new browser tab so you can copy the previously entered text.

You will need to provide the following information:
  • Title: This is the friendly name that customers will see in the Azure Marketplace. Make sure to include your company name, a clear description, and any search optimized keywords. This is limited to 50 characters.
  • Marketing Identifier: This lets you add some customized text into URLs, which should include your company name and the name of your service. Including this text in the website link also helps with SEO/ASO. The URL will then follow the format https://azuremarketplace.microsoft.com/marketplace/apps/company.servicename.
  • Summary: This lets you add a short description of the plan. Make sure to include your company name, a clear description, and any search optimized keywords. This is limited to 100 characters.
  • Long Summary: This section allows you to enter a longer description using search optimized keywords. This has a maximum length of 256 characters.
  • Description: Here you can add a long description which lets you go into details of exactly what you are offering and how you can differentiate yourself. This also supports simple HTML and supports to up 3000 characters. You ought to include the string “managed service” or “managed services” so that it gets picked up by internal and external search engines.  Here you should include the following information:
    • Specific services which are included
    • Onboarding steps
    • Costs and billing process
    • Technical support and SLA
    • Company profile and experience
  • Useful Links: You can add a list of hyperlinks to your company’s website, product page, contact forms or anything else.
  • Categories: Select which categories you would like your managed services to be listed under. You can select a maximum of 5 categories, and it is best to select as many as are applicable so that potential customers who are browsing by category will discover your service.
  • Marketing Artifacts: Here you can upload your logos (required), screenshots (optional) or add links to product videos (optional). Adding logo in four sizes is required in 255×115 pixels (wide), 115×115 (large), 90×90 (medium) and 40×40 (small). Microsoft recommends keeping the logo simple with basic colors and with no text so that it looks consistent with the rest of their enterprise business offerings. You can also add a “hero logo” (815×290) which is a large background image that helps your service get visibility in the Azure Marketplace. Text for your company name, title and summary will automatically be added in white. Once published, you cannot remove the hero logo, but you can replace it.
  • Lead Management & Lead Destination: This section allows you to specify a CRM system where any customer leads will be automatically imported and stored.
  • Legal: Add the URLs for your Privacy Policy and for your Terms of Use.
  • Preview Subscription ID: You should always test that your Azure Marketplace offering looks right before you publish it. This is possible through adding a list of up to 100 subscription IDs for accounts that can preview the offer before it goes live. Microsoft’s product and support teams will also be able to view the marketplace preview.
Save your changes then move to the support section.

Step 5) Add Support Information


This section allows you to list contact information for your customer support and engineering teams. This includes a name, email address, and phone number. You will also be required to add URLs for support information. Make sure you keep this information current so that prospective customers can contact you. Microsoft may also use this contact information. Click Save so that you can review the information before it goes live.

Step 6) Publish your Managed Service Offering


You are almost ready to make your service offering go live. Take time to preview the offer from an account you defined using the Preview Subscription ID from Step 4. Once you click the Publish button, the offering will go through an automatic review and shortly afterward will appear in the Azure Marketplace.

Wrapping Up


Congratulations, you have now published your managed service in the Azure Marketplace. From here, you can expect new customers to discover your services and help you bring in new revenue. Make sure that you check out the next post from Altaro about onboarding Azure Lighthouse customers to understand the additional steps to access your tenants’ workloads.
11 Rad Ways Azure Lighthouse Integrates with Azure Services

11 Rad Ways Azure Lighthouse Integrates with Azure Services

Azure Lighthouse is changing how Managed Service Providers (MSPs) operate their business through its model of centralized multi-tenant management. Now, MSPs can run multiple businesses more securely without switching accounts, directories, or subscriptions. This means that all operations can be applied across multiple tenants at scale. MSPs can significantly reduce their operational costs and complexity while reaching more customers and maximizing their revenue. 

Check out the first blog post from Altaro, which covers an overview of the Azure Lighthouse solution, and the second post, which explains the underlying Azure Lighthouse technology. This third post will cover key integrations with Azure services in the control plane and give you some ideas to help you scale your service provider business.

Azure Lighthouse with Existing Azure Services


Since Azure Lighthouse is a new solution offering, not every Azure service is supported yet. The key requirement for integration is that the Azure component must support Azure Delegated Resource Management (ADRM), allowing tenants to assign role-based access control (RBAC) to their service provider. The following list of services is fully supported and should be considered by MSPs to include in their service offerings. The order below is a good way to think through your Azure Lighthouse offerings, starting with the most basic services and ending with more advanced options.

1. Azure Policy with Azure Lighthouse


For the MSP and tenant partnerships to be successful, one of the fundamental philosophies is to ensure that there is trust between both groups. Azure Policy ensures that all managed resources stay compliant with corporate standards.  With Azure Lighthouse, this can be an effective tool for both parties.  

If a tenant has strict security standards, Azure Policy can ensure that their service provider adheres to them, and this can be particularly important if the tenant is within a regulated industry.  However, many tenants are inexperienced with configuring Azure, so they have delegated their operations to an MSP.  As a service provider, you may already have high operational standards, or part of your offering may be to guarantee compliance within a regulated industry so you can apply your Azure Policy best practices to your tenants’ infrastructure.  This is also a great use case of how Azure Lighthouse allows MSPs to maintain their technical intellectual property (IP) while extending their services to new tenants.

2. Azure Resource Graph with Azure Lighthouse


Azure Resource Graph is an extension of Azure (Delegated) Resource Manager (ARM/ADRM), which allows service providers to run queries at scale to test for compliance. It provides an Azure PowerShell and Azure CLI interface for MSPs to test against their tenants’ environments across multiple subscriptions. It can verify that Azure Policy rules are enforced correctly and flag any misconfigurations. The results can be sorted with advanced filtering based on resource properties, including by tenant (customer). You can even track changes and configuration drifts across your tenants.

3. Azure Service Health with Azure Lighthouse


Set up Azure Service Health for your managed accounts to get a global view of the health of your tenants’ services and resources. Service Health also lets you view the Azure infrastructure operated by Microsoft, which your tenants are using.  

You can set up different types of alerting for outages, which can be a useful value-added service for an MSP offering Tier 1 support. Many tenants will want to defer critical support to their MSP.  Even if you have a tenant that has not subscribed to your Tier 1 support, if an outage happens and you can use Azure Service Health to show them that you could have more quickly identified the problem for them, they will be more likely to subscribe to your premium services.

4. Azure Monitor with Azure Lighthouse


Now that you have set up access and security policies for your tenants, configure Azure Monitor to begin collecting data about their environment.  Even if you do not know how to leverage this information yet, turning it on immediately is a good best practice, so you have the data when you need it. 

You can now view alerts across numerous subscriptions and view activity logs for managed resources. You can also run a single query across all of your tenants to see if an issue or security threat that impacted one customer has a broader impact. If you are an MSP focusing on a specific regulated industry, then having this visibility across multiple customers can give you valuable insight, operational efficiencies, and competitive advantage.

5. Azure Virtual Network with Azure Lighthouse


Once your tenants’ infrastructure is secure and protected, you may wish to optimize their virtual infrastructure.  Networking is usually one of the more challenging IT management operations, and Azure imposes additional restrictions that may take a specialist to understand. This is another value-added service that MSPs can offer: Azure network administration. Azure Lighthouse allows delegated access to virtual networks and virtual NICs, letting MSPs optimize the traffic, make it resilient to failures, apply security policies, and monitor bandwidth utilization.

6. Azure Virtual Machines with Azure Lighthouse


Probably the most popular delegated management service will be for Azure Virtual Machines. Tenants can permit MSPs full access to their virtual machines (VMs), except for managing their product licenses via Key Vault. This means that the service provider can deploy VMs, configure storage, networking, and memory, and run post-deployment configuration tasks, scripts, diagnostics, and almost every other aspect of operations. 

The MSP can also log into that VM to configure any guest workloads. Since most Azure workloads run inside Azure VMs, the delegated management services offered through Azure Lighthouse will support almost every tenant virtual machine scenario.

7. Azure Kubernetes Service (AKS) with Azure Lighthouse


There are a growing number of organizations using containers instead of VMs to run their virtualized services.  Azure Kubernetes Service (AKS) allows organizations to use Azure to manage a Kubernetes cluster, handling all administrative tasks from deployment to monitoring to maintenance. 

Containerization offers numerous resource optimization and consolidation benefits as compared to traditional VMs, yet they are generally considered more complicated to manage. This presents a great opportunity for MSPs to manage Kubernetes as a service for their tenants using Azure Lighthouse.

8. Azure Security Center with Azure Lighthouse


Perhaps one of the best use cases for MSPs to support their tenants is through the Azure Security Center. This Azure service centrally manages and protects and the Azure resources, bringing together proactive and reactive best practices from Microsoft’s security experts. 

Organizations that need to outsource their IT management usually do not have security experts on their staff, so they are likely to want to offload security management to their MSPs.  The cloud adds additional security challenges since it is changing so rapidly and has a broad attack surface on public infrastructure. Leveraging Azure Security Center is highly recommended for any organization, especially those in regulated industries or protecting sensitive data.

 With Azure Lighthouse, MSPs can monitor all of their tenants from a single interface and apply changes at scale. All of the security data is centrally collected to show industry-wide trends, which MSPs can build into their IP. Some advanced features available to MSPs include the ability to provide just-in-time (JIT) access to VMs, dynamic (adaptive) network hardening, registry change monitoring, and whitelisting only permitted applications or processes.

9. Azure Backup with Azure Lighthouse


Azure Lighthouse gives MSPs the ability to manage backups for the tenants’ infrastructures using Azure Backup.  Although Azure Backup is fairly easy to use, backups are so important to the business that they often make risk-averse Azure users want to hand off this responsibility to experts.  Service providers can centrally manage backup and restore for their tenants’ Azure VMs and storage.  

Since Azure Backup offers different options around the frequency (RPO), recovery time (RTO), storage retention, and storage redundancy, an MSP can offer a simplified plan like “Gold,” “Silver,” and “Bronze.”  Manage tenants who are in a regulated industry. Storage compliance can be especially important as you will often need to retain all data and destroy specific records after a certain period.

10. Azure Site Recovery with Azure Lighthouse


One of the most popular Azure features is Azure Site Recovery (ASR). This lets the organization replicate their on-premises Hyper-V or VMware virtual machines to Microsoft Azure, using the public cloud as a disaster recovery site. For MSPs, offering disaster recovery as a service (DRaaS) is a great way to discover new customers who have not yet embraced the public cloud for their daily operations and drive Azure adoption.  

Since ASR requires some settings to be configured in the tenant’s existing datacenter, and those customers are likely using the legacy Windows Server Active Directory, ADRM may not provide an end-to-end delegated solution. The MSP will likely need to be given remote access (or can provide instructions) so that the on-premises configuration can happen to set up the Hyper-V replica on a host or cluster. Once that is set up, then replication using ASR can run and be managed by the service provider using a replicated virtual hard disk and VM running in Azure.

11. Azure Automation with Azure Lighthouse


Azure Automation may be one of the most valuable services that MSPs can provide through Azure Lighthouse.  This was included last in this list as service providers should set up their service offerings before they start automating them at scale. 

Azure Automation includes process/workflow automation, configuration management, update management, and scheduling for both Windows and Linux. This is where the service provider’s intellectual property (IP) really becomes valuable from custom scripts and processes they’ve created. This could include streamlining deployment, enforcing compliance, dynamically adjusting to infrastructure changes, or simplifying reporting. 

Azure Automation will allow MSPs to differentiate their offerings and create new value for their customers. While Azure Automation supports both public and private management, on-premises management through Azure Lighthouse may still be limited because it requires ADRM and Azure AD.

Wrap-Up


Azure Lighthouse already supports many Azure services, and these will continue to increase in time and with industry adoption.  If there are additional services that you would like to see, post about them in the comments section of this blog and request them through the Microsoft Partner Network (MPN) portal. From this blog series, you should now understand the value of the Azure Lighthouse solution and its foundational technologies using ADRM and AAD, and in the next post, we will review the Azure Marketplace go-to-market strategies.

What are your thoughts so far? Do you see yourself using this within your organization? Do you see it helping you do more Azure business?
Hyper-V vs. VMware – What is Best for Your MSP?

Hyper-V vs. VMware – What is Best for Your MSP?

Hello everyone! Today we’re discussing a subject that has garnered many articles and discussions over the last several years. That is, whether Hyper-V or VMware is better for your MSP toolbox. Many of you may already have a winner in mind, and that’s fine, I only ask that you keep an open mind. 

Additionally, you should note that I write this article with the assumption that in both cases you would have technicians that are fully trained and understand each product. It wouldn’t be a fair comparison if you compared a veteran Hyper-V engineer’s deployment vs a novice VMware Admin’s deployment. So, as we talk about both technologies below, engineering know-how will enter into the discussion very little. Without further delay, let’s start by looking at features!

Features


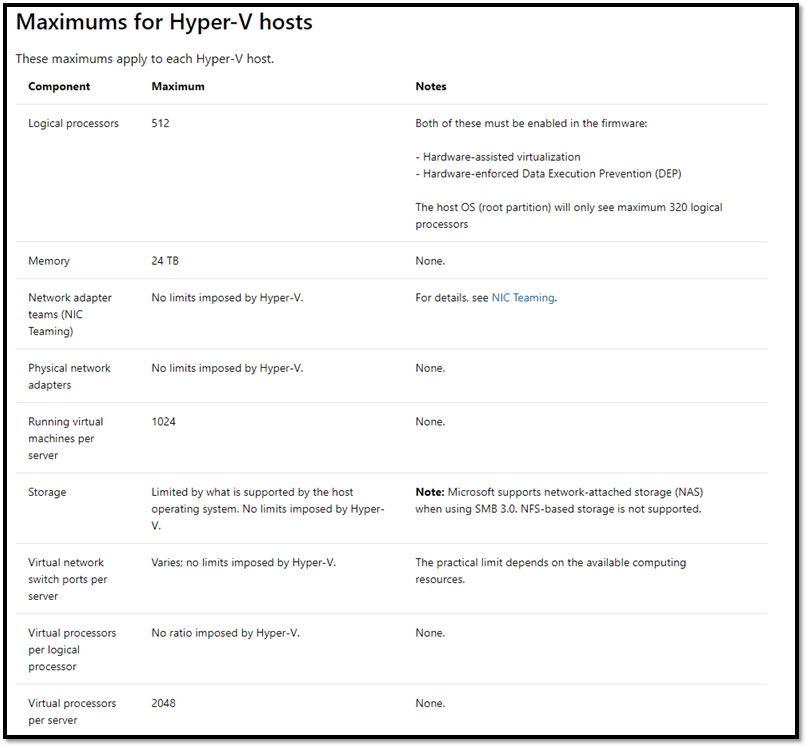
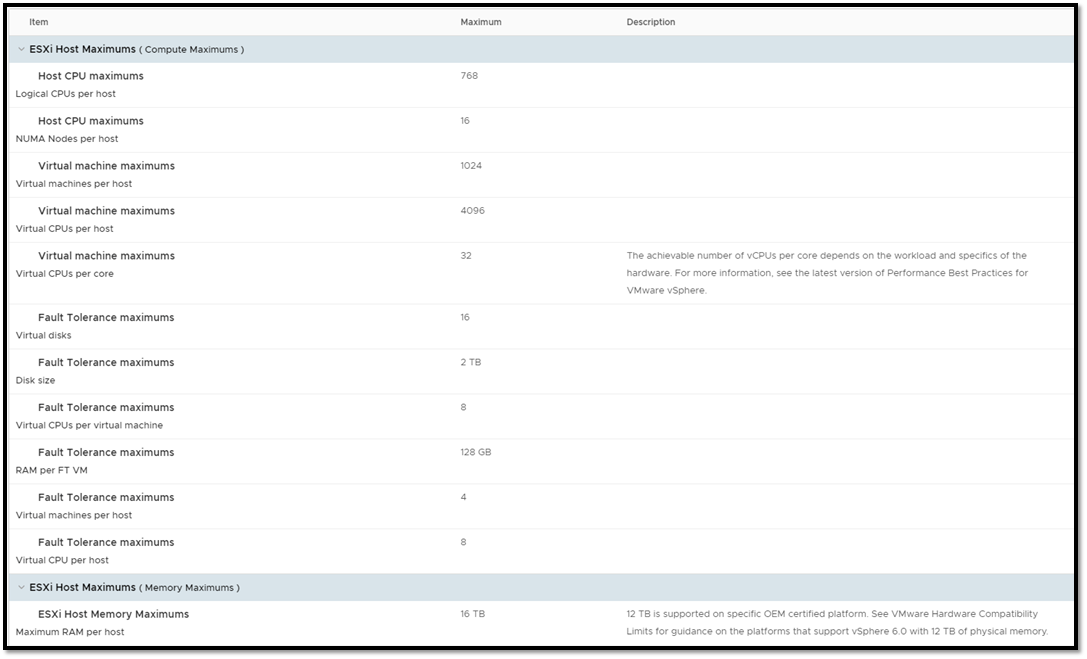
Features have become a part of the VMware vs. Hyper-V debate that has become much more difficult to cover in the past couple of years. This isn’t because one is far better than the other in this area. It’s the opposite! Feature parity between the two is basically a wash these days. For example, both have: Additionally, looking at what both vendors call configuration maximums (the largest amount of resource utilization/assignment the hypervisor/VMS can handle), it’s apparent that each vendor’s maximum is so high only the mega-corporations of the world risk running up to those limits as shown below. Hyper-V Host Maximums for Example hyper-v hosts VMware Host Maximums vsphere hosts As you can see, both options scale out to ridiculous heights, with both having the ability to serve up just about any virtualization need your customers could come across. If you’re interested in looking further into these config maximums, you can find the Hyper-V Maximums discussed here and the vSphere ones here. This hasn’t settled our debate, so let’s move on to the next section Manageability

Manageability


The manageability story for this comparison is a bit murkier than the features section above. Each vendor has a different management story and a slightly different way of doing things. If I had to break it down as quickly as possible with a short answer, I would say this: With a fully trained team, management of either product is effective for MSPs. However, vSphere is more forgiving for junior engineers and those who may not be familiar with virtualization. I say this with Hyper-V being my hypervisor of choice and due to the following:

In vSphere, you have a single pane of glass tool for managing the entire solution; the vSphere Client. You connect to the vSphere client on a stand-alone host or a vCenter instance, and the management experience is largely the same. With Hyper-V, you will use one of several possible tools, including:
  • Hyper-V Manager
  • System Center Virtual Machine Manager
  • PowerShell
  • 3rd Party Management Tool
  • Azure Front-End (If using Azure Stack)
While these different tools are highly effective, they are all used in different deployment types and scales, which can lead to confusion and frustration for new IT Pros. That difference aside, both of these products are well-suited for MSP management. Both have integrations with MSP RMM and reporting platforms, and both can be used in automation scenarios via PowerShell and PowerCLI.

Likely the determining factor here is going to be what your engineering team is comfortable with. If you’re automating as many functions as you can (and you should be), the numerous management tools for Hyper-V are likely a non-issue. So, from an MSP perspective, comparing these two tools, we’re still at an even stretch after this section. Let’s talk about pricing and cost next.

Pricing and Cost


At this stage of the discussion, I start to lean towards Hyper-V. From a pure engineering perspective (no talk of sales or margins involved), Hyper-V wins this section hands-down. And I would argue it’s due to one simple fact. With Windows Server licensing, you are given virtualization rights to run 2 VMs with a standard edition and the ability to run unlimited VMs with datacenter edition on a licensed piece of hardware. This is regardless of the hypervisor type. This requirement is the same whether you’re running Hyper-V or vSphere, and this is where the determining factor comes from.

The vast majority of your customers are going to be running Windows Server. That’s just a fact. If you want to run Windows Server on top of vSphere, you still have to buy those Windows Server licenses, and guess what? That Windows Server license comes with Hyper-V, and all you need to run a small to a mid-sized cluster already. So, it comes down to a simple question. Why would you pay for the extra licensing for vSphere when you already get what you need for most use cases with the purchase of Windows Server licenses that you must buy anyway? For a standard business (Engineering know-how aside), the answer is simple. For an MSP, a little less so. For the aspiring MSP, the decision to choose vSphere over Hyper-V comes down to three extra factors. 1 of which I personally don’t like.
  1. Adding vSphere to the deal adds extra profit margin for the MSP
  2. vSphere is already the defined virtualization solution in the MSPs toolbox.
  3. Chosen Hybrid Cloud Option.
I will concede that all MSPs have a mandate to make money. That’s how the business continues to grow and function, and everyone needs to put food on the table at the end of the day. However, I have an issue with selling a product (in this case vSphere) for the sole purpose of adding to my profit margin. If that’s the ONLY reason I’m choosing vSphere as an MSP, my customers should look elsewhere because it increases the cost on them for the sole goal of lining my own pocket. You’d be surprised how many times I’ve seen this. If this describes you, I would argue that when it comes to cost specifically (all other factors aside), doing a given project with Hyper-V will allow you to come in at a lower price point. Sure not as much margin, but long-term customer trust goes a long way.

As for item 2 on the list above, it’s never too late to change your toolset. If this is the sole resistance to changing your core virtualization choice, then I would suggest putting together a proof of concept and going from there. Item 3 is fairly simple as well. It’s no secret that Hyper-V has native integrations with Azure, and that VMware is closely aligned with AWS. If you have an affinity for one of those public clouds over the other, that may well influence your decision as well.

Is Hyper-V or VMware Better for MSPs?


So, we’ve looked at a few different things as part of this discussion, and I’ve found in my travels that these are the three most important areas for MSPs. Ready for the winner? My answer to which one is better? Surprise! It comes down to which one fits your company culture better. Are you a historically Microsoft-centric shop and want to use Azure? Then go with Hyper-V? Are you a fan of AWS? Then you likely want to go with VMware.

Are you looking for on-prem only and want the lowest cost for your customers? Choose Hyper-V. But please, for the sake of your customers, don’t be the MSP that chooses VMware just to get a little extra margin.
Whatever choice you make, train up your engineers and integrate it into your MSP stack, and your chosen solution will serve you well. Both are fantastic and mature products with large companies behind them ready to help if needed. What do you think? Agree with my assessment? Don’t agree with it? Thanks for reading!
How to Use Azure Automation Runbooks for MSP Customers

How to Use Azure Automation Runbooks for MSP Customers

Microsoft has made great strides in the hybrid cloud automation space with Azure Automation. For Managed Service Providers this is a great tool to take advantage of when managing multiple clients. We can now run our “scheduled tasks” on-premise with Azure Automation and get the following benefits:
  • Azure Log Monitoring – We can now configure alerts for scheduled tasks with Azure Monitor Logs. Now there is more visibility into our scheduled scripts that fail.
  • Encrypted Credentials – Azure Automation provides that ability to securely store credentials and call them via scripts. This one is huge, as we can easily call credentials without having to mess around with encrypted password files and certificates.
  • Hybrid Cloud Versatility with Scripts – We can choose whether to run a script either on-prem, in Azure, or both. This gives us more versatility to run our scripts anywhere.
Looking for general PowerShell Credential Encryption Guidance? See our guide on encrypting passwords with PowerShell! Looking for ways an MSP can get started with Azure? We have more resources to help MSPs get started with Azure!

Setting Up an Automation Account


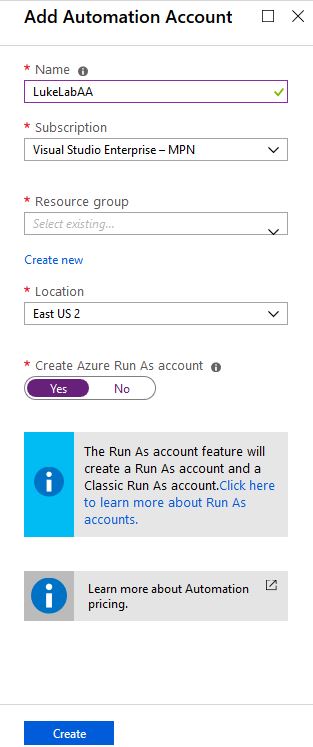
  To get started using Azure Automation Runbooks, we need to have an Automation Account set up. If you don’t have an Azure account already, sign up for the free trial. Then login to the portal and search for Automation Accounts. Select the Add button to create a new account: Automation accounts Azure Fill out the required fields to create the Automation Account. Select Yes to create the Azure Run As account, we could create it manually if needed but the easiest route it to just have Azure create it when setting up the Azure Automation account: add automation account  
How to Create an Azure Log Analytics Workspace


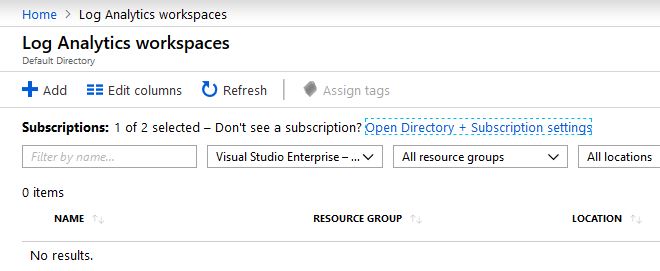
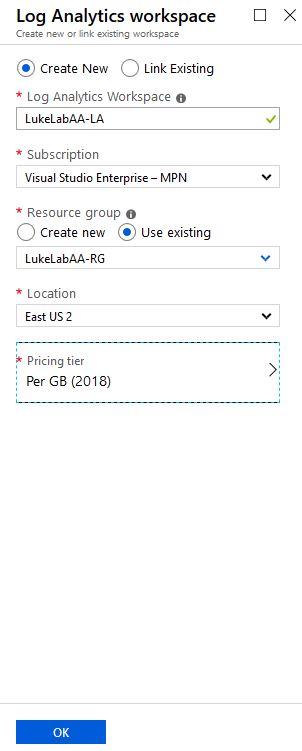
  In order to use Azure Automation Runbooks on-premise, we will need to set up a Log Analytics Workspace. This a service in Azure that provides monitoring and logging for the various Azure services. In the Azure Portal search for Log Analytics Workspaces, select Add: log analytics workspace azure Fill out the required fields, the pricing for Log Analytics is based on storage, so your only paying for the storage to store your logs: Now we need to link our Azure Automation account with our Log Analytics Workspace. As of right now, this has to be done through PowerShell. So open up an administrative PowerShell window and run the following command to install the AZ module:
Install-Module AZ -Force
Then run Connect-AZAccount to connect to your Azure Subscription:
Connect-AZAccount
Now we need to get the resource ID for our Automation Account, we’ll use the Get-AZResource cmdlet and filter by resource type and our automation account name. In my example it’s LukeLabAA. We want to save the resource ID to a variable so we can use it shortly:
$AAResourceID = (Get-AzResource -ResourceType "Microsoft.Automation/automationAccounts" -Name "lukelabaa").resourceid
We will do the same for the workspace resource ID using the same cmdlet with the workspace resource type and the name of the workspace we just set up:
$WSResourceID = (Get-AzResource -ResourceType "Microsoft.OperationalInsights/workspaces" -Name "lukelabaa-LA").resourceid
To link the account with the workspace we will use the Set-AZDiagnosticSetting cmdlet and reference both resource ID’s:
Set-AzDiagnosticSetting -ResourceId $AAResourceID -WorkspaceId $WSResourceID -Enabled 1
To verify that the account is linked we can see in the output that JobLogs and JobStreams are enabled:
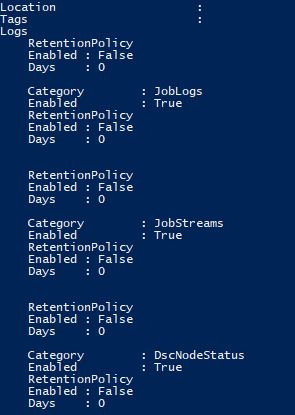
Setting Up the Hybrid Worker Node


  The Hybrid Worker Node is an agent that is installed on an on-premise server running either Linux or Windows. This agent is used to execute commands from the runbook to the on-premise environment. The image below from Microsoft’s documentation gives a good depiction on the high-level topology for the communication between the Hybrid Runbook Worker and Azure Automation. You can group Runbook Workers together to create a redundant solution for your Runbooks. Also, note the port 443 connectivity which provides us with a secure way of transferring data back and forth between on-prem and cloud:

In this example, we’ll configure a Windows Server 2016 Core node with the Hybrid Worker Agent. Currently, as this article is being published, there are two ways to set this up, there is a PowerShell script that can be downloaded from the PowerShell gallery and ran, however, it is using the AzureRM cmdlets and running Connect-AzureRMAccount on server core produces the “Unable to load DLL ‘IEFRAME.dll'” error. So we go over how to add the Hybrid Worker Node on Server Core using the manual process. First, we will need to run the following command with the resource group and name of our log analytics workspace that we set up. This tells our workspace to push the worker components to the agent computer when we add it to the workspace in the next steps :
Set-AzureRmOperationalInsightsIntelligencePack -ResourceGroupName LukeLabAA-RG -WorkspaceName LukeLabAA-LA -IntelligencePackName "AzureAutomation" -Enabled $true
Next, we will download the agent from our workspace. Navigate to the Log Analytics Workspace and select Advanced Settings on the left-hand side. Select Connected Sources and since we are setting up a Windows node we will choose Windows Servers. Select Download Windows Agent (64 bit) and transfer it to the Hybrid Worker. Also, make note of the Workspace ID and Primary Key, these need to be used in order to configure the agent installation to point to the Azure environment: When we run the executable click next through the wizard. Select Connect the agent to Azure Log Analytics (OMS) and click Next: Paste in the Workspace ID and Primary Key that we saw from the previous step, choose Azure Commercial and click Next, then Install: Wait a few minutes for the agent to show in the workspace When the agent installs the Hybrid Registration PowerShell module gets copied down to the Hybrid Worker. So, on the Hybrid Worker node navigate to “C:\Program Files\Microsoft Monitoring Agent\Agent\AzureAutomation\<version>\HybridRegistration” and import the module:
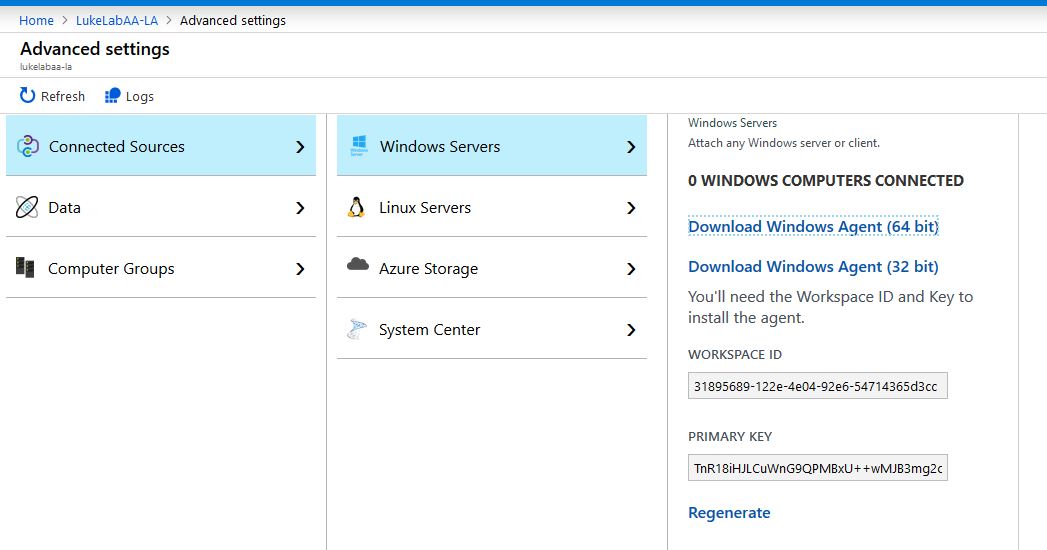
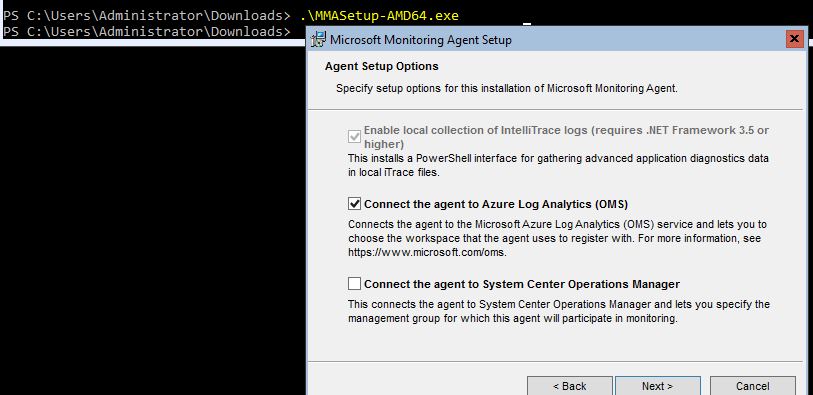
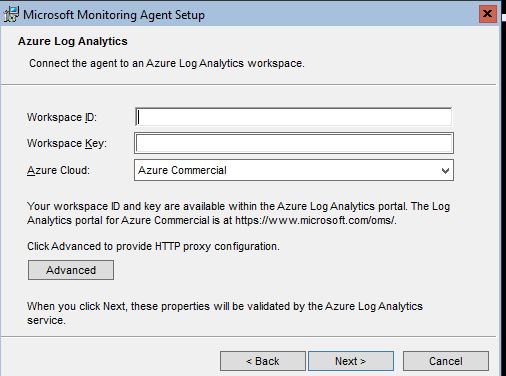
Import-Module .\HybridRegistration.psd1
Then run the following command. The URL and Token are obtained from the Azure Automation account. Select Keys on the left-hand side and the Primary Key will be the token and the URL will be displayed. Also include the Hybrid Worker Group name that you would like to use if the one specified doesn’t exist it will automatically get created:
Add-HybridRunbookWorker –GroupName LukeLabOnPrem -EndPoint "https://eus2-agentservice-prod-1.azure-automation.net/accounts/d3d71ed2-e761-4333-b333-fce7b97e3333" -Token "0B/RNjlieKGSk2QjXmsuGoQtSQW0QVb6vfjqIY2342KJOiYOmedVP/vY+vpP8sfwdomliECn/GTasWmViJg=="
Now when we go to our Automation Account and select Hybrid Worker Groups we can see our new hybrid worker under the LukeLabOnPrem group we specified:

How to Use an Azure Automation Runbook


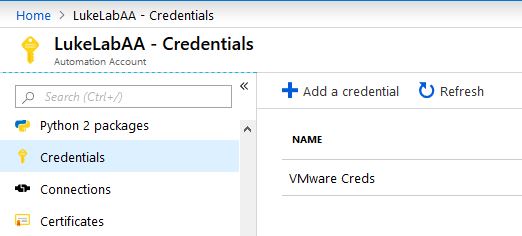
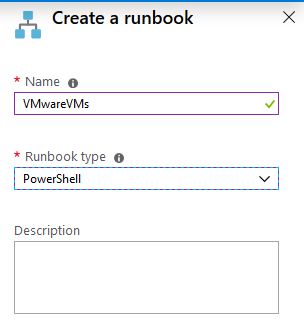
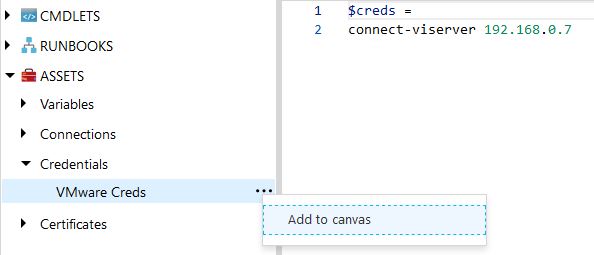
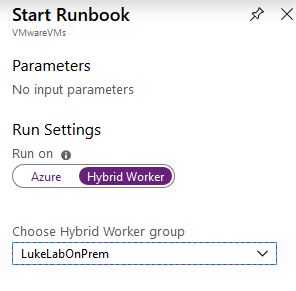
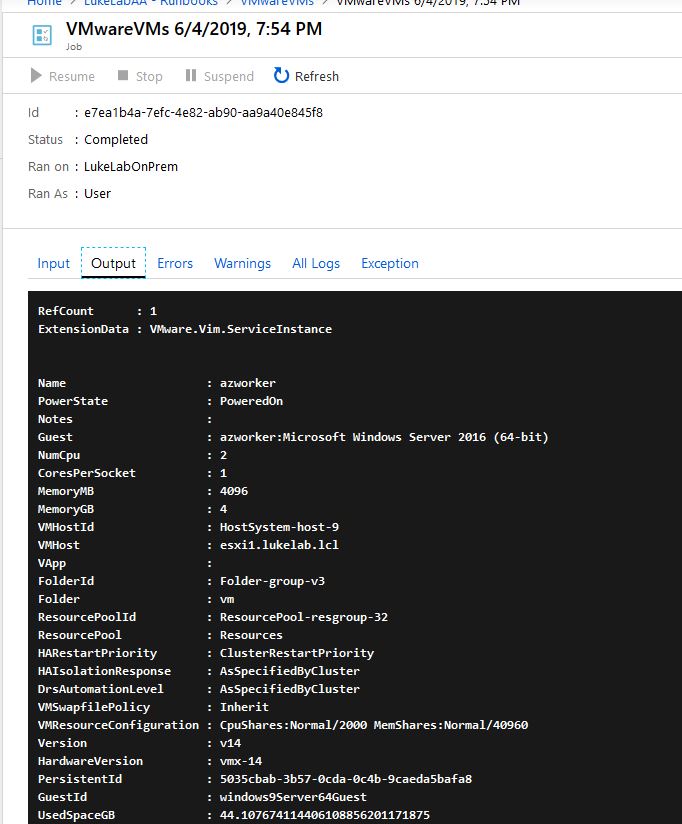
  Let test out running a Runbook through our new Hybrid Worker. I have installed the VMware PowerCLI module onto the node. We will run a simple script that will connect to our ESXi host and display a list of all the VMs. First, let’s add in some credentials. This is one of the coolest features of Azure Automation. Go to the automation account and select Credentials on the left-hand side. Choose the Add a Credential option and input some credentials, in this example I’m inputting my credentials to my VMware environment so we can use them in our runbook: credentials Now, let’s create a Runbook. In the Automation Account select Runbooks on the left-hand side and choose Create a Runbook: Runbooks Fill out the required fields, I am going to create a runbook called VMwareVMs, there can’t be spaces in the name: How to Use an Azure Automation Runbook Another slick feature to point out, while we are creating our scripts in the runbook editor, we can select Assets on the left-hand side and choose our credentials that we saved and select Add to canvas. This will paste in the exact command that we need to retrieve those credentials: Now that I have my quick script to retrieve VM info, I’ll Save and Publish the runbook: When we go to Start the runbook, we have the option to have it run from our Hybrid Worker. I also selected the LukeLabOnPrem worker group: The runbook will kick off on-premise and retrieve the VM information from the Get-VM PowerCLI cmdlet proving that our runbook is executing and connecting to infrastructure on-premise:
Wrap-Up


  Managed Service Providers should definitely take advantage of the hybrid worker option with Azure Automation Runbooks. It can be a great tool to have in the back pocket for not only clients that have hybrid cloud solutions, but also MSP cloud solutions that require an on-premise presence into client environments. Instead of setting up scheduled tasks in native Windows Server where there is no centralized reporting or visibility on the status of a failed task, consider using Azure Runbooks with the power of Log Analytics alerting.

Thanks for reading!