Top 8 Most Important IT Certifications for Engineers
The one constant in IT is that it’s constantly evolving. New technologies and their associated certifications are constantly rolled out, so how can you keep up? You can’t possibly pursue all IT certifications, so which ones should you choose? This checklist will simplify your certification process and ensure your engineers are at the top of their game! As a service provider, MSPs must stay current with technology, security, and service delivery that meets the demands of your customers. One of the key ways to accomplish this is to get your engineering team certified. There are literally hundreds of certifications available to your team. So, which certifications will make you the most competitive, current, and able to meet customer needs? There are two ways to answer this:- The certifications you need your team to have are based on the services you currently deliver.
- The certifications the industry demands indicate what services you should be offering.
The 8 Most Important IT Certifications Topics for MSP Engineers
According to CIO Magazine, the most valuable certifications today (again, which align with services demand) fall into eight distinct service areas:1) Security
A top priority for any customer organization of any size is security. Most MSPs are looking for ways to offer security-related services, including transitioning to an MSSP. A few specific security-focused certifications are in demand: 3 from ISACA and one from ISC2 – both well-respected IT-centric organizations that seek to improve the quality of the delivery of IT services. ISACA’s certification includes Certified in Risk and Information Systems Control (CRISC), Certified Information Security Manager (CISM), Certified Information Systems Auditor (CISA). ISC2 offers the well-known Certified Information Systems Security Professional (CISSP).2) Cloud
Those customers looking to shift their operations to the cloud are looking for partners who not only understand how to administer cloud-based environments but also have staff that has expertise in designing custom cloud solutions. IT certifications such as Amazon’s AWS Certified Solutions Architect – Associate is in high demand due to the success of AWS. And, for those service providers focused on Azure, Microsoft also offers several technical and solutions-focused certifications for Azure.3) Virtualization
You already likely have your customers running much of their infrastructure and critical systems virtually. Having a certified team member who fully understands the architecting and management of virtual environments will help both on-prem and as you move customers to the cloud. Both Citrix and VMware certifications are in demand. Citrix’s Citrix Certified Professional – Virtualization (CCP-V) and Citrix Certified Associate – Virtualization (CCA-V), along with VMware’s VMware Certified Professional 6 – Data Center Virtualization (VCP6-DCV) round out the list.4) Networking
The foundation of the environments you manage is the network itself. Existing both physically and virtually today, it’s necessary to have staff who understand both fully. While nearly any networking-related certifications are certainly helpful to get the job done, those in the highest demand include the Cisco Certified Network Professional (CCNP) Routing and Switching and Citrix Certified Associate – Networking (CCA-N).5) Project Management
It’s not all about keeping technology running; many of your one-off projects require a significant amount of planning, tracking, and management. That’s why one of the most in-demand areas of certification includes those demonstrating a mastery of project management. The Project Management Institute’s Project Management Professional (PMP) and CompTIA’s Project + certifications provide the skills needed to ensure projects are properly managed.6) Service Management
Most of your engineering team is heads-down, putting out fires. They’re thinking solely about the here and now. But it’s important to have at least one member of the team who is thinking about the service lifecycle, helping to mature your offerings. The ITIL v3 Foundation certification focuses on the ITIL service lifecycle, the ITIL phase interactions, and outcomes, as well as IT service management processes and best practices.7) Data Privacy and Compliance
Understanding and implementing data privacy and compliance is more critical than ever. The Certified Information Privacy Professional (CIPP) is a globally recognized certification that equips professionals with the knowledge of privacy laws and regulations. It varies by region to reflect different legal frameworks, making it essential for those ensuring organizational compliance with global privacy laws. Alongside, the Certified Information Privacy Manager (CIPM) is the world’s first and only certification in privacy program management. It focuses on equipping professionals with the necessary skills to establish, maintain, and manage a privacy program throughout all stages of its lifecycle, from inception to implementation and beyond.8) Cybersecurity Analysis
As the landscape of cyber threats evolves, so does the need for skilled cybersecurity analysts. The Certified Ethical Hacker (CEH) certification provides IT professionals with the knowledge and tools to look for system weaknesses and vulnerabilities. It’s about understanding and using the same techniques as a malicious hacker, but legally and ethically. This certification delves into a wide range of hacking techniques and their legal implications, making it a comprehensive choice for security professionals. Complementing this is the CompTIA Cybersecurity Analyst (CySA+), which emphasizes behavioral analytics to detect and combat cybersecurity threats. It focuses on proactive defense using monitoring and data analysis, training individuals to identify and combat malware and advanced persistent threats (APTs), resulting in enhanced threat visibility across a broad attack surface.Summary
The first four service areas are likely very familiar to you already, with the last four being, perhaps, a bit foreign. Regardless, these IT certification areas (as well as some of the specific IT certifications mentioned) represent the knowledge needed to service MSP customers’ needs properly. Take a look at the links above and begin a plan with your engineering team to get them certified. By doing so, you’ll have a stronger team that can take on bigger challenges, larger clients, and longer projects – all making your organization better positioned to grow. Training your employees is also a great way to foster trust and improve retention (however, make sure you still plan what to do if you lose a key engineer!) What about your team? Are you following a certification path similar to this one? Are there other certifications you are pursuing outside of these for something more specific? What are they, and what is the reasoning?
4 Ways To Price BaaS – Which Should I Use?
Are you considering offering BaaS to your customers? Or perhaps you’re already delivering the service but wondering if you’re pricing it correctly. Either way, figuring out how to price any service to optimize customer satisfaction and profits is not an easy task. Pricing BaaS, due to its nature, presents a number of different options to consider. But which one is the best for you? Read on to find out. When it comes to providing a new product or service for your customers, pricing can often be a hang-up for getting things to market. Pricing is tricky. There is no sugar-coating it. If your pricing is too expensive, people won’t buy it. If it’s too complicated, people won’t buy it. However, on the flip side, if it’s too cheap, people will assume it has no/low value. You have to tread a fine line between conveying value and staying competitive. These concepts apply to BaaS pricing just like any other product or service. With that in mind, I thought an article covering some of the common pricing models for BaaS would be in order.Pricing BaaS Per GB
The first model I’ll discuss is likely the most common: a per GB model. Many MSPs providing BaaS services opt for this model because it does a good job of scaling up and down as customer needs change, and it’s simple for the customer to wrap their heads around as well. They understand that storing more data equals additional costs for backups. When determining that magical price per GB amount, there are a number of items you need to consider. Some of these are:- Licensing Costs for Software
- On-Prem Storage Costs
- Off-Site Storage Costs (including applicable public cloud fees)
- Engineering time for recoveries, test restores, maintenance
- Networking costs
Per Protected Workload
While less common, this is still something that I see pretty regularly. Instead of charging per GB, an MSP will determine their average cost per workload across the customer base and then use that as a baseline for determining how much to charge per workload per month. This method is VERY easy for the customer to understand. For example, if they have eight servers, then they pay for eight protected workloads per month. This method is more difficult for you, however. There is an added risk in that the average does not always work. Let’s say you’ve been servicing the SMB space to date, and you bring on a marketing firm as a customer only to find out they have 20TB of marketing copy to protect. There goes your average. Now, you can certainly build some wiggle room to the pricing, but again, if the price is too high, your customer won’t pay, defeating the purpose. Another thing worth mentioning here is that some MSPs using this model will break the model down per the type of workload it is. $X/Month for a SQL Server, $X/Month for a Domain Controller….etc…etc. This helps deal with the abovementioned issue regarding your average. However, keep in mind that if the model is too complicated, you’ll make your customers’ heads spin.Strictly Value Add
This model has gained traction amongst MSPs in the last couple of years. Many customers today see backup as a 101 type of service that any MSP should offer. They assume they will pay the introductory rate for a given server, and the service will just come with a backup. In line with this, many MSPs have taken this to heart and have just rolled up the backup costs into the monthly rate they would change for monitoring and patching a given workload. While you may be a bit more expensive than your competitors on a per/node basis, you provide more value with that cost. The other added benefit here is that it simplifies your go-to-market strategy and ongoing support in that any workload you manage already has backups accounted for. The same applies to any new server added after the fact. This greatly reduces the number of touches needed for approvals from your customers, and it leaves you more time to provide your usual fantastic support and your customers more time doing whatever it is they do.Per SLA
While a bit more uncommon, this is something that I’ve come across a few times. Instead of tying backup pricing to a particular size or number of workloads, an MSP will simply ask the customer a question. “How fast do you need to be back up in the event a recovery is needed?” With that answer, the MSP will present a cost per SLA type of list: Recovery within- 5 to 15 minutes – $X/Month
- 15 minutes to 1 hour – $X/Month
- 1 hour to 4 hours – $X/Month
- 4 to 8 hours – $X/Month
- 8+ hours – $X/Month
Per User or Endpoint Model
Lastly, a growing trend is the per-user or endpoint model, tailored for businesses with a clear count of users or devices that need backing up. This model is straightforward for both MSPs and customers: you simply charge a flat rate for each user or device protected each month. It’s appealing due to its predictability and ease of understanding. For example, a business with 50 employees pays for 50 users. This model scales neatly with the size of the business, ensuring that your services grow with them as they grow. It’s particularly suited for organizations with a mobile workforce or numerous devices, as it aligns the cost directly with the scale of usage. Just be mindful to define what constitutes a ‘user’ or ‘endpoint’ clearly to avoid confusion and ensure transparency.Wrap-Up
So, while this post doesn’t cover ALL the pricing methods you’ll run into out there, it certainly covers some of the most common. How about you? Have you seen or come up with a BaaS pricing model that doesn’t fit neatly into any of the above? Finally, if you’re not offering BaaS to your customers – why not? But before you do read this guide 3 Steps for MSPs to Get Started with Backup-as-a-Service to make sure you deliver the service properly.
11-Point Checklist for Customer Patching
When a new customer signs you on to manage their network and IT Services, they’re really instilling A LOT of trust in you. Many business owners and managers have the perception that they just hired someone to come in and handle everything an internal IT team or person would handle. That includes ongoing daily support operations and the back-end work that end users (and likely your customer contact) can’t see happening. While you likely have a very concise document that you provide your new customers that lays out exactly what items you’ll be taking care of as part of your proactive maintenance, how do you know you’re covering all the bases? What components of your customer’s network do you include in this kind of maintenance? The easy blanket response is, “Well, we update everything.” Do you, though? I’m surprised, even to this day, how many items are left out of the standard patching/maintenance routines, so I’ve compiled a list below of the different items a customer may have in their environment that require regular patching, as well as a few tools in each section that may be of assistance for that particular item. Note: While the tools I list in each section below may help in most cases, they are by no means ALL of the tools available in the marketplace. The ones mentioned here are simply those I’ve had first-hand experience with. You’ll want to test any of these tools before using them in production. With that out of the way, before we get started with that, let’s answer one simple question….Should I be Running Updates on Everything?
I still hear this question way more often than I should. The short answer here is YES. Your customers are paying you for a service. That service includes keeping their systems running with maximum uptime, no data loss, and protecting them from security breaches. Regular patching is part of the equation for all of those items, but I’m surprised that in the MSPs I’ve talked with, they can often be selective about which items they apply updates to on a regular basis. The concern here is often breakage, which admittedly can be a concern for certain components, but you have to remember what the vast majority of patches are for. Patches typically contain fixes for discovered breakages, malfunctions, bugs, and security holes. Sure, getting them applied properly can be something of a chore sometimes, but leaving anything un-patched will eventually lead to your customer running into what was ultimately an avoidable issue. To help avoid the “broken-via-patch” issue, your team should be doing regular patch testing, either internally or by having it outsourced to a provider (Continuum, for example, does patch testing as part of their platform). Doing this gives you the confidence to apply tested patches for all customers. It helps you justify the resounding answer to this question of “yes” as you move forward supporting your customers. With that out of the way, let’s take a look at the checklist.1. Endpoints
This is often what most customers will think of when they hear of patching/maintenance simply because it’s the network component that is most visible. While I could break this down into several sub-categories, for the purposes of this article, simply know that when you’re patching your customers’ endpoints, it’s not just the OS involved. You have third-party applications, device drivers, firmware, anti-virus, possible encryption software, etc. When I first started putting this article together, it was focused primarily on backend infrastructure. But I’ve added this item so that you can at least start thinking about your customers’ endpoints, everything contained within them, and how you’re going to patch them. Most RMM platforms today have methods for dealing with OS patching and common applications such as Flash and Java. But there will undoubtedly be other industry-specific applications that you will need to patch via other methods, such as manual scripting installation. Possible Tools to Assist: WSUS, Continuum, ConnectWise Automate, Kaseya2. Server OS
This is a no-brainer, right? The OS running on your servers (often Windows Server) needs to be updated regularly. Many MSPs dread the monthly patch Tuesday, but again, remember what these patches are doing for you. In most cases, your customer’s core functions and data sit on a Windows Server somewhere, so when there are fixes to known issues and security vulnerabilities available, I HIGHLY recommend you get them installed. You can install said patches manually if you’d like, but many RMM vendors provide the option of doing this for you. At the very least, if you have a customer with more than a few servers and you have no RMM package, consider using WSUS (Windows Server Update Services). It will make your life easier. Possible Tools to Assist: WSUS, Continuum, ConnectWise Automate, Kaseya3. Core Server Applications and Roles/Features
This line item refers to the core applications and roles/features installed on top of Windows Server. SQL Server or Exchange, for example. When you’re running these on top of Windows Server, they often have patches and version releases that happen outside of the core OS. So, you’ll need to plan accordingly for these items as well. Possible Tools to Assist: WSUS, Windows Update, Manual Application4. Third Party Server-Installed Applications
Not all servers run dedicated Windows Server roles/features. Many are running the hosting component of a core business application. Medical facilities might have a patient records application, or a factory might have an inventory tracking app running, for example. Whatever the application, they will eventually need updates as well, just like the OS. When you onboard a new customer, you’ll want to take stock of the core business applications they use and where they live. Once you have compiled your list, you’ll want to contact the vendor of said applications, determine their patching cadence, and get documentation on how to apply patches when they are released. Have this information handy because it can be difficult to gather it at the last minute if an urgent patch is needed. Possible Tools to Assist: Continuum, ConnectWise Automate, Kaseya5. Server Hardware
I find that this item is a big one and often overlooked. An MSP will install a new server, throw Hyper-V or VMware on it, ensure it has the latest firmware and driver versions on it on the day of installation, and then never update those items again. Those same components are capable of having bugs and security issues as well, and MSPs should be checking the hardware vendors’ websites regularly to see if there are new drivers/firmware. This is where it helps to have something like a baseboard management controller or BMC (Dell DRAC or HP iLO, for example) in every server you manage because if you’re upgrading a NIC driver or server BIOS, you have another avenue for getting into the server if there is an issue during a remote patching routine. Some of the MSPs I’ve worked with over the years have simply made BMCs a requirement when a customer wants to install a new managed piece of hardware. I’ve even seen some MSPs who will eat that cost if the customer doesn’t pay for it because the benefits often outweigh the costs. Possible Tools to Assist: Dell Lifecycle Controller, HP Smart Update Manager6. Storage Infrastructure
This line item is an important one. This item includes all the locations where your data sits (if not on a Windows server) and the interconnectivity in between. This includes things like NASs, SANs, Fibre Channel Controllers, SAS controllers…etc…etc. You want these items to be updated regularly for nothing other than stability. If your storage comes crashing down around you, nothing else will work. Make sure you spend the necessary cycles (and the maintenance windows, too!) to ensure these patches and fixes are applied regularly. Thankfully, the plus side here is that storage vendors tend to have excellent documentation and support when it comes to performing maintenance on these systems, so leverage them when you can. Possible Tools to Assist: Dependent on Platform (See your vendor)7. Network Infrastructure
Another frequently missed thing that gets patched at installation and then never again. Switches and routers are the unsung heroes of many networks. They quietly do their jobs, and no one ever thinks of them. However, they do need security and maintenance fixes from time to time, so I recommend you check in with the switch manufacturer quarterly to see if there are any new firmware releases. The only rub with patching switches is if you’re doing it remotely, there is often no recourse other than to go onsite if something goes south during the patching process, so plan accordingly. Possible Tools to Assist: Cisco IOS Software Checker8. Firewalls
If you think about it, a firewall is often the first line of defense for the security of your customer’s network. It’s the entry point, the castle gates, if you will. Many MSPs see the value easily in making sure this item is patched regularly, but I still run into some MSPs that are still running super old Cisco firewalls with ancient firmware. This is NOT one you want to forget. Add it to your quarterly checklist and plan an outage window as needed. Also, like switches, be sure to have someone standing by to head onsite if attempting to upgrade remotely. If things go south, you won’t have remote access anymore. Possible Tools to Assist: Dependent on Platform (See your vendor)9. Printers
If you’re like me, you hate managing printers. They break often, everyone needs them, and they eat up a bunch of support time. But I’ve found over the years that if you keep them well maintained with regular visits from an imaging vendor and you keep the firmware and drivers up to date, you can cut the support calls regarding these items fairly significantly. This item doesn’t need to occur often, but twice a year should make a meaningful impact. Possible Tools to Assist: PrinterLogic10. Phone Handsets
Another often ignored item. Many end-users simply pick up and use their VOIP phone without much thought to how it works. You, as the MSP, know better. While the backend server component of the VOIP service will often get patched as part of one of the above processes, the phone endpoints are often forgotten about. Make it a point to get their firmware updated twice a year to keep them up with security fixes and functionality. Possible Tools to Assist: Dependent on Phone System (See your vendor)11. Mobile Devices
Something of a new line item for many MSPs. As an MSP, wrapping your hands around all of your customers’ mobile devices (phones, tablets…etc…etc) can be difficult. However, many Mobile Device Management (MDM) packages on the market today are making this easier. Some will assist with version levels and lifecycle management, so you can help close the management gap in this ever-growing section of your customer’s business as well. I think that as more corporate data mingles with users’ data on personal cell phones, this space is set to explode from an MSP perspective. Many businesses don’t realize the intricacies of this new trend nor appreciate the importance of tight management and security of any device with their data on it. Adding this to your patching routine today could get you ahead of the game. Possible Tools to Assist: VMware Air-Watch, Microsoft IntuneWrap-Up
So that wraps things up for us! Again, use this list as a planning guide for regularly scheduled maintenance for your customers. If you make it a point to cover all of the mentioned bases above, you should see a drop in support tickets as a whole, leaving you more time for other billable work! Whilst we are in the mood to update things, if you haven’t already done so, why not subscribe to our MSP Dojo newsletter to upgrade your MSP via helpful articles like this one? Sign up here to receive a new MSP article every week directly in your inbox! Thanks for reading!
How to Encrypt Passwords in PowerShell
As an MSP, managing passwords in PowerShell scripts can be a dicey task. There is always a risk that someone may find the password by simply peering at your code. However, certain scenarios call for “storing” a password somewhere and referencing it in a script for authentication. To do this safely, you’ll need to encrypt them, and you can do this using PowerShell. If you’re new to PowerShell, don’t worry it’s not too difficult!Why Should I Encrypt Passwords?
As a savvy tech professional, you’re likely aware of the dangers lurking in the digital shadows, but have you considered the full extent of risks associated with unencrypted passwords in your PowerShell scripts? Let’s dive into why encrypting passwords isn’t just a good practice—it’s essential for maintaining robust security in an ever-evolving cyber landscape.-
- Protecting Sensitive Information
-
-
- Compliance with Security Standards
-
-
-
- Mitigating Insider Threats
-
-
-
- Enhancing Security in Automation
-
-
-
- Safeguarding Against External Threats
-
-
-
- Expand the Scope of Security
-
-
-
- Future-Proofing Your Security Posture
-
$password = “MYPASSWORD”Anyone can easily just open up your script file and read the password. Instead here are 3 more secure ways of passing credentials through to your PowerShell scripts
Using Task Scheduler
This is the easiest method of all. When configuring a task, Task Scheduler allows you to store your account credentials and will execute your specified script using those credentials: This is useful when running a script that needs access to file shares or any domain authenticated endpoint. However, task scheduler will only store 1 set of credentials and uses the Windows Data Protection API to encrypt/decrypt the password. This method uses the user account login credentials sort of as a “key” to access the stored password. The con to this method is, since the login credentials are being stored locally on the server, the script can only be run on the server that has the credentials cached and the Task Scheduler configured.
Create an Encrypted Password File
Another way we can go about hiding the passwords used in our PowerShell scripts, is by creating an encrypted password file and then referencing that password file in our script. Just like Task Scheduler, this method will encrypt using the Windows Data Protection API, which also means we fall into the same limitations of only being able to access the password file with one account and only on the same device that created the password file. The user login credentials are essentially the “key” to the password file. However, this method allows us to save multiple passwords and reference them in our script. To get started we will create the password file by inputting the following syntax into a PowerShell console. Also, note that the user account you are using to create the password file is the same account that must be used to open the password file (Windows Data Protection API remember?):(get-credential).password | ConvertFrom-SecureString | set-content "C:Passwordspassword.txt"You will get a prompt for the password, input the credentials that you want to save. In our example an encrypted password file will be saved to “C:passwordspassword.txt”:
 When we open the file we can see that our credentials are encrypted:
 Now, how do we retrieve these credentials? Easy, if we ever need to retrieve these we include the following syntax in our scripts to provide the creds:
$password = Get-Content "C:Passwordspassword.txt" | ConvertTo-SecureString
$credential = New-Object System.Management.Automation.PsCredential("Luke",$password)
Then just pass $credential to whatever cmdlets need a pscredential to authenticate. If we look at what’s in the $credential variable we can see our username and its encrypted password:
 As I said before, you still fall under the limitation of requiring the same user account to run the script and only on the same machine that you created the password file. Thankfully, there is a 3rd option that allows us to get around this.
Creating a Key File and Password File
With PowerShell, we can generate a 256-bit AES encryption key and use that key to access our password file. First, we input the following syntax to create our key file. You could take this key and put it on a network share and only give specific users access to the key along with the password file. But, in this example we will just save it to C:passwords with our password file:$Key = New-Object Byte[] 32 [Security.Cryptography.RNGCryptoServiceProvider]::Create().GetBytes($Key) $Key | out-file C:passwordsaes.keyIf we open the aes.key in notepad we can see our key is now generated:
 Now, we create a password file just like the one above. However, we use the -key parameter to specify that we want to use a key and input the location of the key file. Then, we create the password file. In this example, we’ll output the password file to our C:passwords directory:
(get-credential).Password | ConvertFrom-SecureString -key (get-content C:passwordsaes.key) | set-content "C:Passwordspassword.txt"Now that we have our password file and our key file. We can simply recall our password from any script by including the following syntax in the script:
$password = Get-Content C:Passwordspassword.txt | ConvertTo-SecureString -Key (Get-Content C:Passwordsaes.key)
$credential = New-Object System.Management.Automation.PsCredential("Luke",$password)
When we look at the data inside the $credential variable we can see that we have the username and password now.
Wrap-Up
Each method has its own pros and cons. However, keep in mind that all of these ways are not 100% foolproof. So, I would not advise doing this with a domain administrator account. Just enough access (JEA) is the way to do it, so I would recommend creating an account with just enough access to do what it needs to do. How about you? What interesting ways have you used to get around the issue of storing credentials in plaintext? More articles about how MSPs can make the most out of PowerShell in their operations:
Building PowerShell Tools for MSPs: HTML Tables for Reporting
This post is part of a series on PowerShell for MSPs.How to Encrypt Passwords in PowerShell
Creating HTML reports with PowerShell is huge for MSPs. Imagine delivering a scheduled weekly report detailing critical information that a client wishes to see. Doing this on the fly sets your company apart from other competitors. Anything that can be queried with PowerShell can be compiled into an easily read HTML table that can be configured to run routinely and sent through email. Let’s see how to do that.Querying Information with PowerShell
In this example, we will pretend that we have a server that we want to be proactive about and monitor the disk space by generating an HTML report and emailing it to our IT department. To do this, we will run the following syntax to get all volumes on the server. Get-WMIObject will allow us to make a WMI call for all physical disks. We will then save this info into a variable called $disks:$disks = GET-WMIOBJECT win32_logicaldisk -filter "DriveType='3'"The disk information that we get looks like this:
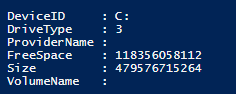 Notice that the FREESPACE and SIZE properties are not yet converted into bytes yet and can be hard to determine the proper value. For each disk on the server, we will want to arrange and convert the information so that we can easily create an HTML table out of it. We will do this by creating a ForEach statement and converting the sizes into GB format:
foreach($disk in $disks)
{
  $DriveLetter = $disk.DeviceID;
  $SizeGB = $disk.Size / 1GB -as [int]
  $FreeSpaceGB = $disk.FreeSpace / 1GB -as [int]
  $PercentFree = [math]::Round((1- ($freeSpaceGB/ $sizeGB)) * 100)
}
Creating the HTML Report
Now that the section is done for collecting our disk info, we can bring in the HTML. We will need to take the information for each disk and create an HTML column row for each disk, then, later, we will combine the column row pieces together to make one complete HTML table. To do this, we will add the following syntax into our ForEach loop. It will create a variable that contains an HTML column row of our disk information that we have queried. The </tr> tag means that we are starting a column row, and the <td> tag signifies a cell is being created in the column. At the end, we are adding each HTML column that we created for each disk to a variable so that we have the HTML columns for all disks$disks = GET-WMIOBJECT win32_logicaldisk -filter "DriveType='3'"
foreach($disk in $disks)
{
$DriveLetter = $disk.DeviceID;
$SizeGB = $disk.Size / 1GB -as [int]
$FreeSpaceGB = $disk.FreeSpace / 1GB -as [int]
$PercentFree = [math]::Round((1- ($freeSpaceGB/ $sizeGB)) * 100)
$dataRow = "
</tr>
<td>$DriveLetter</td>
<td>$SizeGB GB</td>
<td>$FreeSpaceGB GB</td>
<td>$PercentFree %</td>
</tr>
"
$diskreport += $datarow
}
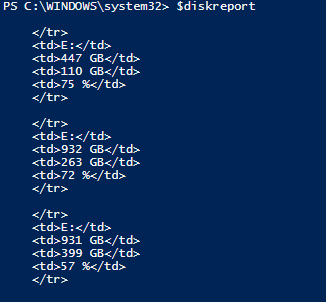
So after running this snippet that we have created we can see we have the information we want for each disk in HTML format:
 Now that we have our columns created for each disk, we need to put our HTML table together. First, we specify the <html> tag indicating that we are creating an HTML document. Next, we use the <style> tag to define the style of the HTML document, and in this example, we’ll use Arial and font size 13pt.
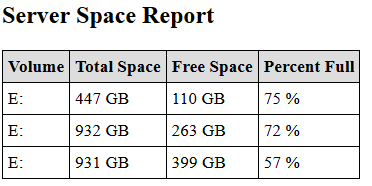
There are many different options to choose from, I recommend doing a little poking around online to figure out which style fits your report best. Next, we will start off with a header called “Server Space Report,” using the <h2> tag to specify the size of the header. Then we will use the <table> tag to specify we want to create a table and include the <tr> tag to specify the row and <th> to specify the header cell. Then we include our $diskreport variable, which contains the HTML piece that we put together before:
Now that we have our columns created for each disk, we need to put our HTML table together. First, we specify the <html> tag indicating that we are creating an HTML document. Next, we use the <style> tag to define the style of the HTML document, and in this example, we’ll use Arial and font size 13pt.
There are many different options to choose from, I recommend doing a little poking around online to figure out which style fits your report best. Next, we will start off with a header called “Server Space Report,” using the <h2> tag to specify the size of the header. Then we will use the <table> tag to specify we want to create a table and include the <tr> tag to specify the row and <th> to specify the header cell. Then we include our $diskreport variable, which contains the HTML piece that we put together before:
$report = "<html>
<style>
{font-family: Arial; font-size: 13pt;}
TABLE{border: 1px solid black; border-collapse: collapse; font-size:13pt;}
TH{border: 1px solid black; background: #dddddd; padding: 5px; color: #000000;}
TD{border: 1px solid black; padding: 5px; }
</style>
<h2>Server Space Report</h2>
<table>
<tr>
<th>Volume</th>
<th>Total Space</th>
<th>Free Space</th>
<th>Percent Full</th>
</tr>
$diskreport
</table>
<tr>
"
Now our HTML table is finished. If we output our $report variable to an HTML file and open it in a web browser, we can see the result, an easy-on-the-eyes HTML report:
Emailing the HTML Report
Now that we have our table created, let’s configure the rest of our script to send it via email to our IT department. To do this, we simply use the Send-MailMessage cmdlet and specify the -To and -From parameters as well as the –SMTPServer parameter. Also, we will include the $report variable in our -body parameter:Send-MailMessage -To luke@test.com -From ServerReport@test.com -Body $report -subject "Server Disk Space Report" -SmtpServer mysmtpserver.comNow we are done. When we run this script we get the disk space on the server, format it into HTML, and send it via email to our IT department. This script can be configured to run daily or whenever desired through task scheduler on the server. Here is our whole script:
$disks = GET-WMIOBJECT win32_logicaldisk -filter "DriveType='3'"

foreach($disk in $disks)
{
$DriveLetter = $disk.DeviceID;
$SizeGB = $disk.Size / 1GB -as [int]
$FreeSpaceGB = $disk.FreeSpace / 1GB -as [int]
$PercentFree = [math]::Round((1- ($freeSpaceGB/ $sizeGB)) * 100)

$dataRow = "
</tr>
<td>$DriveLetter</td>
<td>$SizeGB GB</td>
<td>$FreeSpaceGB GB</td>
<td>$PercentFree %</td>
</tr>
"
$diskreport += $datarow
}
$report = "<html>
<style>
{font-family: Arial; font-size: 13pt;}
TABLE{border: 1px solid black; border-collapse: collapse; font-size:13pt;}
TH{border: 1px solid black; background: #dddddd; padding: 5px; color: #000000;}
TD{border: 1px solid black; padding: 5px; }
</style>
<h2>Server Space Report</h2>
<table>
<tr>
<th>Volume</th>
<th>Total Space</th>
<th>Free Space</th>
<th>Percent Full</th>
</tr>
$diskreport
</table>
<tr>
"
Send-MailMessage -To luke@test.com -From ServerReport@test.com -Body $report -subject "Server Disk Space Report" -SmtpServer mysmtpserver.com
Wrap-Up
There are so many use cases for these HTML tables. I have created tons of HTML reports for various purposes. The latest reporting script I created was one that checks the HP iLO configurations on all servers in the environment to ensure that all the iLO settings are correct and then generates an email to report on the servers that are not up to “company standards.” Creating these nice looking HTML reports will be sure to impress your co-workers and clients. More articles about how MSPs can make the most out of PowerShell in their operations:The new Backup Bible
Discover
The Backup Bible
For complete guidance, get our comprehensive Backup Bible, which serves as your indispensable resource containing invaluable information on backup and disaster recovery.