by Andy Syrewicze | Apr 4, 2019 | Managed Service Providers
When it comes to infrastructure management, MSPs really have a rough go of it. Most internal IT Organizations have a flat network or at least multiple networks connected with the proper routing and network translation. These connectivity options make the management and patching burden for those internal IT departments much easier to wrap their hands around. MSPs don’t really have this luxury.
The typical MSP management story looks much like figure 1 below: you have multiple disparate customers, each with networks, subnets, and WANs. Maybe some of them even share the same IP scheme (192.168.1.0/24, anyone?). Some of them may have connected VPNs back to the MSPs. Most will not.
Some will use a collocated datacenter, and some will use the public cloud. This can make management at scale difficult because not only do MSPs have to reach the endpoints/servers they are looking to manage, but it must be done in a way that makes management of one system easy and does not affect the management of the others. With that said, let’s look at how MSPs can manage Hyper-V at scale.
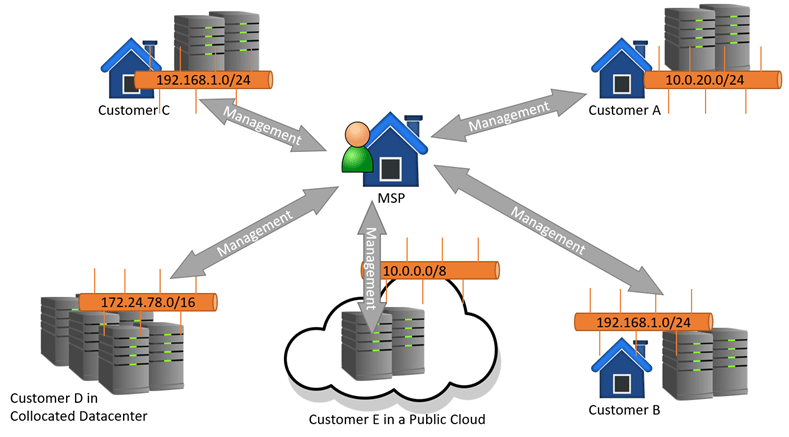 Figure 1: MSP Managing Multiple Sites with Multiple Similar or Dis-similar network segments
How to Manage Hyper-V at Scale
This article will focus on the few available tools that can help MSPs manage Hyper-V at scale specifically. Hyper-V is a core service that many MSPs leverage today. It can become difficult if you can’t manage it effectively at scale, like many solutions. Also, like other solutions, there isn’t a magic “one-size-fits-all” answer to this issue. What works for one MSP’s workflows and processes may not work for a different MSP. You’ll have to review the tools available and make your own judgments.
Before we start listing tools, it is worth noting that you’ll likely only have to do this with your larger customers. Most SMB customers running Hyper-V will be low-touch customers. In those situations, simply RDPing into the customer’s environment and making changes as needed will be enough. The tools mentioned below will likely be needed when you have a larger customer who has customized virtualization needs or makes frequent changes.
Let’s take a look.
Hyper-V Manager and Failover Cluster Manager
This is likely the simplest option. Many are apt to discard these tools in the scope of this discussion, but I would suggest otherwise. I’ve seen many MSPs who make it a common practice to set up VPN tunnels between their larger customers and their management locations. As long as it’s done properly, you can ensure there is no “cross-talk” between customer networks.
Once established, the Hyper-V Manager and Failover Cluster Manager (FCM) can be used just like they normally would if you were on-prem at the customer’s location. You may notice some latency, but nothing that is deal-breaking.
The problem with this option is that the MSP must ensure that their network does not become compromised by an outside attacker. If that happens, an attacker could potentially access all of the customer networks attached via VPN, which would obviously be VERY bad. You could help mitigate this by creating a separate “Management Network” that your engineers must connect to before attempting to manage customers.
The other issue with this approach is that when we’re talking about managing “at scale,” these tools don’t lend themselves well. When managing things at scale, you’ll want to automate certain tasks, and these tools don’t really allow for that.
System Center Virtual Machine Manager
This tool is something of a step up over the above. While I’ll be the first to tell most organizations that you don’t need SCVMM to use Hyper-V and will actively advocate that they don’t use it, my stance is a bit different for MSPs. You’d still use the VPN setup for your customers, as I mentioned above, but SCVMM does a better job of maintaining customer and “cloud” separation.
In SCVMM, you would define a private cloud for each customer consisting of their Hyper-V deployment and associated infrastructure (Storage, Network…etc). You would then see them as abstracted resources to be consumed within VMM for each customer location. It’s more to manage, but it does a better job managing multiple locations in this fashion.
One question that I’m commonly asked at this point is, what about running SCVMM over WAN? I wouldn’t recommend it. Any management traffic of any kind, I’m opposed to it traversing the public internet. At a bare minimum, it should go through an encrypted VPN tunnel. Even if you only establish said VPN tunnel when there is a management need.
One other thing to note. VMM is not a tool that requires little overhead. There are some fairly significant system requirements and ongoing maintenance. If you want something that provides as good of control but with less overhead, take a look at the next two options.
Your RMM Package
No MSP is complete without an RMM package such as Connectwise Automate or Continuum. Both tools (and others) provide the hooks and mechanisms to provide some management and monitoring overhead of your Hyper-V systems. Many MSPs will opt for this option because it already fits in well with their existing workflows and processes. Additionally, VPNs are often not a requirement here because most RMM platforms have been designed to avoid that requirement.
The capabilities are not uniform across all RMM platforms, and you’ll want to take a look at your own platform’s documentation to see exactly what type of management options there are for Hyper-V.
NOTE: Interested in RMM platforms and other MSP tools? Check out our MSP tool comparison guide!
PowerShell
Regardless of that, one thing all of these platforms have in common is the ability to manage and execute PowerShell scripts against managed endpoints, including Hyper-V Hosts. The Hyper-V PowerShell Module is VERY mature, and anything you can do in the management GUIs (and more) can be done using PowerShell. For example, all the below common tasks can be done using PowerShell:
- Start/Stop VMs
- Take Checkpoints
- Configure Virtual Machine Settings
- Configure Hyper-V Host Settings
- Configure vNICs and vSwitches
- Manage VHD(X)s
- Deploy new VMs
- Migrate VMs
- Etc….etc…..
You can script any Hyper-V task/function you desire and then use your RMM toolkit to deploy and execute said script. Need some ideas on what sort of things to do? Jeff Hicks, one of our Altaro Hyper-V authors, has some amazing articles on using PowerShell to work with Hyper-V.
Wrap-Up
Choosing and standardizing one of the options listed here can make managing customer virtualization infrastructure easier and more effective. You’ll want to research each option and determine which is right for you and your customers. Remember, though, what works for you may be a combination of all these options!
What about you? Do you have any management stories about trying to manage Hyper-V for your customers? What worked? What didn’t?
Thanks for reading!
by Luke Orellana | Feb 8, 2019 | Managed Service Providers
I’ve seen a lot of discussions online recently from IT Pros who work for managed service providers who are finding it difficult to use PowerShell in their environment. Let’s be honest, there are many hurdles to overcome in the MSP workspace. You are managing multiple customers, and typically, they all have their own domains and networks.
Each customer environment has its own unique IT ecosystem, and most of the time, you can’t just do an Invoke-Command from your laptop at your desk to manage them. One of the best ways to help with this is with automation and a better understanding of what PowerShell is capable of. It’s much easier to automate tasks when you know what you can (and cannot) do with PowerShell. To help you get a little bit of an idea, I’m going to go over 7 PowerShell techniques in this post that you can use to help you supercharge your MSP operations.
This article is a great introduction for newcomers to using PowerShell in an MSP setting but also for current users who may learn a thing or two about optimal applications. Let’s get started!
1. Using SFTP For Transferring Files
This one is HUGE. Transferring files back and forth between a customer location opens up so many doors for automation. Many situations can take advantage of this, such as pushing installation files to client workstations, but one unique way that I’ve used this on in the past was when troubleshooting network issues.
We had a customer who was intermittently dropping internet connectivity every day. They were getting upset with us that it was happening and wanted us to fix it. Their ISP could see that they were overusing their connection, causing it to appear like it was cutting in and out. Now the witch hunt started; who was using all the bandwidth?
They didn’t have expensive network equipment that allowed them to audit bandwidth consumption on devices, so options were limited. I ended up creating a script that would run for hours at a time and create a log file on the workstations of network traffic on the NIC. It would then upload the log hourly to our SFTP server.
We used our RMM agent to deploy this script to all the customers’ workstations, and when they were having bandwidth issues, we analyzed each workstation’s log files on the SFTP server and determined the culprit. As you can see, there are many situations where SFTP can be used with PowerShell.
2. Encrypting Passwords to Run Scripts
One of the hurdles when creating scripts is securing access for a specific user to run a certain script. Maybe you have a customer who wants their managers to be able to run a specific automated task for HR.
The ability to encrypt passwords allows one to create service accounts that can be used in combination with encrypted password files to allow end-users to run their automated tasks in a secure way. Not to mention, this is useful for your own scripts as well!
Learn how to encrypt passwords using PowerShell
3. HTML Reports
In my eight years of working for an MSP, I’ve encountered countless situations where a customer asked for a specific report that our current systems could not create. Luckily, Powershell can be used to create custom HTML reports that look professional and can be emailed to out on a schedule.
One example I’ve had in the past was a customer who was working on a big application rollout and was going to be creating multiple VMs on their Hypervisor cluster. He wanted to have a daily report on the redundancy state of his cluster, meaning it was able to host all the VM workloads in the event of a host failure.
We created an HTML report that would calculate the host resources and provide an email with an HTML table specifying the host resources and whether or not it was “N+1”. The client was very grateful that we were able to accommodate his request.
Learn how to create custom HTML reports using PowerShell
4. Ticketing systems and APIs
Ticketing systems are the bread and butter of an MSP. Automating processes into your ticketing system can produce game-changing efficiency in the company. Many ticketing systems with PowerShell modules are already available on the Powershell Gallery. These modules can provide the ability to create and search through tickets.
Also, using Powershell with restful APIs is another must-have technique that allows PowerShell to interact with other applications and services (Like your ticketing system). This option can open so many doors for automation in the MSP workspace, and the sky is the limit. I’ve found it’s simply best to start tinkering with this option and see what it can do for you in your own individual case.
Learn how to use PowerShell to optimize your ticking system
5. Deploying Software
Powershell can be used in combination to quickly deploy software to workstations. This has saved me many hours and trips to customer sites. One time, I had a customer call into the helpdesk in a panic because they upgraded their main business software, and the current version of Java on the workstations was no longer compatible. In a matter of minutes, we were able to use PowerShell and our RMM agent to push out the Java upgrade to all the workstations.
6. Windows Updates
There are many useful PowerShell modules out on the PowerShell Gallery. I recommend you take a peek at it if you haven’t already. One of the most useful Modules I’ve found was PSWindowsUpdate. This module allows IT Pros to manage Windows Updates with PowerShell.
This can be used as a step to build scripts or just whenever you need it! I can’t count how many times I’ve built a server and had to manually kick off Windows updates for a few hours to get the OS up to date. It can also be used to remotely kick off Windows Updates on a large list of workstations across multiple customers, making the mass rollout of a zero-day patch, for example, much easier and less time-consuming.
Learn how to manage Windows Updates using PowerShell
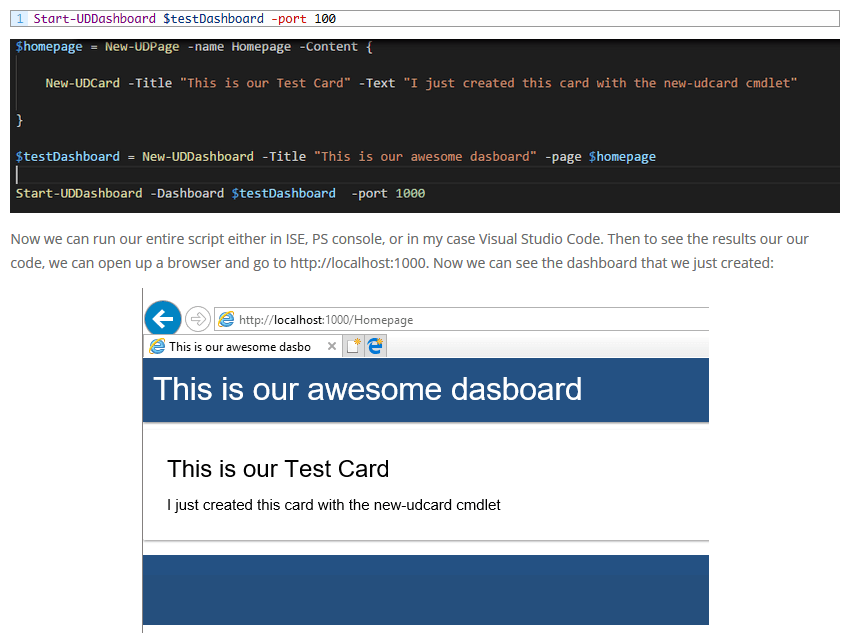
7. Dashboards
The PowerShell Universal Dashboard module is one of the greatest modules in the PowerShell community. This allows one to create their own customized dashboards, and they look amazing! For MSPs, this is a great tool that can display and analyze data for customers and internal use.
I recommend checking this out and playing around with it. Just like the API section listed above, this is one you have to tinker with and see how it can fit into your own MSP workflow. It will; you just need to figure out exactly what your needs are first.
 Learn how to be a pro with the PowerShell Universal Dashboard
Wrap-Up
Powershell isn’t always going to fit into every solution (though it will come close!), and with the complexity of a Managed Service Provider business, it can be rather difficult at times. However, in knowledgeable hands, it can be used to overcome many challenges in the MSP workspace.
Thanks for reading!
by Luke Orellana | Jan 31, 2019 | Managed Service Providers
Building a web scraping tool can be incredibly useful for MSPs. Sometimes, there isn’t always an API or PowerShell cmdlet available for interfacing with a web page. However, there are other tricks we can use with PowerShell to automate the collection and processing of a web page’s contents.
This can be a huge time saver for instances where collecting and reporting on data from a web page can save employees or clients hundreds of hours. Today, I’m going to show you how to build your own Web Scraping tool using PowerShell. Let’s get started!
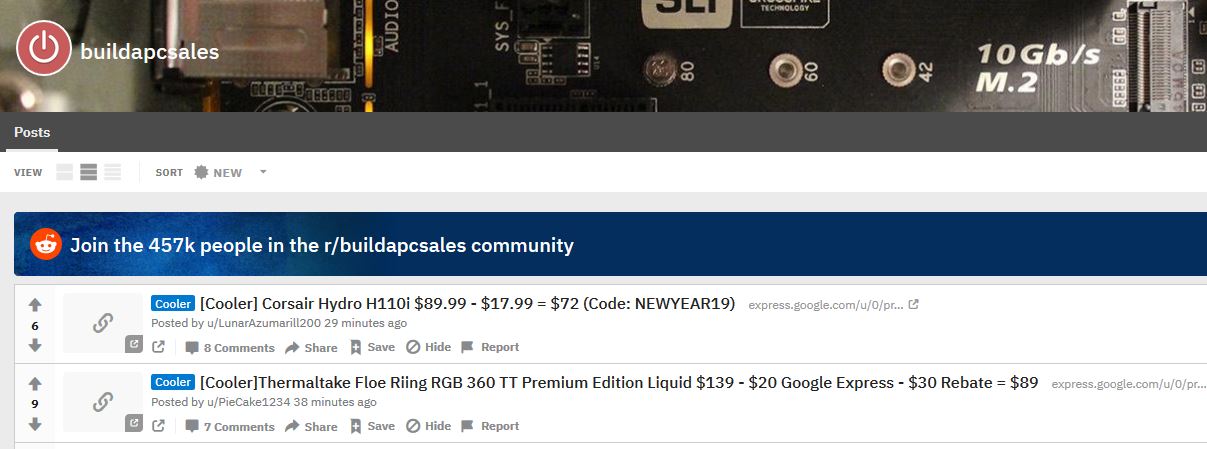
We are going to scrape the BuildAPCSales subreddit. This is an extremely useful web page as many users contribute to posting the latest deals on PC parts. As an avid gamer such as myself, this would be extremely useful to check routinely and report back on any deals for the PC parts I’m looking for.
Also, because of the limited amount of stock for some of these sales, it would be extremely beneficial to know about these deals as soon as they are posted. I know there is a Reddit API available that we could use to interface with but to demonstrate making a web scraping tool, we are not going to use it.
Web Scraping with Invoke-WebRequest
First, we need to take a look at how the website is structured. Web Scraping is an art since many websites are structured differently; we will need to look at the way the HTML is structured and use PowerShell to parse through the HTML to gather the info we are looking for. Let’s take a look at the structure of BuildAPCSales. We can see that each Sale is displayed with a big header that contains all the info we want to know, the item and the price:
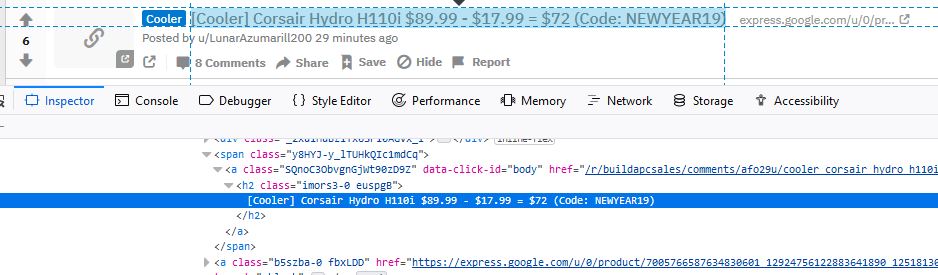
 Now, let’s use the Web Developer tool in our browser to inspect the HTML portion of these posts further. I am using Firefox in this example. I can see that each Post is tagged in HTML with the “h2” tag.
 Let’s try scraping all of our “h2” tags and see what we come up with. We will use the Invoke-WebRequest PowerShell cmdlet and the URL to the Reddit webpage and save it as a variable in order to collect the HTML information for parsing:
$data = invoke-webrequest -uri "https://www.reddit.com/r/buildapcsales/new/"
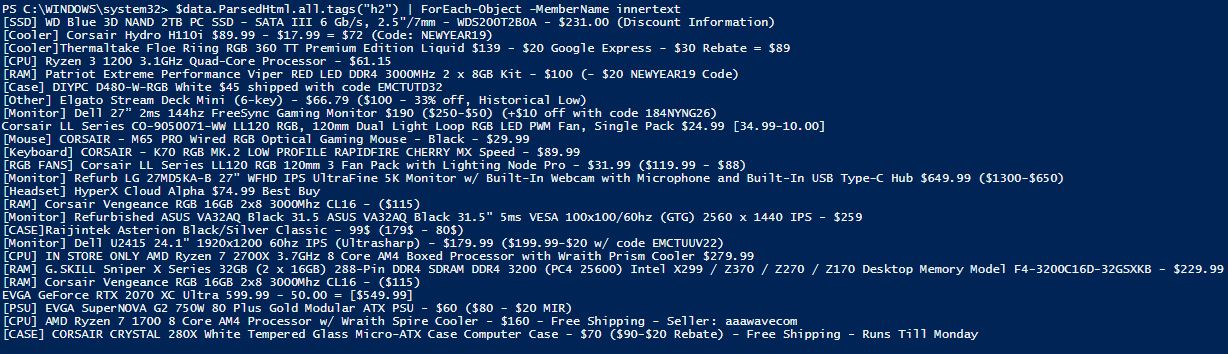
Now we are going to take our new variable and parse through the HTML data to look for any items tagged as “h2”. Then we will run through each object and display the “innertext” content which is the text content of the tag we are searching for:
$data.ParsedHtml.all.tags("h2") | ForEach-Object -MemberName innertext
Yay, it worked! We are able to collect all the deals posted:
 I like what we have so far, but I don’t only want the post headings but also the links for each sale. Let’s go back and look at the webpage formatting and see what else we can scrape from it to get the links. When using the inspection tool in Firefox (CTL + SHIFT + C) and clicking on one of the sale links, I can see the HTML snippet for that post:
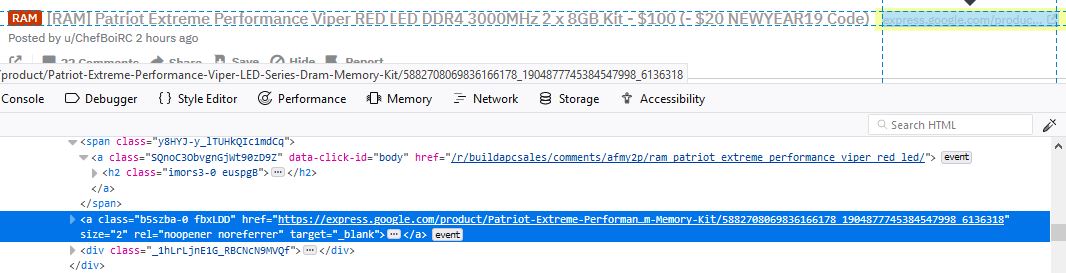 It looks like these are tagged as “a,” which defines a hyperlink in HTML. So we want to run a search for all HTML objects tagged as an “a,” and we’ll want to output the “href” for these instead of the “innertext” as we did in the example above. But this would give us all hyperlinks on this page. We need to narrow down our search more to only pull the links that are for sales. Inspecting the web page further, I can see that each sale hyperlink has the class name “b5szba-0 fbxLDD”. So, we’ll use this to narrow our search:
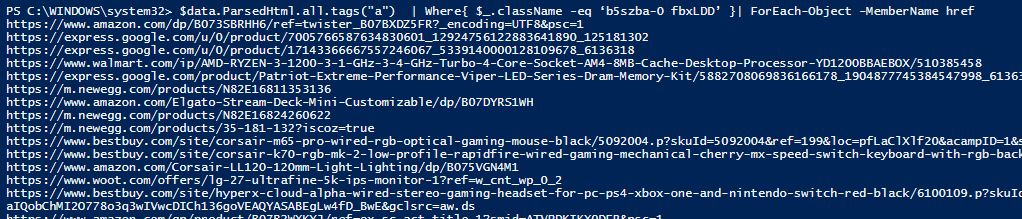
$data.ParsedHtml.all.tags("a") | Where{ $_.className -eq ‘b5szba-0 fbxLDD’ }| ForEach-Object -MemberName href
Now we have the links to the items for each post. We now have all the information we are looking for:
Processing Our Web Information
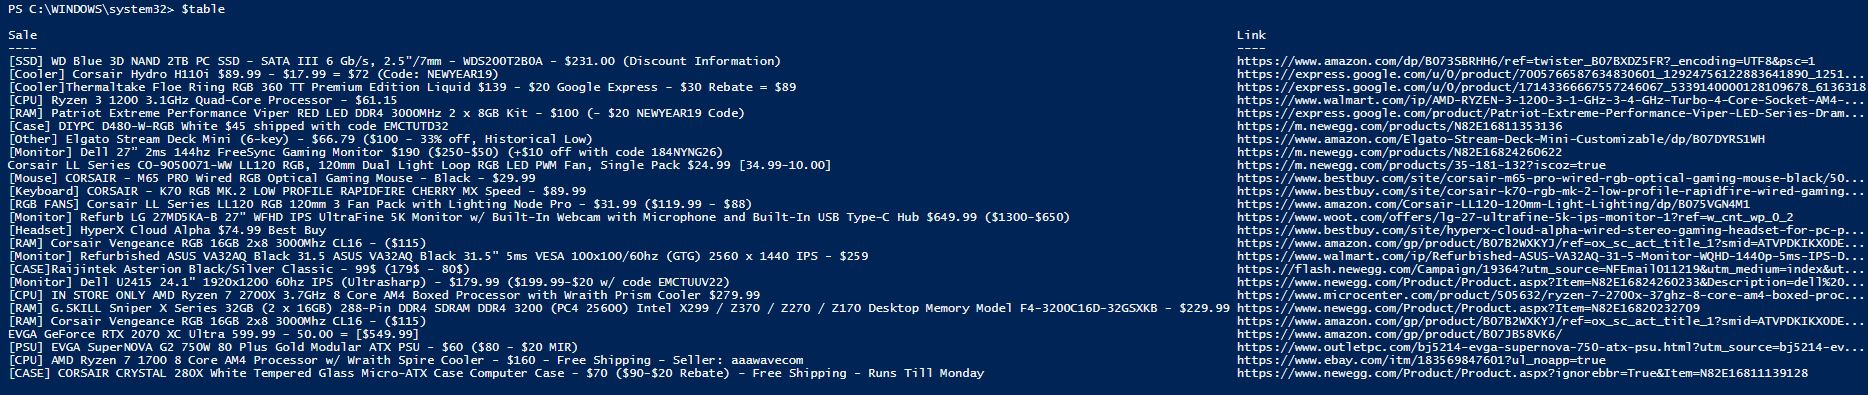
Now that we have the information we want, we need to process it, I would like to create a table for each sale and its respective link. We can do this by using the following syntax:
$data = invoke-webrequest -uri "https://www.reddit.com/r/buildapcsales/new/"

$Sales = $data.ParsedHtml.all.tags("h2") | ForEach-Object -MemberName innertext
$Links = $data.ParsedHtml.all.tags("a")  | Where{ $_.className -eq ‘b5szba-0 fbxLDD’ }| ForEach-Object -MemberName href


Foreach ($Sale in $Sales)
    {
    $index = $sales.IndexOf($sale)
    $row = new-object -TypeName psobject
    $row | Add-Member -MemberType NoteProperty -Name Sale -Value $sale
    $row | Add-member -MemberType NoteProperty -Name Link -Value $links[$index]
    [array]$table += $row
    }
When we go to look at our $table, we can see the correct info:
Taking It Further
Now, let’s take it a step further and make this web scraping script useful. I want to be notified by text if there is a specific sale for a PC component that I’m looking for. Currently, I’m searching for a good 144hz monitor. So, to get notified of the best deals, I created a script that will run as a scheduled task on my computer every 15 minutes.
It will scrape the Reddit web page for any monitor deals and notify me of the deal via text. Then, it will make a note of the deals that have been sent to me in a text file to ensure that I’m not getting spammed repeatedly with the same deal. Also, since I don’t have an SMTP server at my house, I’ve set up a g-mail account to send email messages via PowerShell. Since I want to receive these alerts via text and not email, I am sending the email alerts to my phone number, which can be done with each popular carrier.
I’m using Google Fi, so I just simply put in my phone number with @msg.fi.google.com, and the email goes right to my phone as a text. I’ve also encrypted my g-mail account password into a file using the process outlined in our blog post about encrypted passwords in PowerShell. After everything’s done, the syntax will look like this:
#Edit this to change the string to web scrape for
$PCPart =  "Monitor]"
#Edit this to change the email address to send alerts to
$EmailAddress = "1234567890@msg.fi.google.com"

#Collect information from web page
$data = invoke-webrequest -uri "https://www.reddit.com/r/buildapcsales/new/"

#filter out headers and links
$Sales = $data.ParsedHtml.all.tags("h2") | ForEach-Object -MemberName innertext
$Links = $data.ParsedHtml.all.tags("a")  | Where{ $_.className -eq ‘b5szba-0 fbxLDD’ }| ForEach-Object -MemberName href

#create table including the headers and links
Foreach ($Sale in $Sales)
    {
    $index = $sales.IndexOf($sale)
    $row = new-object -TypeName psobject
    $row | Add-Member -MemberType NoteProperty -Name Sale -Value $sale
    $row | Add-member -MemberType NoteProperty -Name Link -Value $links[$index]
    [array]$table += $row
    }


#analyze table for any deals that include the PC Part string we are looking for
If ($table.Sale -match $PCPart)
    {
    $SaletoCheck = $table | where-object {$_.sale -match $PCPart}
    ForEach($sale in $SaletoCheck)
        {
            if ((Get-Content C:\scripts\SaleDb.txt) -notcontains $sale.link)
            {
                #Save link to text file so we don't send the same deal twice
                $sale.link | out-file C:\scripts\SaleDb.txt -Append

                #obtain password for gmail account from encrypted text file
                $password = Get-Content "C:\Scripts\aespw.txt" | ConvertTo-SecureString
                $credential = New-Object System.Management.Automation.PsCredential("lukeautoscript@gmail.com",$password)

                $props = @{
                    From = "lukeautoscript@gmail.com"
                    To = $EmailAddress
                    Subject = $sale.sale
                    Body = $sale.link
                    SMTPServer = "smtp.gmail.com"
                    Port = "587"
                    Credential = $credential
                    }
                Send-MailMessage @props -UseSsl
              }
        }
    }
We wait for a sale for a good monitor to pop up and see our end result:

Wrap-Up
As you can see, web scrapping tools can be incredibly powerful for parsing useful web pages. It opens up so many possibilities to create useful scripts that one might think were not possible. As I said previously, it is an art; a lot of the difficulty depends on how the website is formatted and what information you are looking for.
Feel free to use my script in the demo if you want to configure your own notifications for PC part deals. If you’re curious, I ended up getting a good deal on an Acer XFA240, and the picture looks amazing with 144hz!
by Luke Orellana | Dec 21, 2018 | Managed Service Providers
If you don’t use automation in your MSP then quite frankly, you’re doing it wrong. It’s pretty much the standard way of doing things these days and if you’re not doing it, your competitor is and will probably be providing a better service because of it. For MSPs, having an employee that is proficient with PowerShell is far more valuable than those who don’t. In fact, Jeffery Snover, the founder of PowerShell, predicts that in the future those who refuse to learn some sort of automation language like PowerShell will gradually become replaced by those who do. The skill set is that vital to a company.
Imagine a scenario where we need to know if a specific event has occurred in the event logs on all client servers. If we had no one with PowerShell skills, we would have to manually dig through the event logs of each server and spend hours filtering through each one. On the other hand, if we have an employee who is adept at PowerShell they can write a script that will automatically dig through the event logs of each server and report back if the event exists. The benefit is just incomparable, which is why it is important for employees to be trained up on how to use PowerShell.
Luckily, there are free community-driven tools like PSKoans that allow IT Pro’s to interactively learn and practice PowerShell to improve their skills and worth to the company.
What is PSKoans?
PSKoans is a project on GitHub started by Joel Sallow. It allows users to learn and practice PowerShell right through the console by providing “challenges” or “questions” that must be completed before progressing on to more challenging questions. The questions start off simple and eventually progress to intermediate and advanced PowerShell concepts. The module makes clever use of Pester, which is an automated unit test framework for PowerShell. It provides an interactive way to learn PowerShell by using PowerShell!
How to Install
You can literally start using PSKoans within 5 minutes. All you need to get started is a machine with PowerShell 5.1 or higher (PowerShell Core included). Just open up an Administrative PowerShell console of the required version and run the following command to install the Pester module (if you already don’t have it installed):
Install-Module -Name Pester
After the Pester module is installed, we can now install the PSKoans module by using the same Administrative PowerShell console:
Install-Module -Name PSKoans
Now we are set to start using PSKoans. Simple, right? Because of the ease of installing PSKoans, it really makes this tool a “must have” tool for employees to use for “sharpening” their PowerShell skills.
How It Works
Now that we just installed PSKoans in under 5 minutes, let’s get started using it. To start using PSKoans, simply open up a PowerShell console and type:
Measure-Karma
Now, the journey begins! Because this is all done through the PowerShell console, it may be a little confusing at first, but let’s go over what we are looking at. The goal is to reach “Enlightenment” by completing each challenge. The first challenge is in the red text. The script-block shown is incorrect and we need to input the correct answer where the “_” symbol is. For the first question, the expected outcome is $true but we are currently getting null with this comparison script block. We need to edit the “AboutAssertions.Koans.ps1” file with the correct syntax and run a pester test against the koan to check if we pass the question: 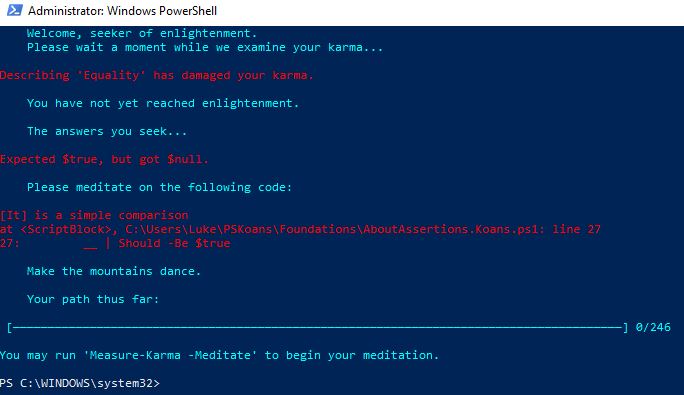 Let’s answer the first problem by running the following command to open up the .ps1 and edit line 27 to contain the proper code:
Measure-Karma -Meditate
The command checks if Visual Studio Code is in $env:Path and will open up VSCode to use for editing the .ps1 files: 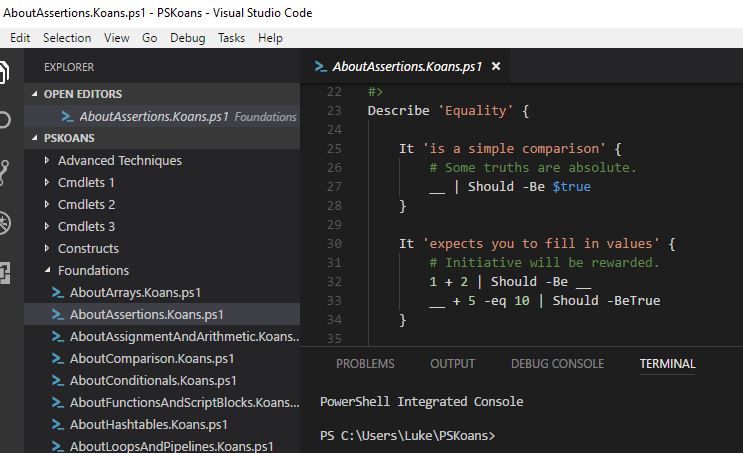 Otherwise, it will simply open up the Koan’s folder directory in Explorer which is housed in UserFolder\PSKoans, in this case, we will just want to open up the .ps1 file with PowerShell ISE (or even better, install Visual Studio Code, its FREE!):
 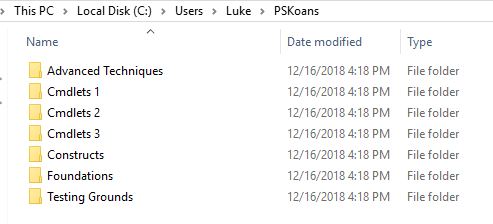 To answer the question, we replace the “_” on line 27 with “$true” and save the file:
 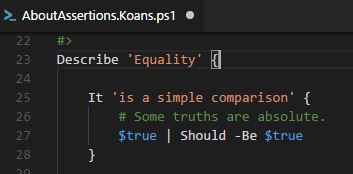 To check out the answer we re-run Measure-Karma since we entered the correct answer we are now on to a new “Koan”, also we can see in the Path Thus Far section that we have 1 out of 246 questions correct now:
 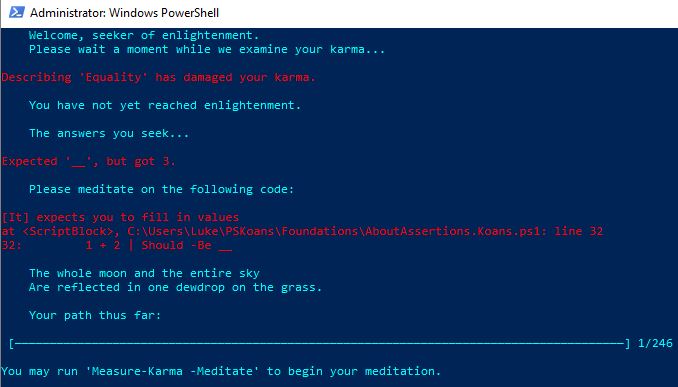 Now, on to the next Koan. Check out the GIF below which demonstrates me answering the next Koan:
Want to learn more about how PowerShell can help you? Read on
Building PowerShell Tools for MSPs series
Further PowerShell reading
by Luke Orellana | Dec 20, 2018 | Managed Service Providers
We all know that Automation for Managed Service Providers can provide huge benefits. In the past, I’ve written about automating many components of IT. However, I believe that one of the most efficient gains an MSP can obtain from automation is through automating their ticketing system.
The ticketing system is the core of any MSP’s service delivery. It provides the tracking of incidents as well as documented historical data on client resources. An MSP that can find a way to bring automation to their ticketing system and integrate it with other internal processes and technologies puts them leaps and bounds ahead of the next competitor and is one step towards the future of how MSPs operate.
Having the ability to perform automated processes based on ticket creation opens up so much potential for automated workflows for clients.
For example, tickets are automatically created for servers with low disk space – An automated “disk cleanup” process can be run against servers specified in these tickets for automated self-healing, which can provide faster reaction time and reduce operational strain on staff resources!
Not only do we get the ability to provide automated self-healing on tickets, but we also use PowerShell to perform additional queries on ticket data. This can be extremely useful in cases where the native reports in the ticketing system don’t measure up. If we can use Powershell to quickly sort through ticket data for clients, we can manipulate the data and create useful reports for information that we wouldn’t normally be able to gather.
How To Find PowerShell Cmdlets for My PSA
The automation movement in IT is growing larger and larger each year. Some vendors know this and publish their own PowerShell cmdlets for their products. At the very least, most have some REST API that can be manipulated with PowerShell’s Invoke-Restmethod cmdlet. The “I want it done now” theme is starting to become extremely common in IT, and we are now in an era where PowerShell vendors and community-made cmdlets for 3rd-party applications are starting to become a norm.
One of the most promising platforms for finding PowerShell modules is the PowerShell Gallery. This is an online repository of PowerShell Modules that anyone can download and use instantly. Also, many of these modules start as projects on GitHub. GitHub is a public software development platform that allows developers to upload their code and collaborate with others around the world on projects. This movement has allowed for many interesting projects to come about, and PowerShell modules for certain applications are one of them.
I recommend checking out both the PowerShell Gallery and GitHub for any PowerShell-related projects available for your current Ticketing System. Just like how IT pros use Google to find information about a certain issue they are trying to resolve, it is now a necessary skill to be able to search for available PowerShell cmdlets and use them to fix certain scenarios.
One scenario I ran into a year or so ago was when I was working with a file system archiving application. I was tasked with running configurations on hundreds of folders, and it would have taken a few hours to perform this task manually. However, I did some digging around on the PowerShell gallery. I found that someone had published a module for this application, and within 10 minutes, I had a script that was automatically performing my tasks for me.
3 Popular MSP Ticketing Systems and PowerShell Modules for Automation
Below, I have outlined GitHub projects for three of the most commonly used ticketing systems today. For the sake of time, I won’t go into how to use each one. I am just providing the links to the current projects and directions on installing the modules. If your ticketing system is not one of them, I recommend searching for it on PowerShell Gallery first to see if there is a module published for it yet. If nothing turns up, dig on GitHub to find out if someone has created a project for your PSA application
Service Now
Install the modules by running the following syntax in an administrative PowerShell Console:
install-module ServiceNow
Check out the Github project documentation here.
Connectwise
Install the modules by Downloading the .zip file from the GitHub project. Extract the contents of the .zip, and Import the module by using the following syntax:Import-Module "PathToModuleFolder\PSConnectWise.psm1" -Force
Check out the GitHub project documentation here.
Auto Task
Install the modules by Downloading the .zip file from the GitHub project. Extract the contents of the .zip, and Import the module by using the following syntax:Import-Module "PathToModuleFolder\Autotaskcli.psm1" -Force
Check out the GitHub project documentation here.
Wrap Up
For an MSP, having the ability to integrate their ticketing system with other applications and scripts can open up many doors for efficiency and standardization. There are many projects on GitHub where developers can come together and create a tool for many. Again, this is starting to become a norm, and MSPs need to learn to take advantage of this to become more efficient with the services they are selling.
Thanks for reading!

by Luke Orellana | Nov 29, 2018 | Managed Service Providers
Worried artificial intelligence will take over the world? Well, it doesn’t look like that’s happening any time soon. But one thing AI can help you with is to take your MSP to new levels. How so? Well, it’s all thanks to Azure AI.
Artificial Intelligence has become a big buzzword within the IT world. Companies like Microsoft have been heavily investing in AI projects and are now allowing companies to take advantage of this through their Azure Cognitive Services.
One of the recently released cognitive services that they are offering is the custom vision service, which allows companies to use Microsoft’s machine learning algorithms to analyze images and classify them however they desire. Managed Services Providers can now harness this power in their own PowerShell scripts to provide even more automation for their clients.
For example, we’ll make up a simple scenario. Let’s say, as an MSP, we want to start offering clients a “rack organization” service, where we will go onsite and organize their racks and clean the cabling up. We need to determine which clients could benefit from this service so we can target them.
This would require going through each client’s rack picture in our client documentation to determine which ones require some rack cleanup. Then, we can reach out to each client and offer additional services for organizing their server racks. However, we can automate this process with Azure’s Custom Vision service. Let’s see how to do that.
Getting Started
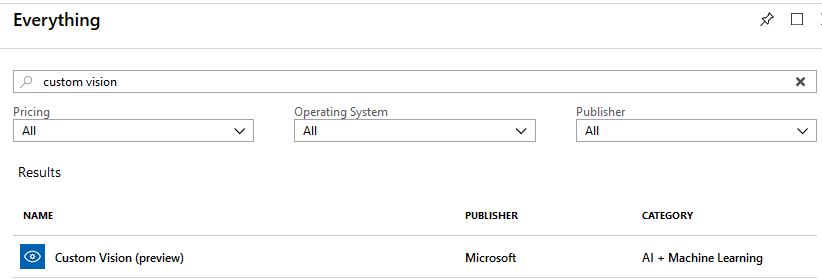
To get started creating our own Custom Vision API, we need to go to Azure. If you don’t have an account then you can sign up for one. Once logged in, go to Create a Resource on the left-hand side and type in Custom Vision. This is currently in the preview stage right now, so there will be a “Preview” next to the service. Go ahead and select it:
 We will name our new resource LukeLab-CustomVision. Fill out the information for pricing, location, and resource group. Make sure you read up on how the pricing works, it is calculated based on how much you use the API. Click Create when done:
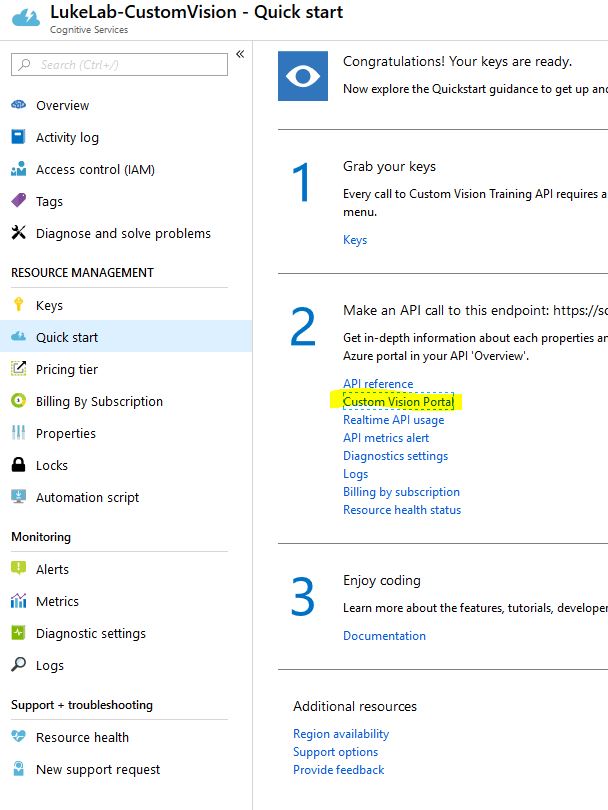
 Wait a little bit for the resource to finish deploying. Once we are all set we can now start training our API to classify images of our server racks. Navigate to the resource and select the Custom Vision Portal option under Quick Start:
 Now click the Sign In button and we will be navigated to the custom vision web page:
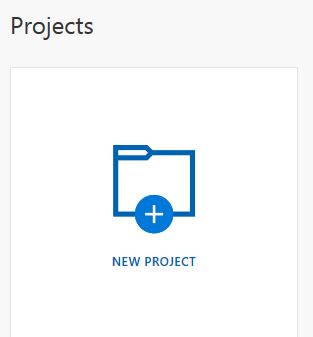
 Let’s get set up with a new project, click New Project:
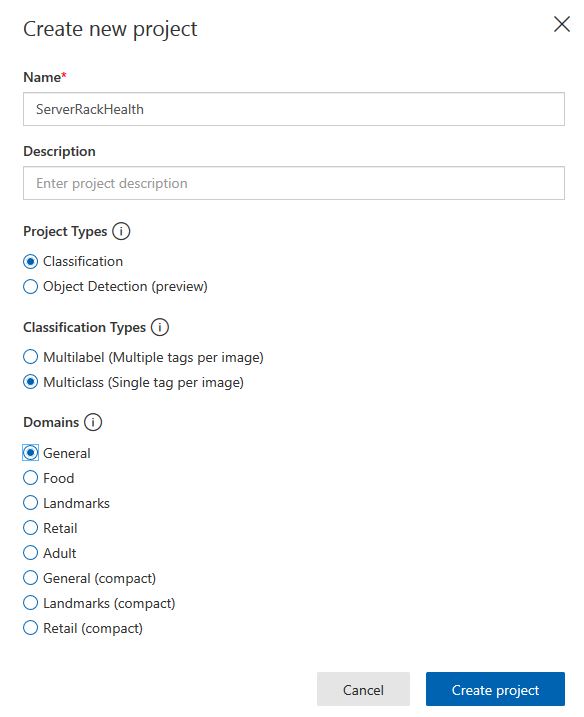
 We will call our project “Server Rack Health” and set the project type to Classification as we want to look at a picture and classify it as something. Since we just want to classify each image as either good (organized and neat rack) or bad (messy cabling and needs cleanup) we will choose the Multiclass setting. Now we can select Create Project:
Training Our API
Now that we are all set up, we can begin uploading pictures and training our classifier to detect a messy server rack. The more pictures uploaded, the more accurate the prediction will be. I’m not going to go into detail on the classifier because that would need an entire post in itself, but I recommend checking out this guide for more information on how to train your classifier.
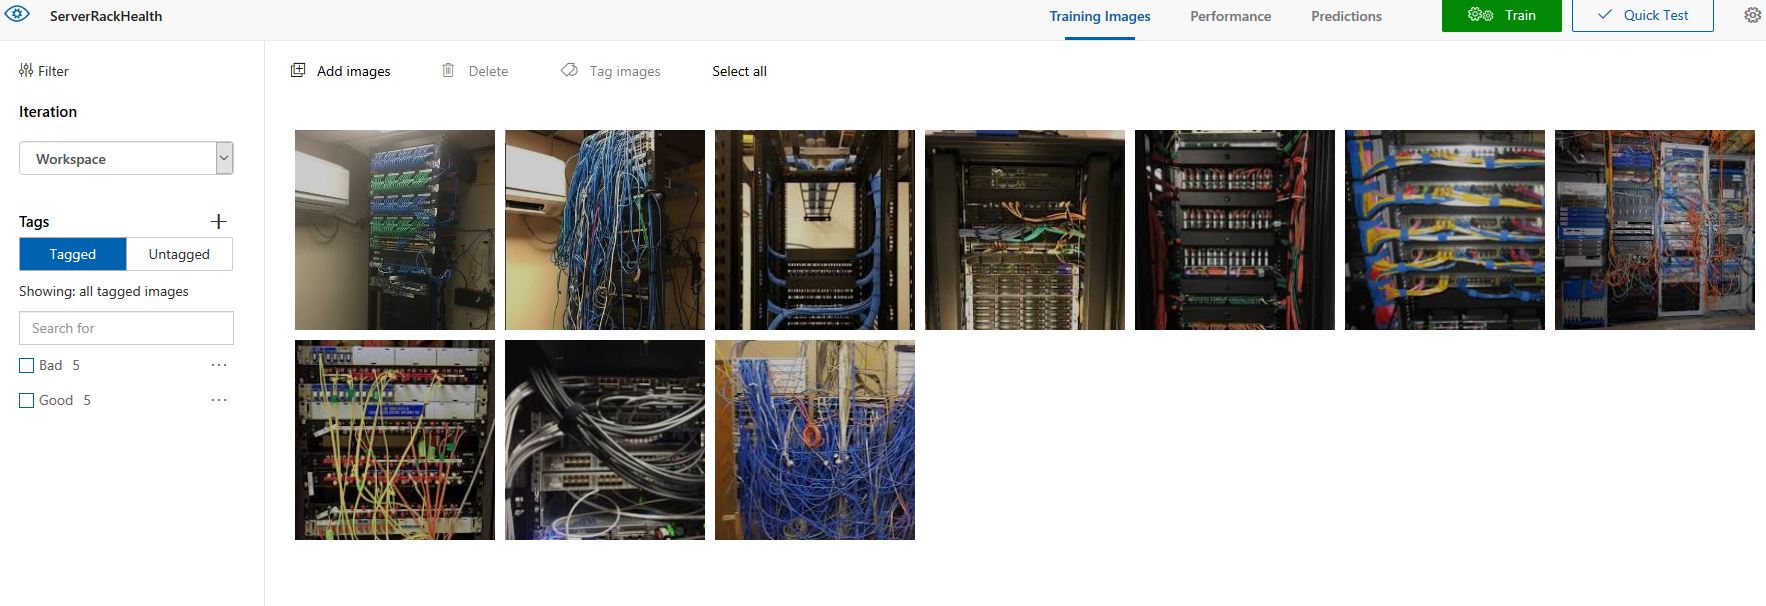
What I have done is upload ten pictures and classify them as either good or bad. Then, I have trained the classifier to determine which pictures contain a good rack or a bad rack:
Using the Custom Vision API in PowerShell
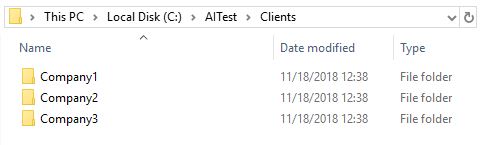
So now that we have our classifier trained. We have our folder set up with 3 client-server rack pictures:
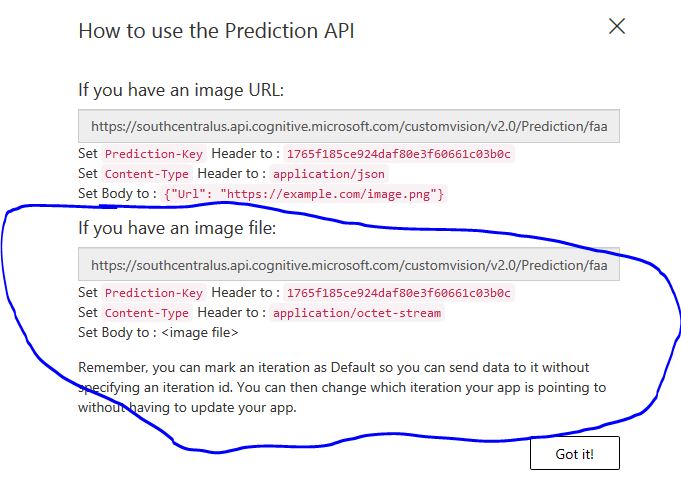
 Now we can use PowerShell to upload each photo to our Custom VIsion API to analyze the image and classify it as “good” or “bad”. To do this we need a few keys from our Custom Vision Resource and Azure makes it extremely easy to get this information. Select the Performance tab of our classification that we made on the Custom Vision Web Page. Then click on the Prediction URL to get our keys:
 There are two different sets of URL’s one is for if we are analyzing images on the web (which could be amazing for analyzing pictures across the internet) the other, which we are using, is for uploading an image from a file on our computer to the API. So we will save the info from the second group:
 Now comes the magic, we need to establish our keys in our code first in order to properly communicate with the Custom Vision REST API, so we will set the following variables:
$header = @{'Prediction-Key'= '1765f185ce924daf80e3f60661c03b0c'}
$url = "https://southcentralus.api.cognitive.microsoft.com/customvision/v2.0/Prediction/faa8a0a3-2a36-46d0-b3d0-3a661712a59f/image?iterationId=4489e653-85bd-4da8-bc92-a647efa83eb0"
$Method = "POST"
$ContentType = "application/octet-stream"
Since all these variables will be used as parameters, let’s clean it up a bit and split them:
$properties = @{
    Uri         = $url
    Headers     = $Header
    ContentType = $ContentType
    Method      = $Method

}
Now we will collect all of our image files in our “clients” folder. In our case, the server rack pictures are all .jpg files. So I’m using the Where-Object cmdlet to grab any .jpg files in our “clients” folder:
$photos = Get-childitem "C:\AITest\Clients" -Recurse | where-object {$_.name -like "*.jpg"}
Lastly, we can create a ForEach loop to run through each picture in our $photos variable and upload each image to the Custom Vision API which then analyzes the image and classifies it according to the classifier that we built in the previous steps. I would also like the script to return the full name of the image as well as the prediction result:
Foreach($picture in $photos) {
$info = (Invoke-RestMethod @properties -InFile $picture.FullName).predictions
$picture.FullName
$info | Sort-Object -Property probability | Select-object -ExpandProperty TagName -Last 1
}
When we run the ForEach Loop, we get our file name and prediction:
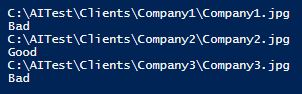 As we can see, the Custom API did a great job with classifying each rack:
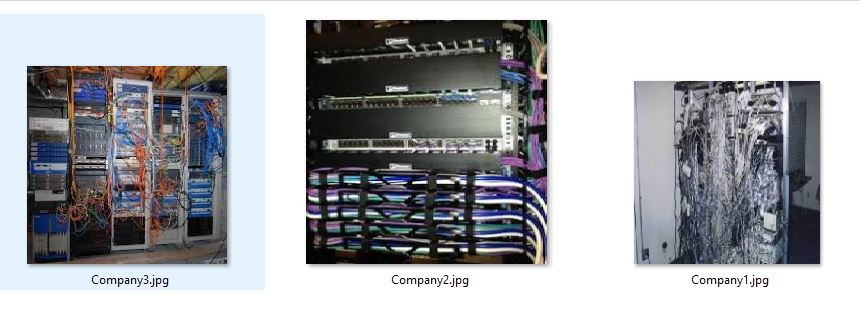 If we wanted to, we could take our script a step further and automate the process of emailing each client with a picture of their server rack and explain the new MSP “Server Rack Cleanup” offering. This is just a simple example of what types of feats can be done when utilizing artificial intelligence with our PowerShell scripts.
As AI services like these get more and more advanced, we will start to see more of an appearance of AI in the IT workspace. Managed Service Providers that are able to find these “niches” that utilize AI will be able to assist their clients and provide services on another level compared to their competitors.
If we wanted to, we could take our script a step further and automate the process of emailing each client with a picture of their server rack and explain the new MSP “Server Rack Cleanup” offering. This is just a simple example of what types of feats can be done when utilizing artificial intelligence with our PowerShell scripts.
As AI services like these get more and more advanced, we will start to see more of an appearance of AI in the IT workspace. Managed Service Providers that are able to find these “niches” that utilize AI will be able to assist their clients and provide services on another level compared to their competitors.