

How to Create a New Virtual Machine from a Hyper-V Snapshot
Without a doubt Hyper-V snapshots can be quite useful. They make software and systems testing a little less stressful because you know you can roll back any changes. They can provide a “quick and dirty“ backup solution. Or you can use them as starting points for new virtual machines.
You could take a snapshot and use it as the basis for a new VM on another Hyper-V server. Perhaps you want to roll a snapshot from a production virtual machine to a virtual machine on your test server. Or if resources are limited, perhaps even on the same server. That’s what I want to demonstrate: creating a new virtual machine based on a snapshot of an existing virtual machine.
Table of Contents
Using the Hyper-V Manager
To begin, we’re going to need a snapshot. I’m going to “clone” my XP LAB virtual machine. In the Hyper-V Manager select Snapshot in the actions pane as I’ve highlighted in Figure 1.
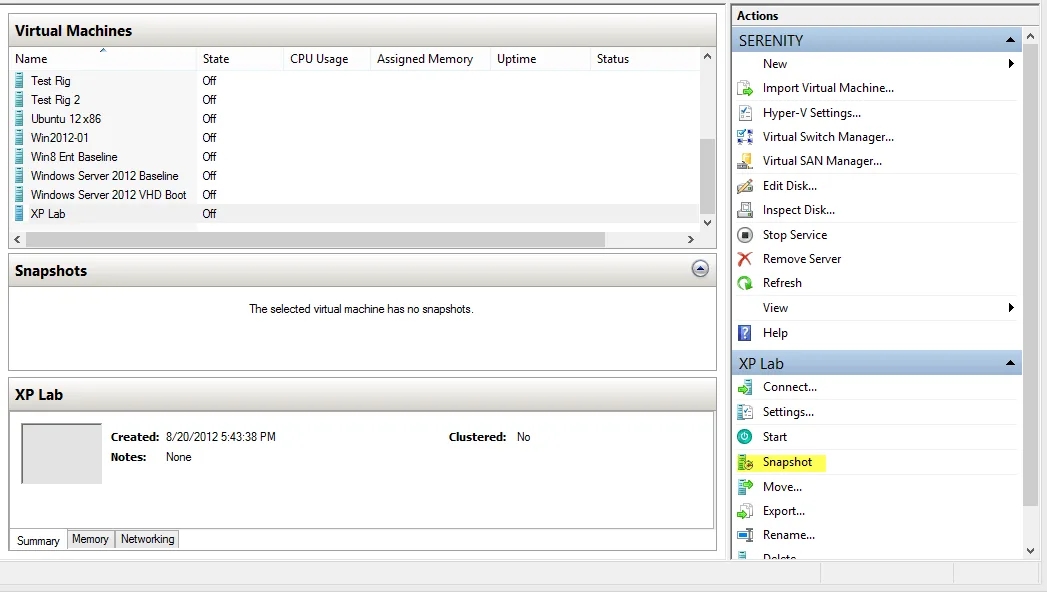
Or right-click on the VM and choose Snapshot from the context menu. Once I have a snapshot, I’m going to export it. This will write all the necessary files to disk in a new location. I want this so that I can work with the exported files and not worry about disturbing the snapshot itself. I can either right click on the snapshot as you see in Figure 2 or select Export from the Actions pane.
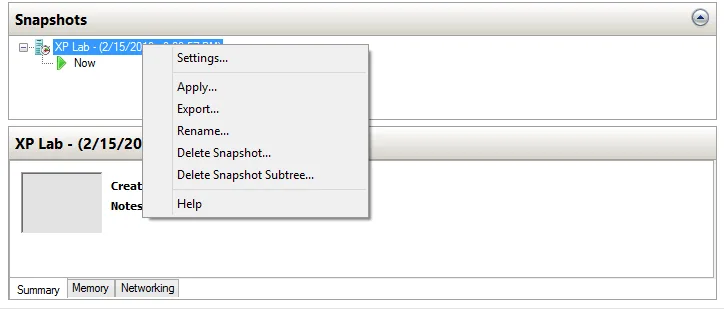
Export the Virtual Machine
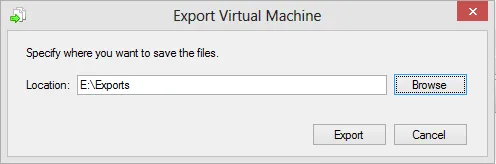
In the prompt I’ll specify the path for my exported files in Figure 3 and click Export.
The export will create a folder for the hard disks and virtual machine as you can see in Figure 4.
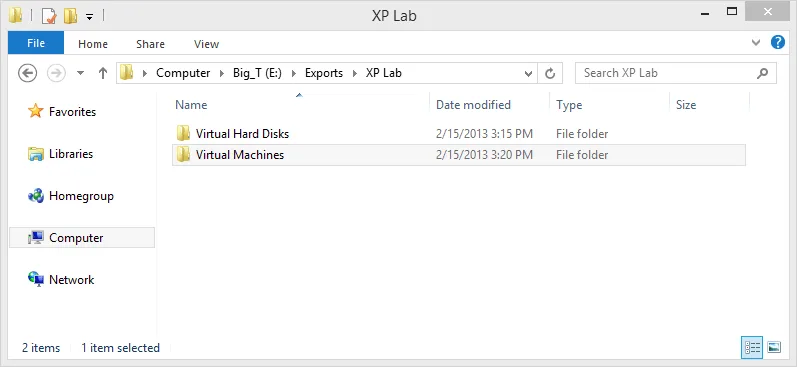
The disk will be copies of any VHD or VDHX files. Under Virtual Machines you’ll find an XML configuration file. To create a new virtual machine I have a few options. I can create an entirely new virtual machine in Hyper-V Manager using the exported hard disk. Or I can re-import the virtual machine.
Note: There are ramifications regardless of how you use the exported snapshot. Because the hard disk is already configured with an operating system, at least in my example, when the virtual machine comes on line there may be naming, network or licensing conflicts. You’ll need to take this into account either through additional virtual machine modification or through changes to the underlying operating system.
Import the Virtual Machine
Creating a new virtual machine is pretty straight forward so I won’t cover that. My intention is to use the exported virtual machine as a new virtual machine. In Hyper-V Manager I’ll select Import Virtual Machine from the Actions pane and specify the top level path to the exported snapshot (Figure 5).
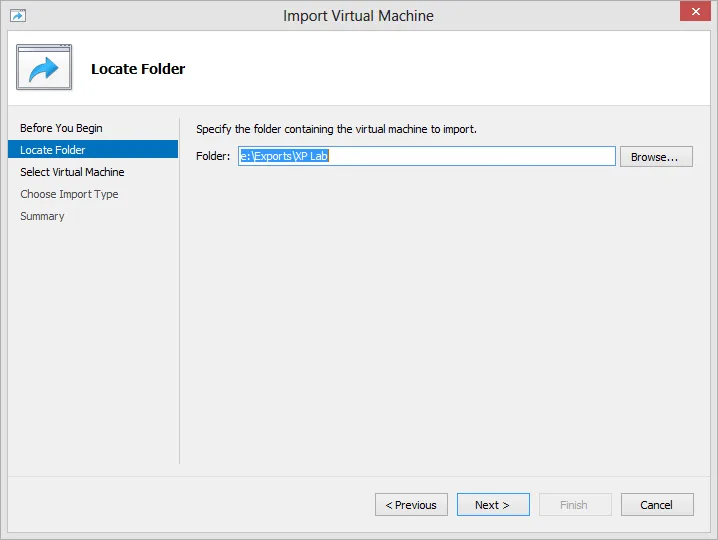
Clicking Next displays the exported virtual machine snapshot (Figure 6).
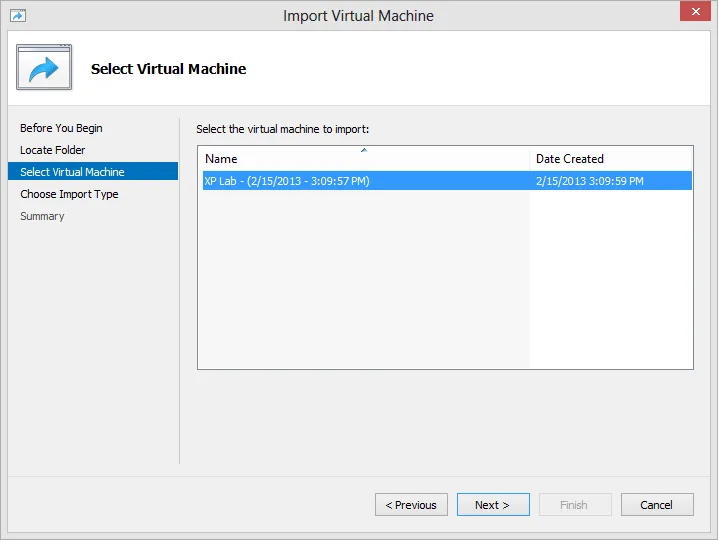
On the next screen you have to be careful. Because my original virtual machine still exists and I’m importing this on the same system, I need Hyper-V to create new identifiers. So I choose the appropriate option in Figure 7.
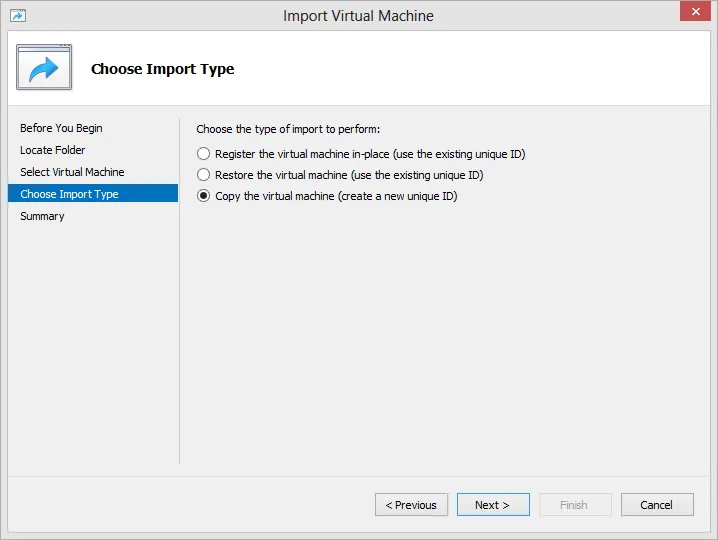
Another alternative would have been to create new virtual machine using the exported files by using the Register option. This only works if you are importing on a different Hyper-V server or if the original virtual machine disk files are in a different location other than the default.
But I’m going to copy the VM anyway. Next, I can decide where to store the new virtual machine (Figure 8).
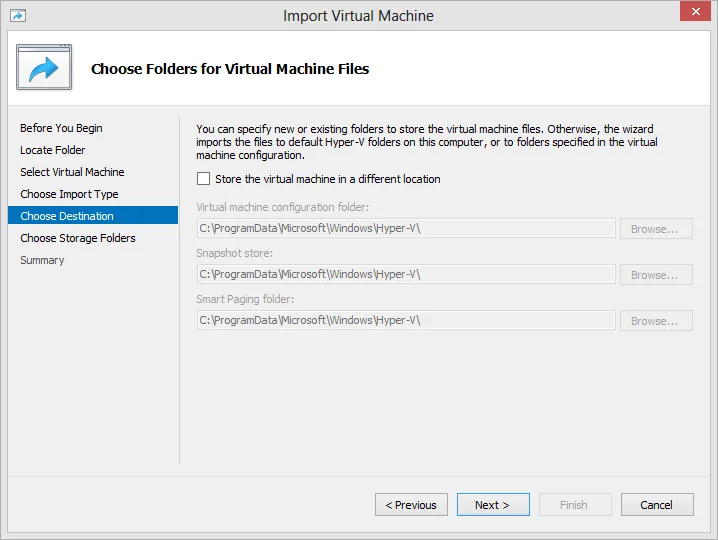
I’m going to use the default settings. Finally, Hyper-V wants to know where to store the import virtual disk. It will display the default location, as you see in Figure 9.
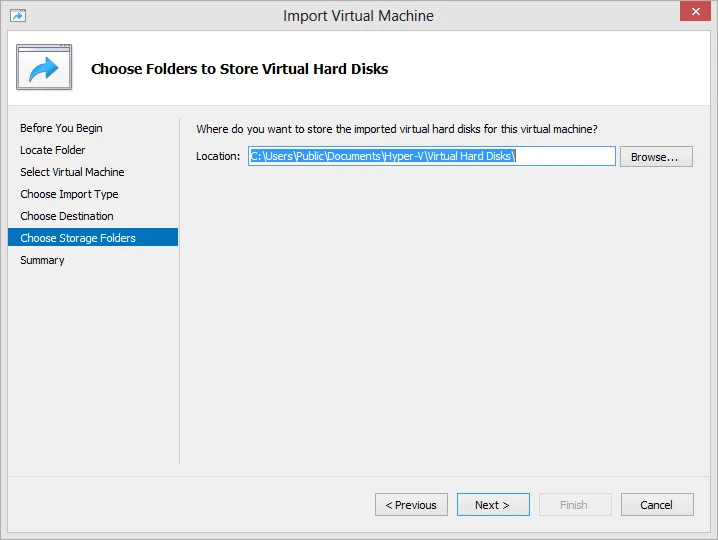
I have to specify a different path if the disk files from the original machine virtual machine still exist in the default location. The import process will re-copy the VHD file (or files depending on the virtual machine) to this location. See Figure 10.
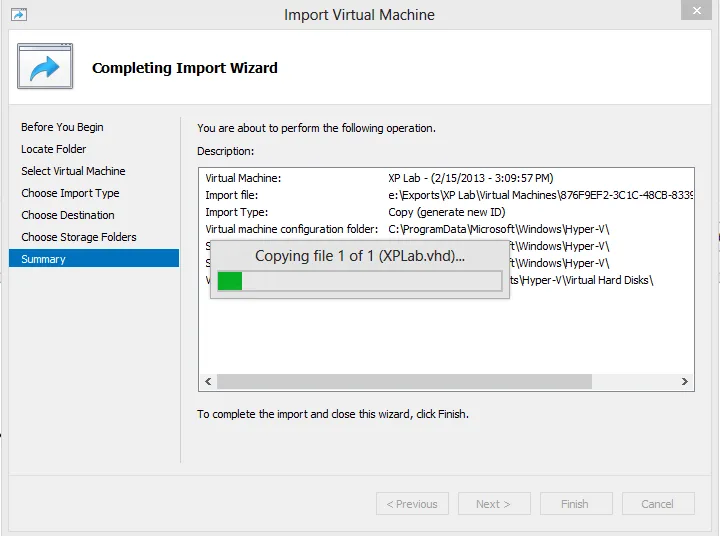
When the process is completed I have a new virtual machine as you see in Figure 11.
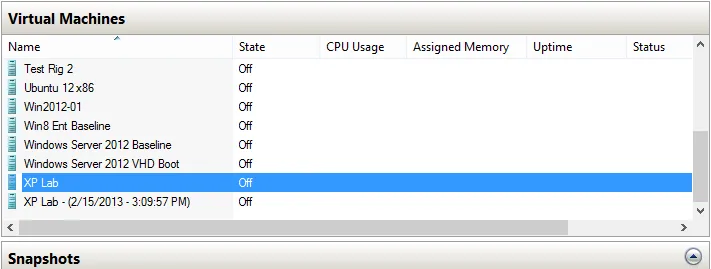
The name isn’t very friendly, but that is easily changed. Actually, if you edit the XML configuration file, you can modify the name prior to importing.
<global_id type="string">876F9EF2-3C1C-48CB-8339-BDE6D5097592</global_id>
<highly_available type="bool">False</highly_available>
<last_powered_off_time type="integer">130054318094417485</last_powered_off_time> <last_powered_on_time type="integer">130011093383728297</last_powered_on_time> <last_state_change_time type="integer">130054325974483199</last_state_change_time>
<strong> <name type="string">XP Lab - (2/15/2013 - 3:09:57 PM)</name></strong>
<notes type="string"></notes>
All I would need to do is modify the name which I’ve boldfaced. The import process will use this value. Ultimately, which ever technique you use will depend on your end goal.
Interim Conclusion
The steps I’ve gone through should work if you are migrating the snapshot to a different Hyper-V Server or using the same as I’ve done here. As you can see, there is a lot of manual interaction here. I suppose if you only need to clone a single virtual machine from a snapshot is no big deal. But for real efficiency we will need to turn to Windows PowerShell, which we’ll cover next.
Using Hyper-V 3.0 PowerShell Cmdlets
When you install the Hyper-V role on Windows Server 2012 (or in Windows 8) and include the Management tools you should also get the Windows PowerShell module. You should see something like Figure 1 on Windows 8
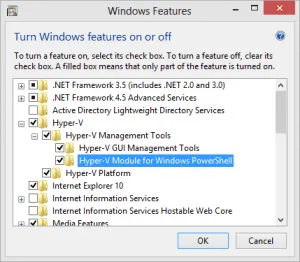
Or on Windows Server 2012 something like Figure 2.
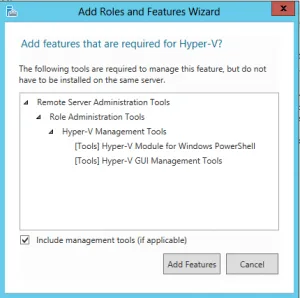
The PowerShell module includes commands for just about anything you would need to accomplish with Hyper-V. While I’m going to walk through using them interactively, you can just as easily take the commands and turn them into a PowerShell script or function, in essence creating your own Hyper-V PowerShell tools.
In PowerShell 3, modules will be autoloaded the first time you run one of its commands. But I’ll explicitly import the module anyway.
PS C:> Import-Module Hyper-VI’m going to run the commands locally, but specify a computername so you can see how you could do this for a remote server.
PS C:> $Server = $env:COMPUTERNAMECreating the snapshot with PowerShell
I’m going to take a snapshot of a virtual machine called Test Rig
PS C:> $VMName= “Test Rig”
Because I want my imported VM to have a nice name, which is derived from the snapshot name, I’ll define one:
PS C:> $SnapName= “$VMName Clone”
Now to create the snapshot.
PS C:> $snapshot = Checkpoint-VM -Name $VMName -SnapshotName $SnapName -ComputerName $Server –passthru PS C:> $snapshot | VMName | Name | SnapshotType | CreationTime | ParentSnapshotName |
| Test Rig | Test Rig Clone | Standard | 2/18/2013 | 12:41:14 PM |
Next, I’ll export the snapshot to disk
PS C:> $export = Export-VMSnapshot -VMSnapshot $snapshot -Path $ExportPath –PassthrThe path is relative to the Hyper-V server and should be created if it doesn’t already exist. The computername is included as a property in the $snapshot object so PowerShell knows what server to use. From here I have some options.
Creating a new virtual machine
I could create a totally new virtual machine using the exported VHD or VHDX files. I’ll create a new virtual machine without any disk drives. I’ll also “copy” some settings from the snapshot.
PS C:> $clone = New-VM -Name $snapshot.Name -NoVHD -MemoryStartupBytes $snapshot.MemoryStartup -switch "Private Data" -ComputerName $Server
You can obtain the switch name from Get-VMSwitch.
PS C:> Get-VMSwitch -ComputerName $server | Select name
Name
----
Private Data
Work Network
So now I have a virtual machine without any drives. The tricky part is that I want to add the drives from the export folder, not the paths specified in the snapshot configuration. So I need to do a little parsing to extract the drive name from the snapshot, e.g. “Test Rig.vhdx” without the path. Then I need to construct a new path using the export folder path and this file name. Finally, I’ll construct a hash table of parameters which I’ll eventually pass to the Add-VMHardDiskDrive cmdlet which will ensure I get the drives hooked back up in their original positions.
PS C:> ForEach ($drive in $Snapshot.HardDrives) {
>> $VHD = Split-Path -leaf ($drive.path)
>> $VHDPath = Join-Path (Join-Path (Join-Path $ExportPath $VMName) "Virtual Hard Disks") $VHD
>> $addDriveHash=@{
>> VMName=$Clone.Name
>> Path=$VHDPath
>> ControllerType=$drive.ControllerType
>> ControllerNumber=$drive.ControllerNumber
>> ControllerLocation=$drive.ControllerLocation
>> Computername=$Server
>> }
>> Add-VMHardDiskDrive @addDriveHash
>> }
>>
You can see where eventually this is much easier accomplished in a script. The last step, and it is purely optional, is that I want to configure the new virtual machine with the same memory settings as the original. The Set-VM cmdlet offers a number of settings that I can pass all at once with a hash table.
PS C:> $paramhash=@{
>> MemoryStartupBytes=$snapshot.MemoryStartup
>> ProcessorCount=$snapshot.ProcessorCount
>> Notes="Cloned $(Get-Date)"
>> Name=$($clone.Name)
>> Computername=$Server
>> }
PS C:> if ($snapshot.DynamicMemoryEnabled) {
>> $paramhash.Add("DynamicMemory",$snapshot.DynamicMemoryEnabled)
>> $paramhash.Add("MemoryMinimumBytes",$snapshot.MemoryMinimum)
>> $paramhash.Add("MemoryMaximumBytes",$snapshot.MemoryMaximum)
>> }
>> PS C:> Set-VM @paramhash
And it is done!
PS C:> Get-VM $clone.name -ComputerName $Server| Name | State | CPUUsage(%) | MemoryAssigned(M) | Uptime | Status |
| Test Rig | Clone Off | 0 | 0 | 00:00:00 | Operating normally |
Importing the snapshot
The other approach is to import the snapshot. When you import the snapshot it will use the snapshot name. Since I defined it at the time I created the snapshot I should be ok. But if you want to modify the name again, you can use PowerShell to adjust the XML configuration file. There should only be one XML file in the Virtual Machines folder.
PS C:> $VMPath = Join-Path (Join-Path $ExportPath $VMName) "Virtual Machines" PS C:> $VMConfigPath = (dir $vmpath -filter *.xml).FullName
PS C:> [xml]$config = Get-Content -Path $VMConfigPath
PS C:> $config.configuration.properties.name.'#text'="My Cloned VM"
PS C:> $config.Save($VMConfigPath)
Note that if you are doing this remotely, you’ll need to modify this to run via PowerShell Remoting, most likely using Invoke-Command.
Importing is very easy. I can register the import in place.
PS C:> Import-VM -Path $VMConfigPath –RegisterThis will only work if you are importing to a different server or if the original virtual machine no longer exists. Or you can copy. If you are importing on a different server you can use the default paths. But if you are importing on the same server, and the disks exist from the original virtual machine in the default location, you will need to specify a new path. Because I’m copying the imported virtual machine to the same server, I’m going to use the export path as my disk path.
PS C:> $VHDPath = (Join-Path (Join-Path $ExportPath $VMName) "Virtual Hard Disks")Finally, the import command.
PS C:> Import-VM -Path $VMConfigPath -Copy -GenerateNewId -VhdDestinationPath $VHDPath -ComputerName $serverBecause the original virtual machine still exists I need to generate a new GUID. If you look at help for Import-VM you’ll see that the VhdDestinationPath is marked as obsolete. But it still works and in this case I need it to.
Summary
This may seem like a lot of work, but once I have the PowerShell commands in place it isn’t too difficult to turn them into a tool that automatically converts a snapshot to a virtual machine. If you are new to the PowerShell Hyper-V module, be sure to look at help for all the commands I’ve shown here. You can also download my demo commands here.