
How to set up a nested vSphere 6 environment
Welcome to this deep-dive article where I’ll show you how to set up a nested vSphere 6 environment comprising vCenter Server 6.0 for Windows and ESXi 6.0 hosts. If the term nested virtualization is alien to you, don’t worry. All it means is that we will be running a hypervisor as a VM running under another hypervisor. So, in this case, ESXi will be installed as a VM which is itself hosted on a physical ESXi host. One of the advantages of nesting, is that you can test out new VMware features or simulate upgrade paths to a new vSphere release. Nesting is also frequently used for QA/DEV and other testing environments as well as for home labs.
First, we will have a look at how to download the required VMware ISO images and how to create the VMs needed for the nested ESXi hosts.
Then, we will install and configure ESXi on the VMs created.
Lastly, this article covers the installation and configuration of vCenter Server, how to add nested ESXi hosts to it and also some basic tasks.
Table of Contents
The Requirements
There are a few prerequisites you’ll need to take care of first.
1 – If you don’t have one, register for a VMware account. Once you do, an activation link is sent to your email address. Activating it will allow you to download the ESXi hypervisor and vCenter Server ISO images.
2 – A physical ESXi host (v5.5 or later) managed by vCenter Server
3 – On the physical ESXi host, do the following.
- Create a virtual machine and install Windows Server 2008 or a later version on it.
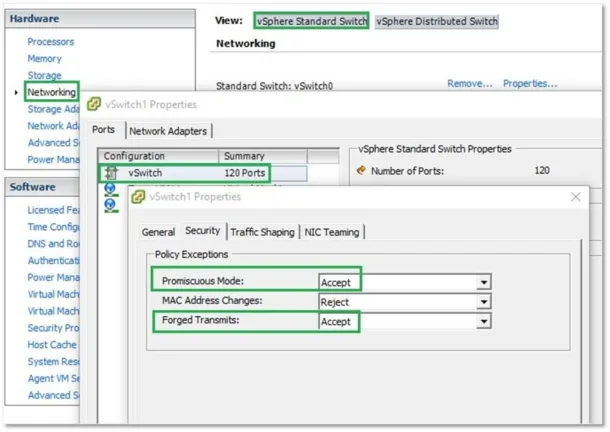
- Enable promiscuous mode and forged transmits on the virtual switch’s portgroup as per Fig.1. This is where you’ll connect the ESXi VMs you’ll go on and create it later on.
Downloading the VMware ISO images
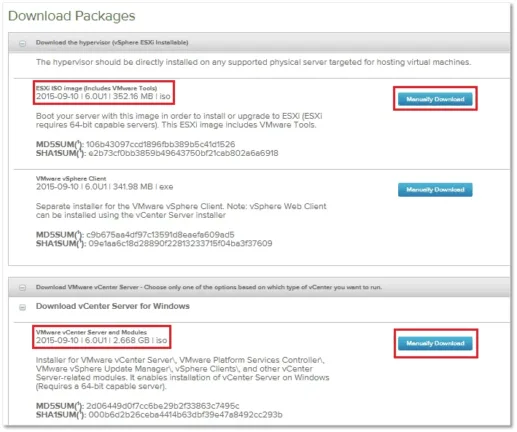
You first need to download the ESXi and vCenter Server for Windows ISO images as well as the ISO shown in Figure 2. Save the ISOs to a local folder or upload them to a datastore mounted on the physical ESXi host. Either method will work just fine however for this post, I’ll be using the local folder method.
As an alternative to the vCenter Windows version, you can also try out vCenter Server Appliance (VSCA) which is a Linux based appliance. Both ESXi and vCenter Server can be fully and freely evaluated for up to 60 days.
Creating the ESXi VMs
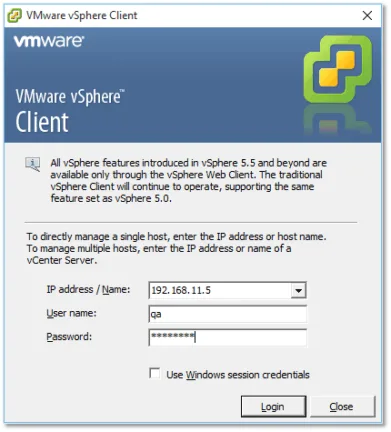
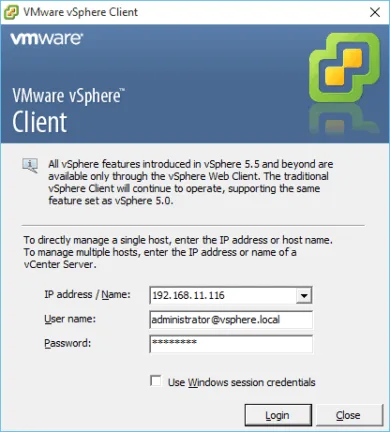
We start off by creating the VMs on which ESXi will be installed. Log in the vCenter server managing the physical ESXi host or directly to the physical ESXi host using the thick vSphere client or the vSphere Web client. I’ll be using both clients in this series just to illustrate any differences but mostly because some functionality is only exposed by the web client.
UPDATE: Since this series was written, vSphere 6.5 has been released. The bulk of what’s covered here still applies however you will not be able to connect to vCenter Server using the thick vSphere (C#) client since it is no longer supported.
Step 1 – Log in vCenter Server with the thick vSphere client.
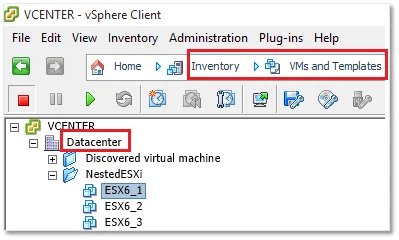
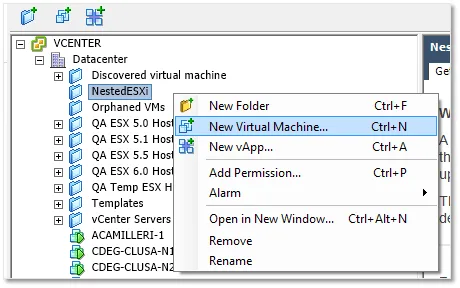
Step 2 – Switch to the VMs and Templates view. Right-click on the <datacenter> name, select New Folder and create a folder called NestedESXi.
Step 3 – Right-click on the NestedESXi folder and select New Virtual Machine.
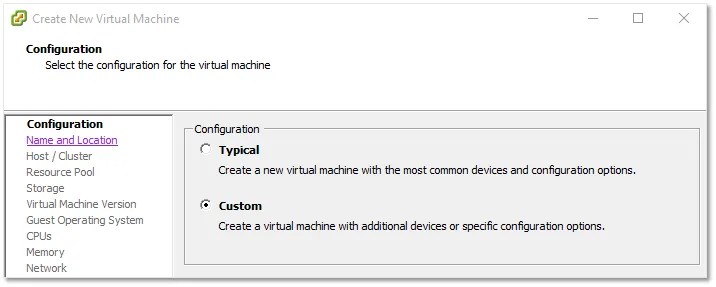
Step 4 – Choose Custom configuration and click Next.
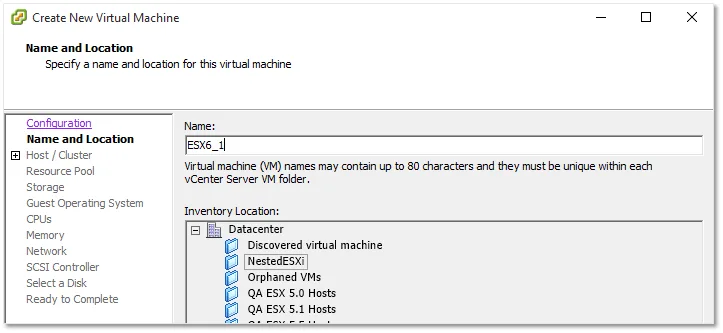
Step 5 – Specify a name for the VM. Let’s just call it ESX6_1. Click Next.
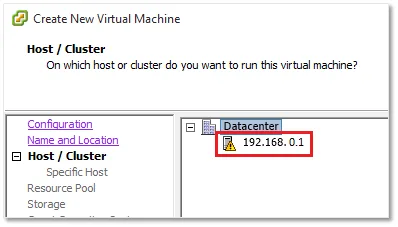
Step 6 – Select the physical ESXi host on which to create the VM and click Next.
Step 7 – Where applicable, specify a resource pool, otherwise select an ESXi host instead. Click Next.

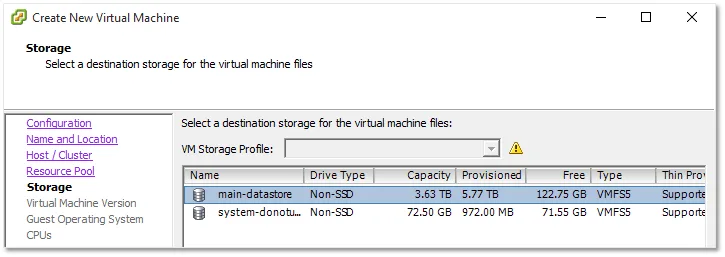
Step 8 – Pick a datastore where the VM is created and click Next.
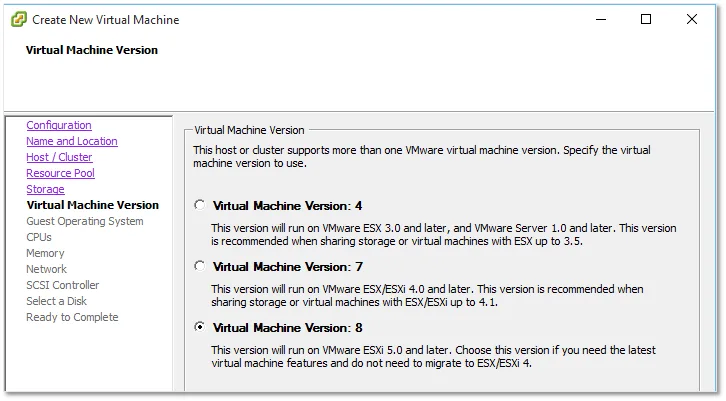
Step 9 – Select Virtual Machine Version: 8. At a later stage we will be able to upgrade the VM to version 10. Click Next.
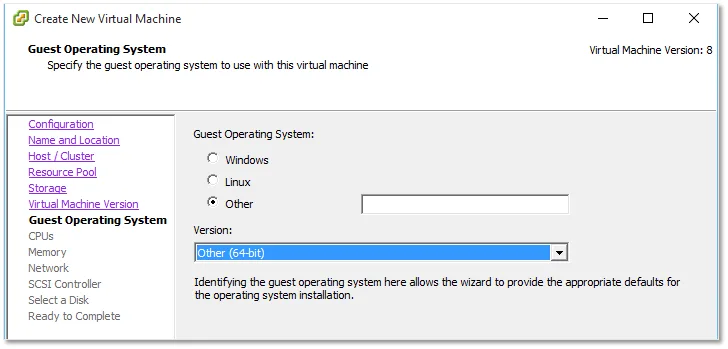
Step 10 – Select Other from the Guest Operation System list and Other (64 bit) from the Version drop-down list. Click Next.
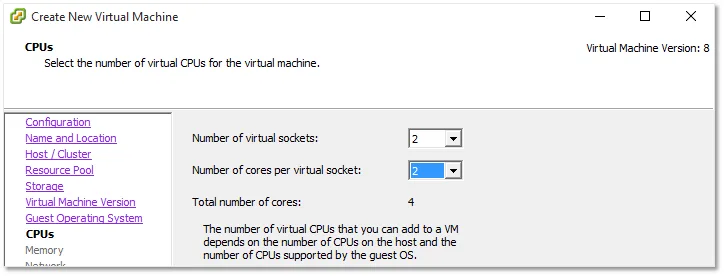
Step 11 – Set the number of virtual sockets and cores per virtual sockets to 2 each. Click Next.
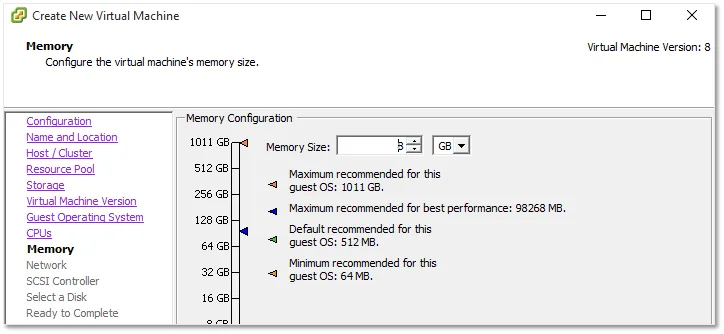
Step 12 – Assign 8GB of RAM and click Next.
Step 13 – Specify the Network the VM will connect to. This should correspond to a portgroup on the virtual switch listed under the requirements section. Also, set the adapter type to VMXNET 3 for optimal performance and tick on the Connect at Power On option. Click Next.
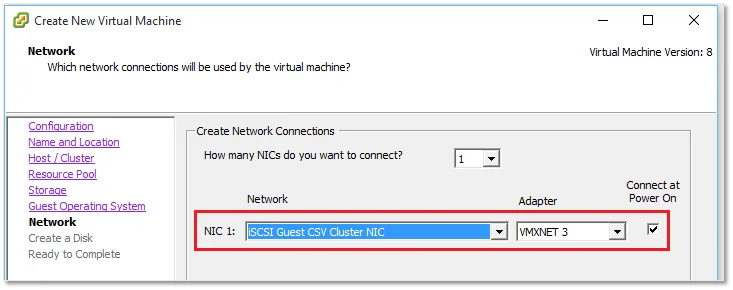
Note: Starting with vSphere 6, VMware Tools are embedded in the ESXi ISO image so you won’t need to install them manually. This also means that the VMXNET 3 adapter drivers are automatically installed.
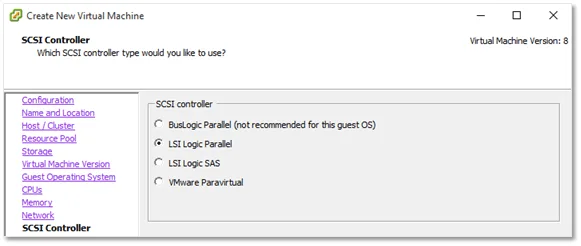
Step 14 – Make sure the LSI Logic Parallel SCSI controller is selected and click Next.
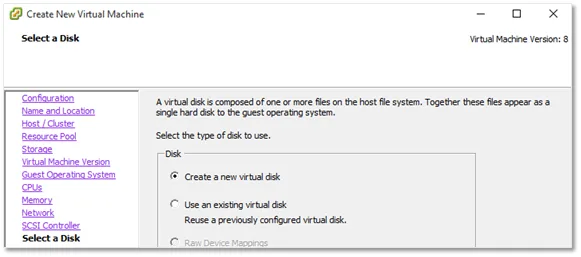
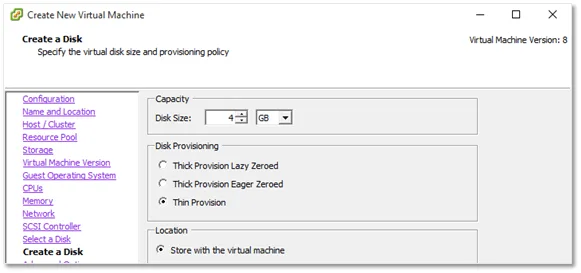
Step 15 – Select Create a new virtual disk and set its size to 4GB. Select Thin Provision from the Disk Provisioning option and leave the remaining settings as set. Click Nextat the next 3 screens shown.
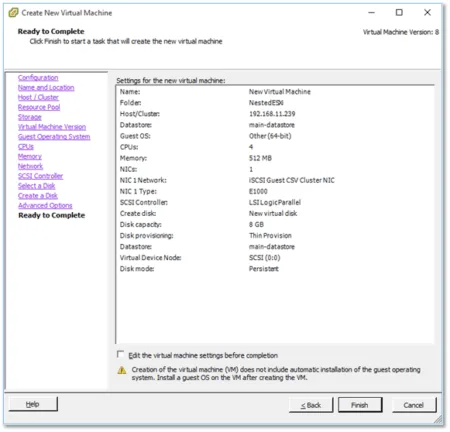
Step 16 – Click Finish to create the VM.
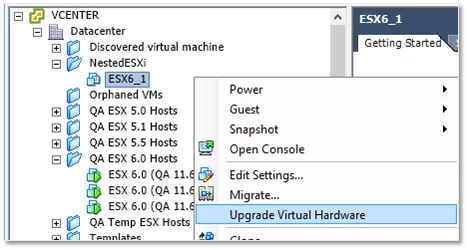
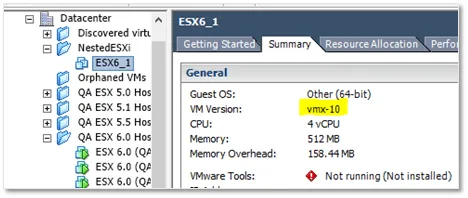
Step 17 – It’s important that the VM’s virtual hardware is upgraded. This will expose the assisted virtualization features of the physical ESXi host’s processors to the underlying guest hypervisor. Right-click on the VM just created and select Upgrade Virtual Hardware. In the Summary tab, you will notice that VM Version changes from vmx-8 to vmx-10.
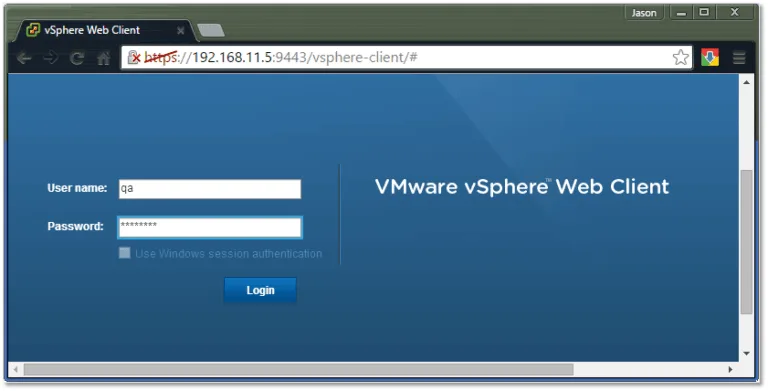
Step 18 – Using the vSphere Web client, log in vCenter Server. We need to apply a few final settings to the VM before we can install ESXi. This is the reason why vCenter Server is listed as a requirement since the vSphere Web Client is available on available when it is installed.
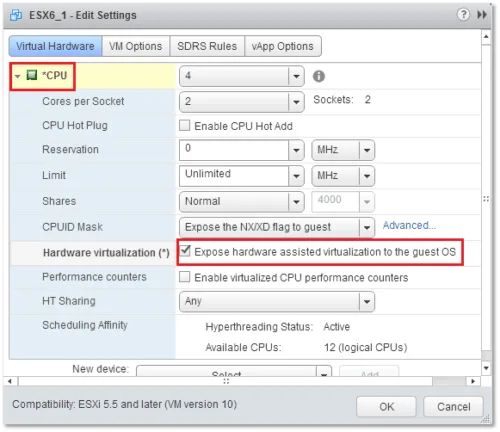
Step 19 – Right-click on the VM just created and select Edit Settings. Expand the CPU properties page and enable the Expose hardware-assisted virtualization to the guest OS option.
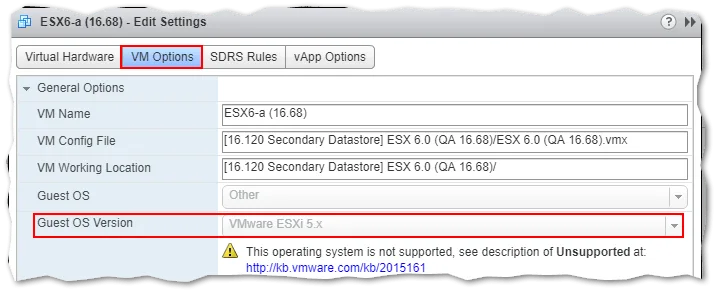
Step 20 – With the Edit Settings dialog box still open, switch to the VM Options tab and select VMware ESXi 5.x from the Guest OS Version list. If your physical ESXi host is running ESXi 6.0, a VMWare ESXi 6.x option will also be available. You can safely ignore the Unsupported warning.
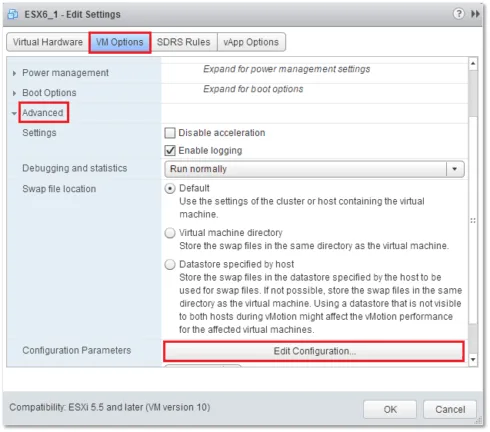
Step 21 – We also need to make sure that we can host VMs with a 64-bit guest OS on the nested ESXi hosts after we finish installing them. From the VM Options tab, expand Advanced and click on the Edit configuration. Click Add Row and add the vhv.enable = “TRUE” line.
Note: This line must also be added to the /etc/vmware/config file on the physical ESXi host(s). To do so, enable SSH on the physical ESXi hosts and SSH to it using something like putty. Run the following command
echo 'vhv.allow = "TRUE"' >> /etc/vmware/config
This last step completes the creation and customization of the nested ESXi shell VM. We can now clone the VM as needed.
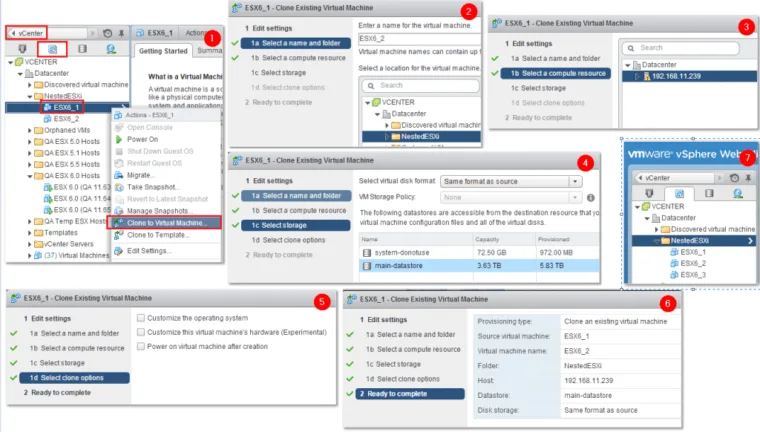
Step 22 – Locate the VM just created and select Clone to Virtual Machine. Follow the steps shown in the next sequence of screenshots to create an additional 2 VMs for a total of 3 under the NestedESXi folder.
Installing ESXi
UPDATE: Since writing this series, vSphere 6.5 has been released. You can read about a few nesting related features exclusive to ESXi 6.5 here.
Remember that, as if often the case with many VMware products, it is important to create DNS records (A and PTR) in advance more so the ones assigned to ESXi hosts and vCenter Server. This lessens the chances of coming across SSL certificate issues and improves management of the overall infrastructure. In this section, I’ll take you through the process of installing ESXi on the VMs prepared in Part 1.
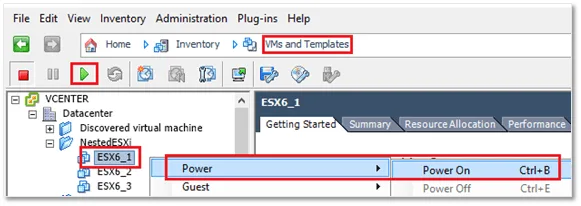
Step 1 – Switch to the VMs and Templates view. From the NestedESXi folder, power on the ESX6_1 VM. To power on a VM, use the Power On button from the toolbar, highlight the VM and press Crtl-B or right-click on it and select Power → Power On.
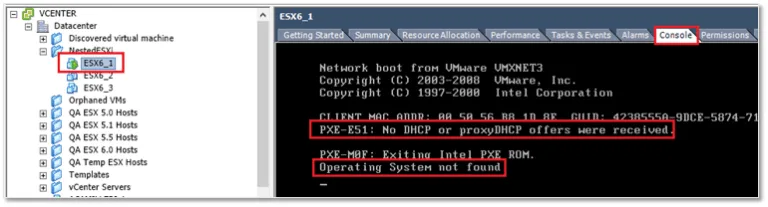
Step 2 – When you switch the Console tab, you’ll see the VM trying to PXE boot followed by a probable Operating System not found error. This is expected since there is no VM guest OS installed as yet and I am also not running any PXE related service on my network.
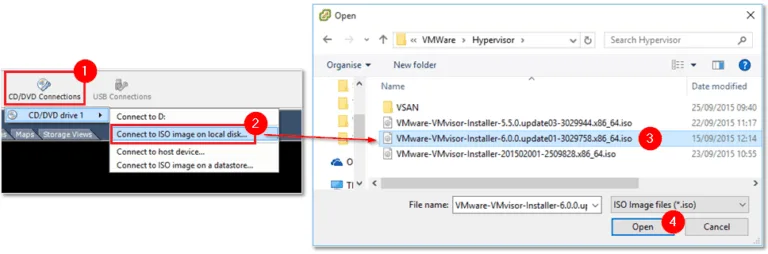
Step 3 – Mount the ESXi ISO image on the VM. To do so, click on the CD/DVD Connections button and choose Connect to ISO image on local disk. If you uploaded the ISO image to a datastore, select Connect to an ISO image on a datastore. In my case, I mounted the ISO image from a local folder on my computer.
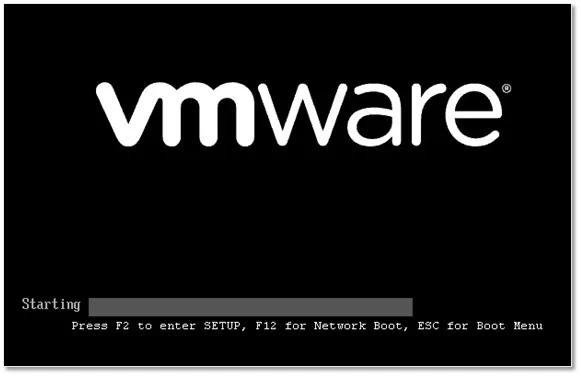
Step 4 – Click inside the console window. The mouse pointer will disappear. Press Ctrl-Alt-Insert to reboot the VM. You’ll see the VMware logo displayed followed by the ESXi installer boot-up screen.
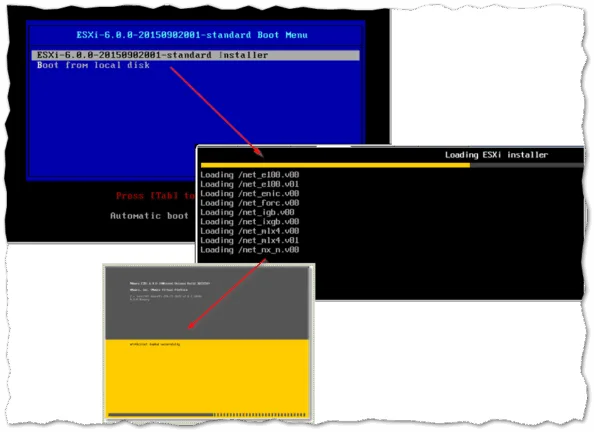
Step 5 – Press Enter to load the ESXi installer. The required binaries are loaded in the course of the next 2 minutes or so.
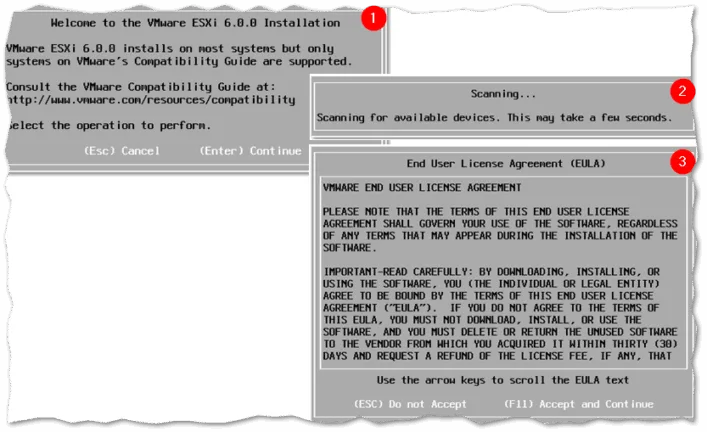
Step 6 – Press Enter to kick off the ESXi OS installation. A device scan is carried out after which are prompted to accept the EULA. Press F11 to accept it and proceed to the next screen.
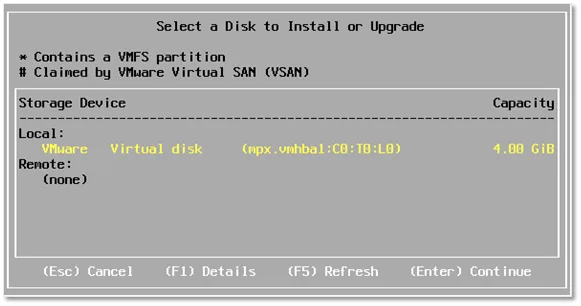
Step 7 – Press Enter to select the disk on which ESXi is installed. Only one disk will be listed unless you specified more while creating the VM. Press Enter.
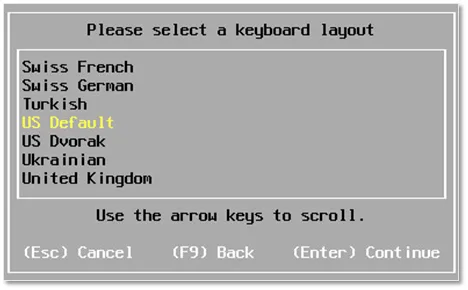
Step 8 – Select a keyboard layout. Press Enter to continue.
Step 9 – Here we need to set the password for the root account. Choose a strong password and write it down somewhere safe. Press Enter when done. Note: Use the arrow keys to alternate between the Root password and Confirm password fields.


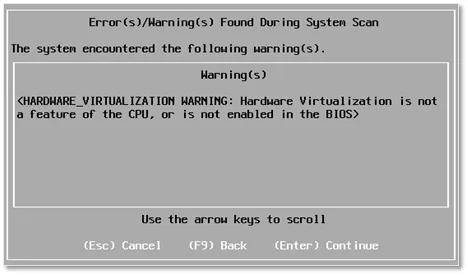
Step 10 – You can safely ignore the following hardware virtualization warning. Press Enter to continue.
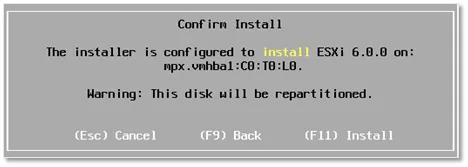
Step 11 – Press F11 to start installing the ESXi OS on the selected disk.

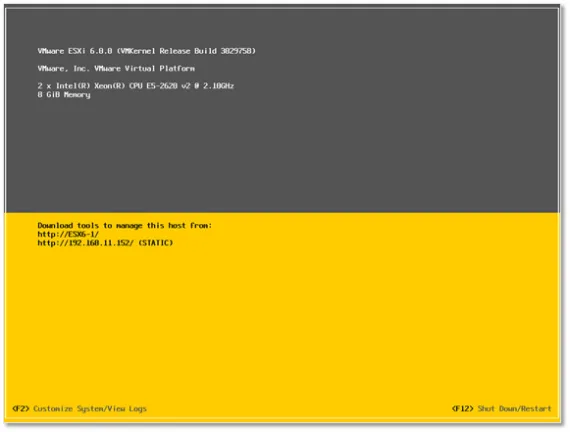
Step 12 – The installation takes only a handful of minutes to complete. Press Enter to reboot the VM once installed.

Note: The following steps will show you how set up networking on the ESXi host via the Direct Console User Interface (DCUI).
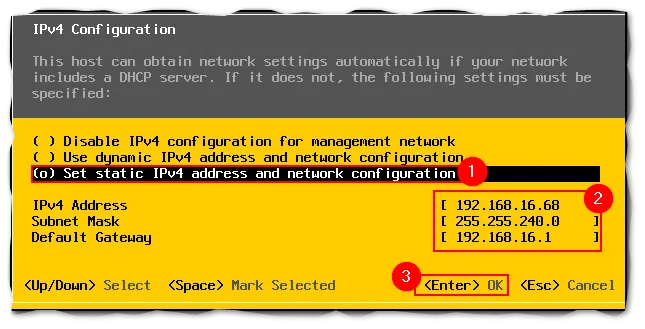
Step 13 – If a DHCP server is present on the network, ESXi will try and acquire IPv4 and IPv6 address from it. In my case, I opted for a static IPv4 address.
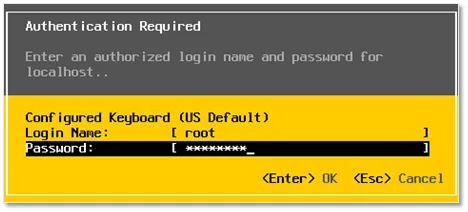
Step 14 – With the focus still on the VM’s console window (vSphere client), go ahead and press F2. Type in the root password you specified in step 9 and press Enter.
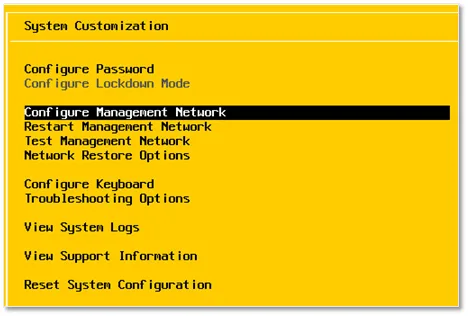
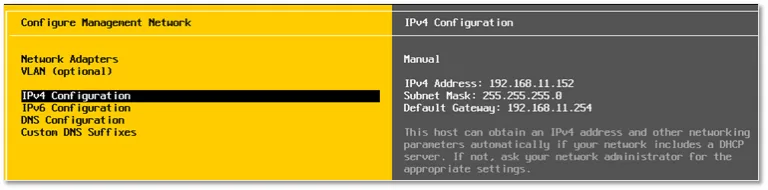
Step 15 – Scroll down to Configure Management Network and press Enter.
Step 16 – Select IPv4 Configuration to view the DHCP acquired settings. Alternatively, switch over to using a static IP address
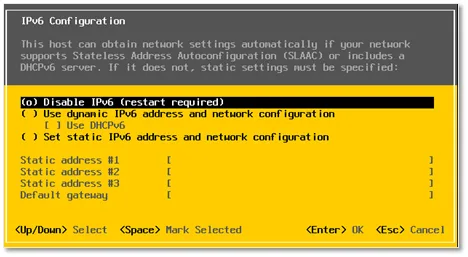
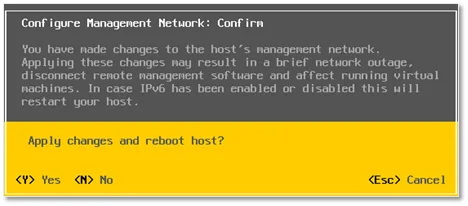
Step 17 – This step is optional. Select IPv6 Configuration and press Enter. I’ll be disabling IPv6 since I’m not using it. To do so, select the Disable IPv6 (restart required) option using the arrow keys and toggle the setting with spacebar. Press Enter to commit and return to the previous menu. Note: This becomes effective only after ESXi is rebooted.
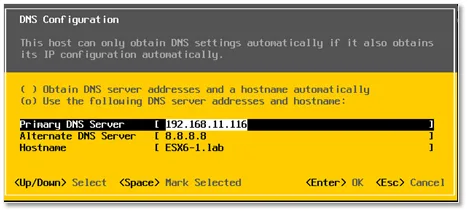
Step 18 – Next make sure that the DNS configuration is correct. In this example, I’ve manually entered the addresses for both the primary and secondary DNS servers. Select the DNS Configuration menu item and press Enter. Toggle on the Use the following DNS server addresses and hostname option and type in values for the primary and alternate DNS servers. Make sure the Hostname matches the DNS A record previously created. Press Enter to save the changes.
Step 19 – You’ll be prompted to reboot again if you disabled IPv6. Press Y to reboot.
And there you have it. Your first nested ESXi host should now be up and running. We could always clone the ESX6_1 VM and use it as a template for any future bested hosts we might need. This, however, requires a few changes using shell commands for it to work properly. I’m skipping this part as it is beyond the scope of this post but if you wish to learn more, here’s a good article on the subject.
In reality, it only takes a few minutes to install ESXi so personally I’d rather install the two remaining nested ESXi hosts from scratch.
Configuring ESXi
In this section, I’ll show you how to configure the ESXi hosts so you can start hosting VMs.
Step 1 – Using the vSphere client, log in as root. Same password as before.

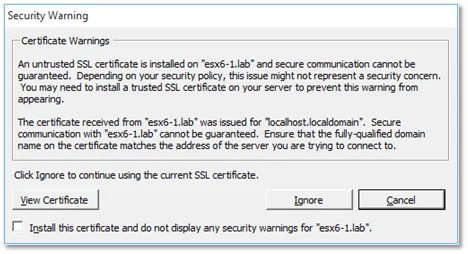
Step 2 – Press Ignore to acknowledge the certificate warning.
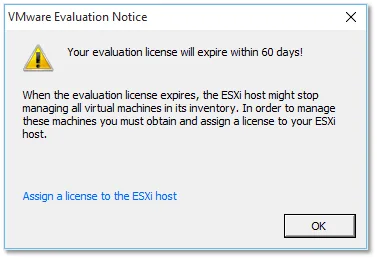
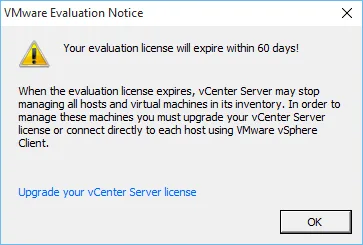
Step 3 – Press OK to acknowledge the evaluation notice. You 60-day trial period starts now.
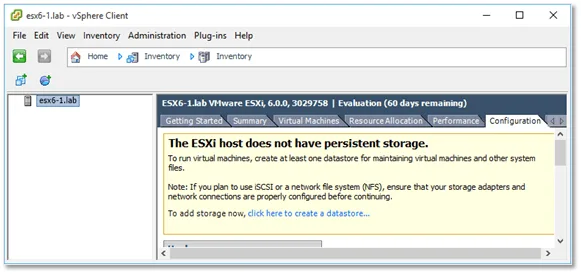
Step 4 – At this point, all’s looking pretty bare which is normal. We first need to create our first datastore. A datastore is a storage location where the files and folders comprising virtual machine will reside. I’m covering local datastores, these being those created on disks directly attached to ESXi as opposed to NAS and SAN datastores. The absence of a datastore is highlighted by the The ESXi host does not have persistent storage message shown next. This usually occurs because of insufficient disk space or problems with the underlying storage. This prevents the ESXi installer from automatically creating a local datastore.
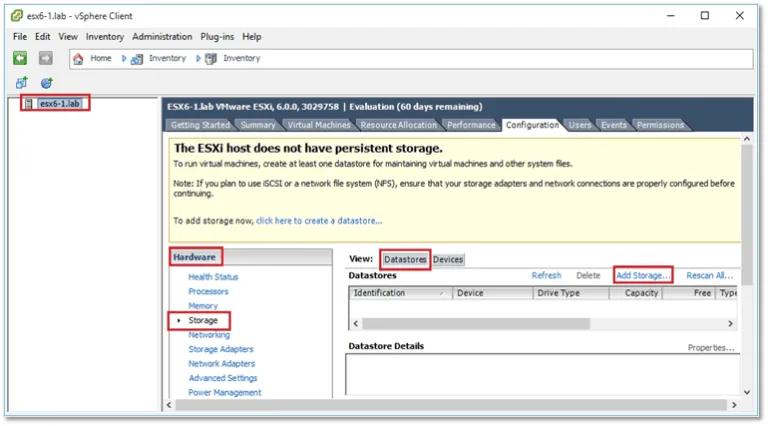
Note: The following steps relate to creating a datastore. If a datastore has been created for you automatically you can skip them or create a second datastore just to get the feel for it.
Step 5 – Click on the ESXi hostname in the left-hand pane. Move to the Configuration tab and select Storage from Hardware. Click on Add Storage from the Datastores view.
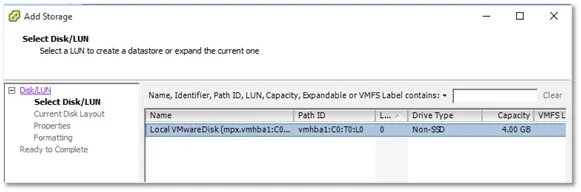
Step 6 – Select Disk/LUN and click Next.

Step 7 – Select the disk where you want the datastore created and click Next.
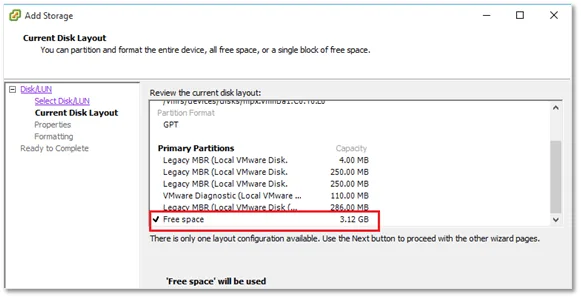
Step 8 – Note the existing partitions on the disk. This is where ESXi has been installed. We’re interested in the amount of free space available to determine if and where the new datastore is created.
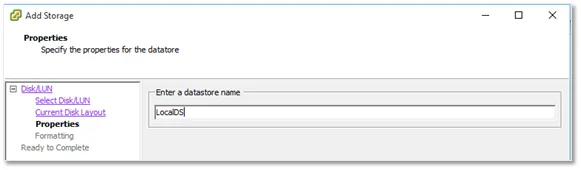
Step 9 – Specify a name for the datastore. For this example, I used LocalDS. Press Next to continue.
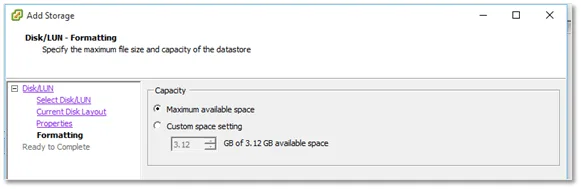
Step 10 – Specify the amount of disk space you want allocated to the datastore and press Next.
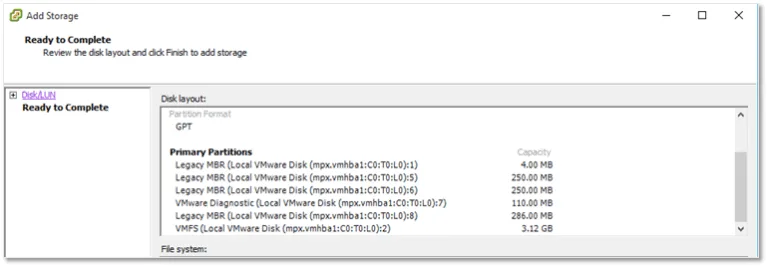
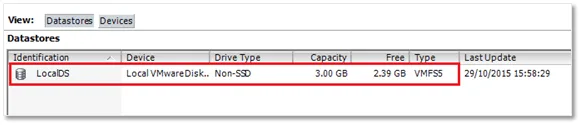
Step 11 – Click on Finish to create the datastore. You will see the LocalDS datastore listed in Datastores pane.
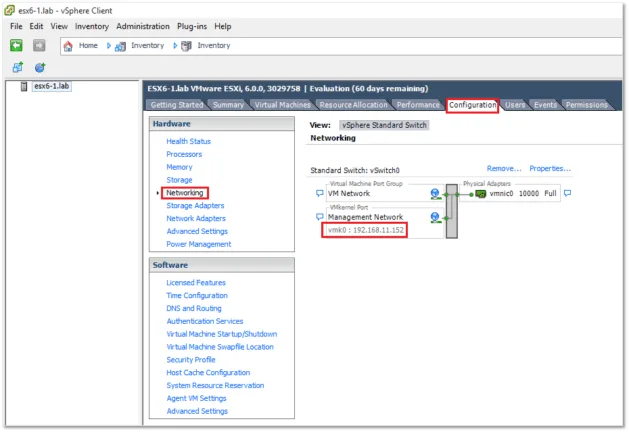
Switch to the Configuration tab and go through the list of settings found under the Hardware and Software categories. In particular, have a look at the Networking settings paying attention to the default Standard Switch, the VMkernel Port and the Management Network.
How to install and configure vCenter Server for Windows 6.0 as part of a nested vSphere 6 environment
Next, I’ll be installing vCenter on a Windows Server 2012 64-bit virtual machine. Note that Windows Server 2008 SP2 64-bit is the minimum supported OS version.
When creating the VM, make sure to assign at least 8GB of RAM, 2 vCPUS and roughly 60-80GB of disk space to compensate for both the Windows OS and vCenter Server disk space requirements. In this post, I skipped the part where you install and configure the Windows Server OS.
The Platform Services Controller
Before we jump in and start installing vCenter Server, let’s have a look at the Platform Services Controller (PSC) component. Prior to vSphere 6, one had to install a number of individual components alongside vCenter Server namely the SSO, Web Client, Inventory and vCenter Server in this specific order. This decoupling of components presented users with the option of installing each individual component on its own dedicated VM or physical server which ultimately resulted in a more complex and difficult to manage the environment.
With vSphere 6 .x, VMware has grouped these components under one ceiling, the Platform Services Controller as you probably guessed. This makes for an easier installation of vCenter Server 6.0 given there’s only one installer to run and reduces the chances of a botched installation.
As you’ll learn, you are presented with two deployment models when installing vCenter Server. These are the Embedded Platform Services Controller and the External Platform Services Controller. The choice is primarily governed by the size of your environment or growth thereof. For small-scale environments, the embedded model will suffice where vCenter Server and its components are installed on the same server in one take. For more demanding environments or perhaps where you have multiple vCenter Server which you can link, the external model is the recommended way forward.
Installing vCenter Server 6.0
In the previous post, I reiterated the importance of creating DNS records in advance. In this section, I’ll show you just how to do this using a DNS server running on Windows. For a complete list of vCenter Server for Windows 6.0 requirements, make sure to read this.
Setting up DNS
Step 1a – Choose an FQDN for vCenter Server. I’ll be using vcenter60.lab for this tutorial. Proceed to create A and PTR records on the Windows DNS server as shown next.

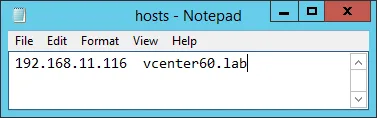
Step 1b – This step is optional. If you do not have access to a DNS server, run a text editor like notepad in an administrative command prompt and open c:\windows\system32\drivers\etc\hosts. Type in the vCenter Server’s IP address and FQDN as shown next. Save and close the hosts file.
Step 2 – Make sure that the vCenter Server FQDN is correctly resolved. This is a crucial step since the vCenter installation will fail if otherwise. Use the nslookup tool as shown to verify correct functionality.

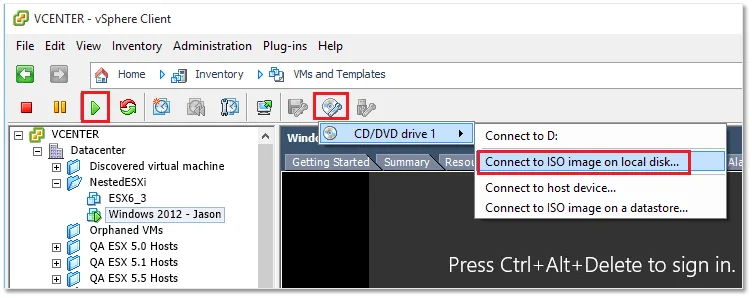
Step 3 – Power on the Windows Server 2012 VM where vCenter Server will be installed. Once it’s running, mount the vCenter ISO image, using the method described earlier where we mounted the ESXi image.
Installing vCenter Server
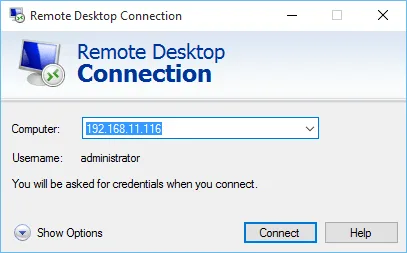
Note: You can either carry out the following steps while consoled to the VM using the vSphere client or RDP to the Windows VM, which is what I did. The latter is easier to work with. Also, make sure to install VMware Tools on the Windows VM first.
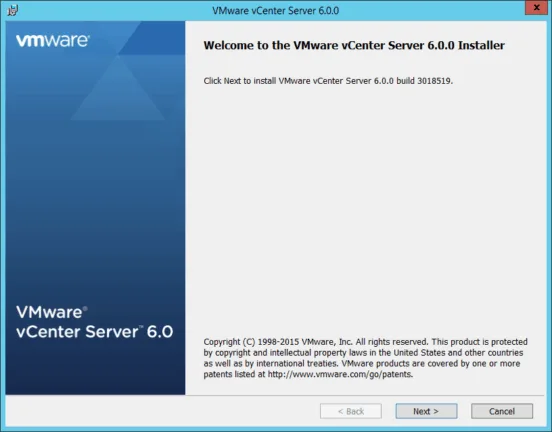
Step 4 – Using File Explorer, right-click on the VMware VIM DVD drive as shown next and select Install or run program from your media.

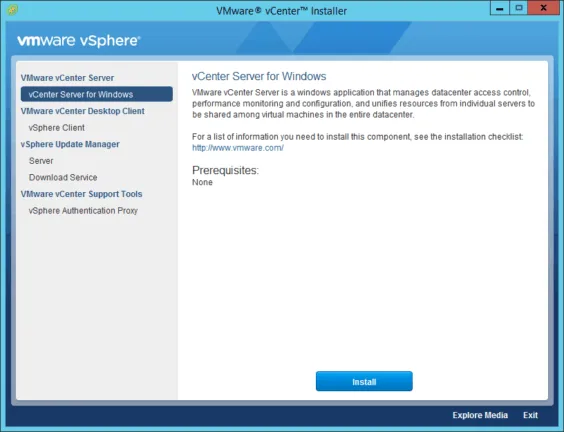
Step 5 – Click on the Install button on the VMware vCenter Installer dialog box.
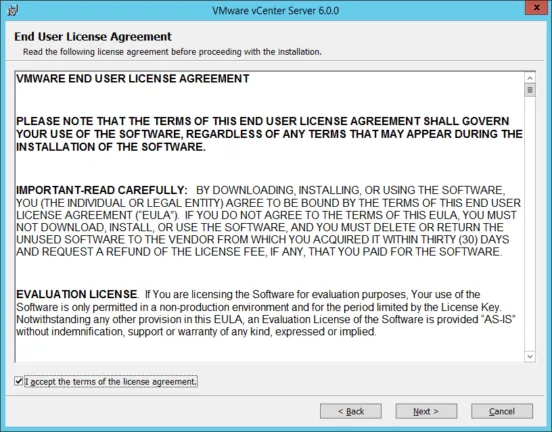
Step 6 – Accept the EULA by agreeing to the terms and clicking Next.
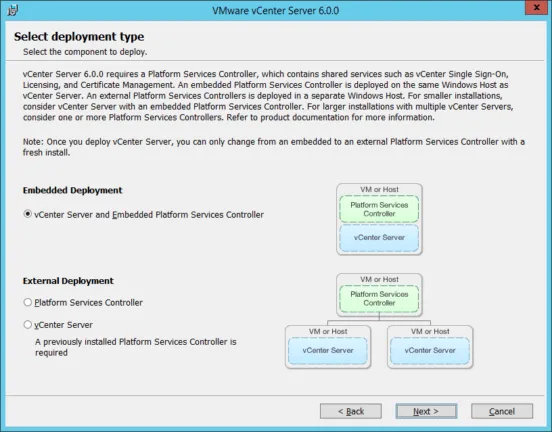
Step 7 – On this screen, you must choose between an Embedded or External deployment mode. Let’s go with Embedded Deployment. Tick the option under Embedded Deployment and click Next.
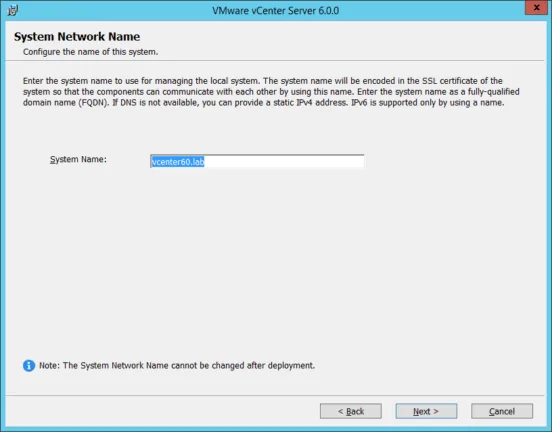
Step 8 – Type in the vCenter Server’s hostname. This must match the DNS A record (FQDN) created earlier. In theory, you can use the IP address instead of the hostname but this is something I do not recommend since you will eventually run into SSL certificate issues. Click Next.
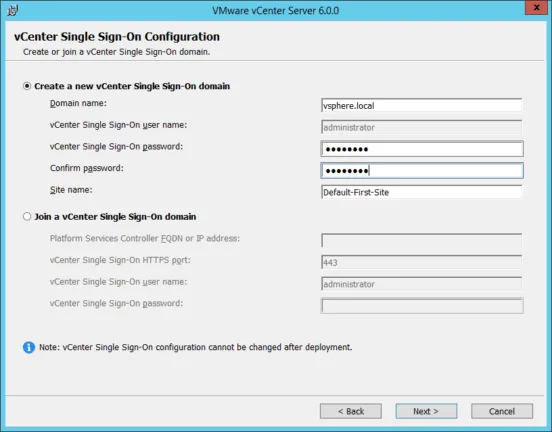
Step 9 – Under Create a new vCenter Single Sign-On domain, type in a value for the domain name and the Site name. You must also set a password for the administrator@<domain name> account. Click Next when finished.
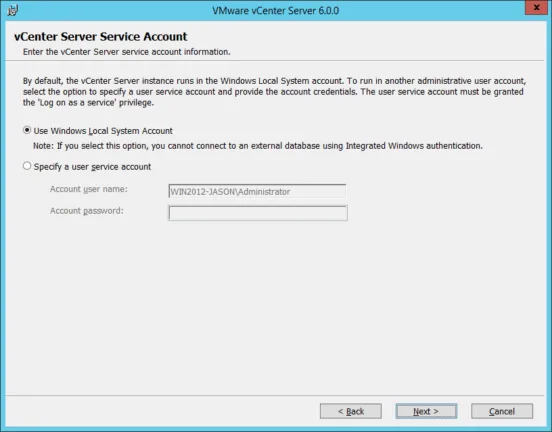
Step 10 – This screen gives you control over the user context under which vCenter Server services are run in Windows. Select Use Windows Local System Account and click Next. Note: This is acceptable for testing environments. For production environments, it is advisable to user Active Directory user accounts where deployed. This improves user account management and security.
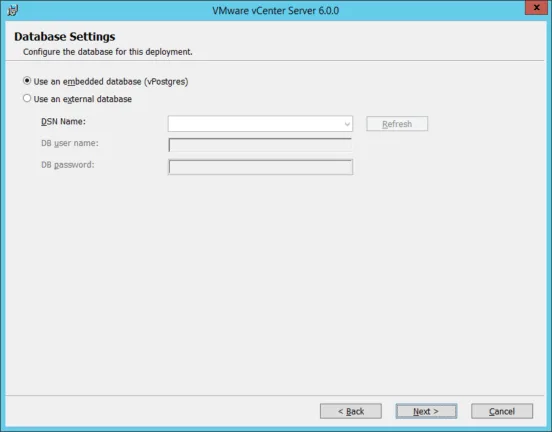
Step 11 – Next, we need to select a database model for vCenter. We will Use an embedded database as it will do just fine for smaller environments. For larger environments, go for an external DBMS solution for better performance and scalability. Press Next.
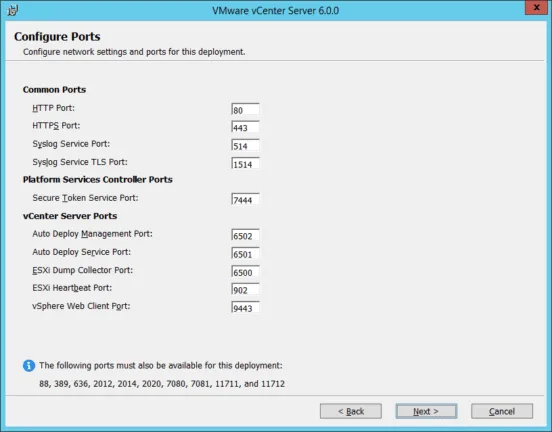
Step 12 – The network ports required by vCenter Server are best left to their default setting. If for any reason, you need to change ports, make sure that no other service or application conflicts with or uses the same ports. Click Next.
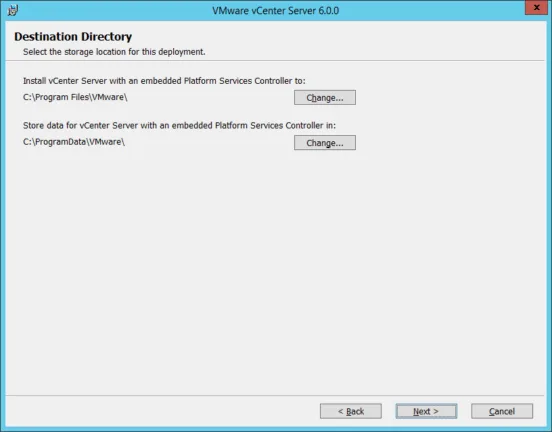
Step 13 – Click Next to accept the default destination folders. Again, you can choose to have vCenter Server installed on a separate disk or partition for easier backups and troubleshooting.
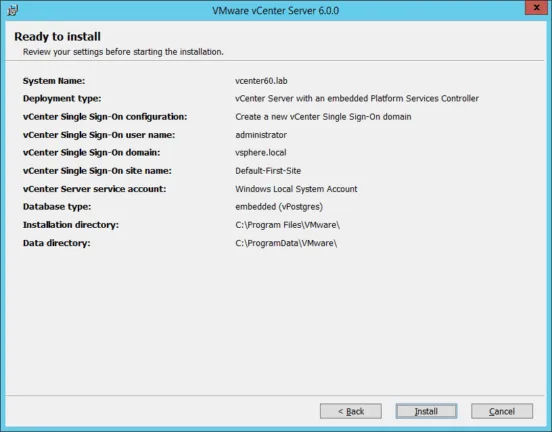
Step 14 – Review the settings. If need be, you can go back and make amends. Click Install to install vCenter.
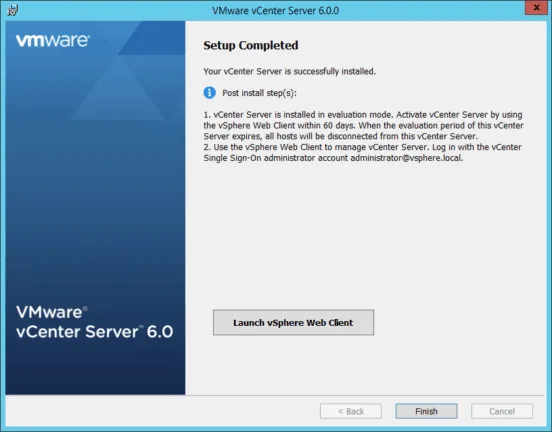
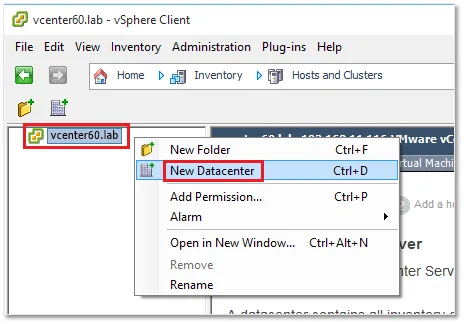
Step 15 – Once the installation completes, launch the traditional (or Web) vSphere Client to activate vCenter Server. Assuming all the above steps have been followed, you should now have a fully functional vCenter Server. The first thing we need to do is create a datacenter. This is a mandatory object which will contain the nested ESXi hosts created in parts 1 and 2.
Step 16 – Ignore any certificate errors that come up. Press OK to accept the start the 60-day evaluation period.
Step 17 – Right-click on the vCenter Server name and choose New Datacenter. Type in a name for the DC and press Enter or click anywhere on the screen to save the change.
Adding ESXi hosts to vCenter
One of the great things about vCenter Server is that you can manage multiple ESXi hosts using a single interface as opposed to logging in on each individual host. The other advantages, of course, are clustering and the features unlocked which include high availability, load balancing, fault tolerance and power management.
Step 1 – Right-click on the datacenter and select Add Host while in Hosts and Clusters view.
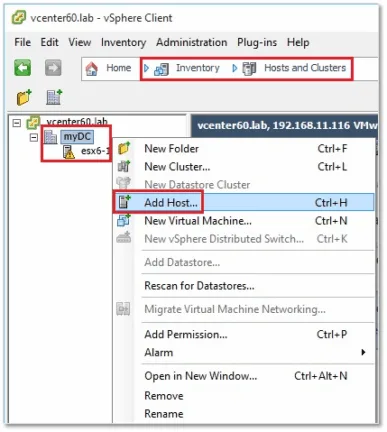
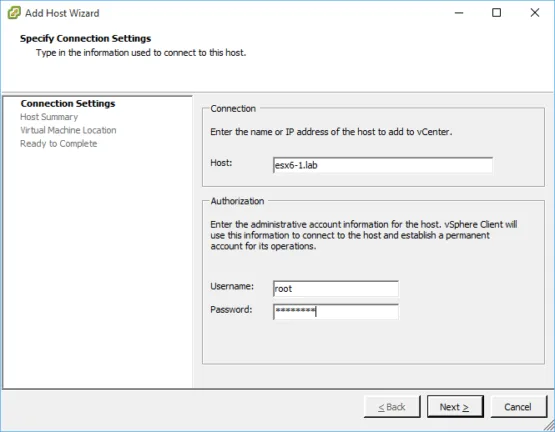
Step 2 – In the Host field, type in the ESXi FQDN (or IP address), followed by the root account and password. Click Next.
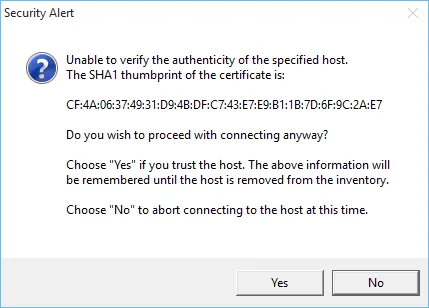
Step 3 – Press YES to acknowledge the certificate security alert.
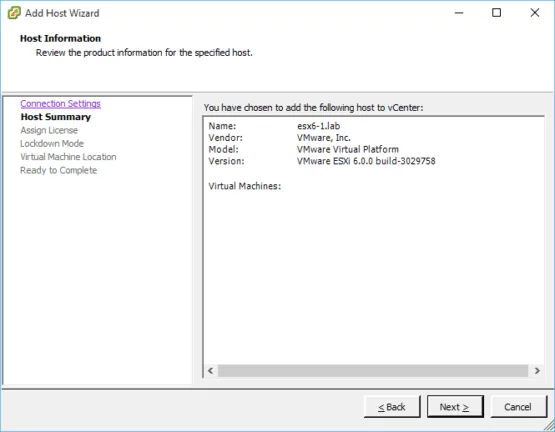
Step 4 – On the summary screen, press Next.
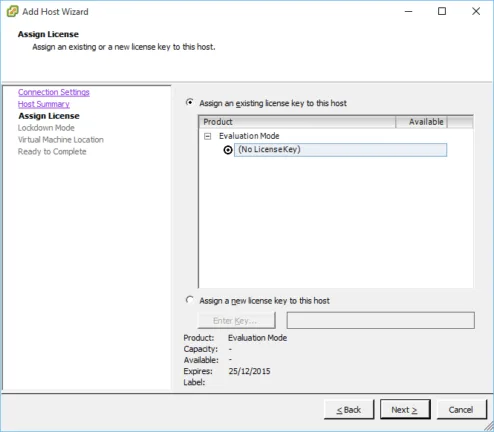
Step 5 – If you have purchased a license, you can assign it now. If not, press Next and keep using ESXi in evaluation mode until the 60-day trial period expires.
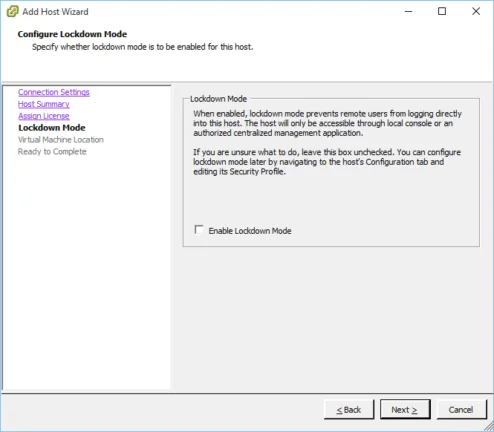
Step 6 – Leave the Enable Lockdown Mode unchecked. You may wish to enable this setting in production environments. Just make sure you don’t end up locking yourself out.
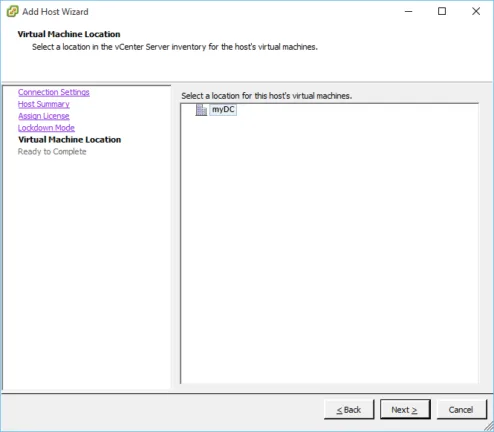
Step 7 – Select the datacenter under which the ESXi hosts will reside and press Next.
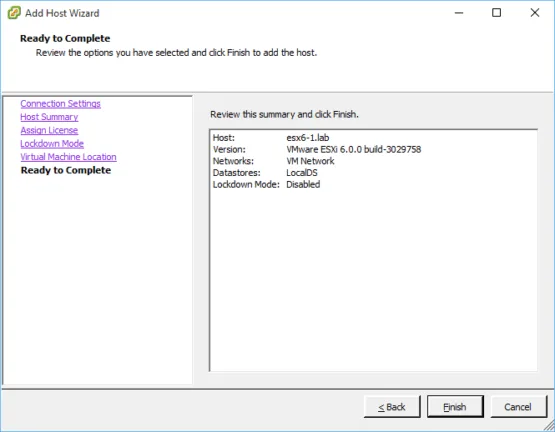
Step 7 – Click Finish to complete the addition process.
Note: The above steps, outlined in this section, must be repeated for the remaining two ESXi hosts.
Conclusion
If you have made it this far, congratulations. You now have a nested vSphere 6.0 environment comprising a vCenter Server 6.0 managing three nested ESXi hosts. You can use it as a test bed for all sorts of scenarios as well as to test vSphere features ranging from clustering to vSAN.