
How to Restrict Clustered Hyper-V VMs to Specific Cluster Nodes
There are times when you need to keep certain virtual machines from being moved to particular nodes in your Hyper-V VM cluster. In my case, I’m architecting a six-node cluster that will have its nodes split evenly across two sites connected with high speed fibre.
We want the virtual machines for each site to stay within their sites even if a cluster failover event occurs. We want to have the option to quickly LiveMigrate them from site to site if we have reason to. This is just one of any number of scenarios in which you might want to have control over how your guests can be isolated. We’ll look at a couple of ways to make that happen.
Table of Contents
Method 1: Hard Restriction Using the GUI
Using this method, it will not be possible to move a virtual machine to an excluded node by any method without first removing the restriction. I read a complaint in another forum that System Center Virtual Machine Manager’s automated Live Migration routines may attempt to move a guest to a node it has been restricted from using. That migration will fail, but as long as it isn’t because of the original host being offline, the guest should continue running. I currently have no method of testing this behavior myself, so be advised of the possibility. If you are not using SCVMM with automated Intelligent Placement, this is probably not likely to happen to you anyway.
To use the GUI to restrict which hosts a virtual machine can run on:
Hyper-V 2008 R2
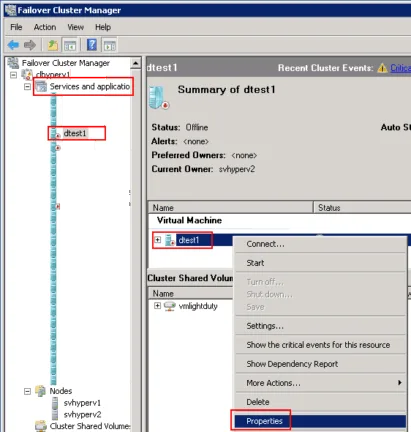
- Open Failover Cluster Manager.
- On the left pane, expand “Service and applications”.
- Still on the left pane, highlight the VM to modify.
- In the center pane, right-click on the virtual machine resource object and click “Properties”.
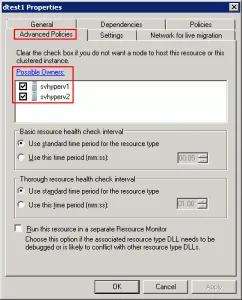
- Switch to the “Advanced Policies” tab.
- Uncheck any hosts you do not wish the guest to be able to migrate to. Click OK.
If the “Advanced Policies” tab is missing, then start over at step 3. If you highlight the “Services and applications” node and then right-click on the virtual machine in the list that is presented in the center pane and bring up its properties there, you get an entirely different dialog box. However, if you double-click on the virtual machine in the center pane’s list, you are taken to the screen that you wanted to be on initially.
Hyper-V 2012
- Open Failover Cluster Manager.
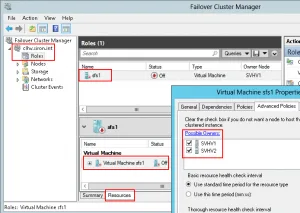
- In the left pane, highlight “Roles”.
- In the center pane, highlight the virtual machine you want to modify.
- At the very bottom of the center pane, switch the tab from “Summary” to “Resources”.
- In the lower center pane, either double-click the virtual machine or right-click on it and choose “Properties”.
- Switch to the “Advanced Policies” tab.
- Uncheck any hosts you do not wish the guest to be able to migrate to. Click OK.
Method 2: Hard Restriction Using PowerShell
If you have several virtual machines to modify, this might suit your solution better. I’ll show you the command, and you can use it to work up a script that sets your virtual machines in a way that suits your needs.
First, on 2008 R2, you have to import the module:
Import-Module FailoverClustersFor 2012, you just have to run the command on a system that has the Failover Clusters PowerShell module already installed. If you haven’t, run this:
DISM /ONLINE /ENABLE-FEATURE /FEATURENAME:FailoverCluster-PowerShellAfter that, both versions are the same. You’ll need the name of the virtual machine to modify. To list all of them:
Get-ClusterResourceOn 2012, the command accepts wildcards. So, if your virtual machine is named “svtest”, then you can run the following:
Get-ClusterResource -Name "*svtest*"Notice that each item has two entries: one is the virtual machine and the other is its configuration resource. The one that you really want to set is the virtual machine. You generally do not want to restrict configuration ownership.
Get-ClusterResource -Name "Virtual Machine svtest1" | Set-ClusterOwnerNode -Owners svhyperv1,svhyperv3The above command will restrict the virtual machine named “svtest1” so that it only runs on nodes svhyperv1 and svhyperv3.
If you try to exclude the virtual machine it is currently running on, the command will fail.
Remember what I said earlier about scripting potential? You can send in more than one virtual machine at a time:
Get-ClusterResource -Name "Virtual Machine svtest1", "Virtual Machine svtest2" | Set-ClusterOwnerNode -Owners svhyperv1,svhyperv3With 2012, you can use wildcards. I’d advise caution with that method, however, because you’re likely to restrict ownership of the configuration file as well and that has the potential to cause problems. Consider this an open challenge: first, if anyone can demonstrate a method to trap for a “ResourceType” of “Virtual Machine” on the Get-ClusterResource command prior to sending it through the Set-ClusterOwnerNode command.
Now that I’ve shown you how to prevent virtual machines from being migrated to specific hosts, I’ll show you how to loosen these restrictions so that virtual machines prefer certain nodes but aren’t completely prevented from being migrated to others. I’ll also show you how to set it so that certain virtual machines will try not to be on the same host as other guests that you specify.
Preferred Nodes via Failover Cluster Manager
You can indicate to a virtual machine that it should prefer certain nodes. If a failover event occurs, it will try to find a preferred node to start on. If none in the preferred list are available, only then will it start on any other node. This setting is very simple to make. The process is almost identical for both 2008 R2 and 2012, so I’m only going to include the screenshot for 2012:
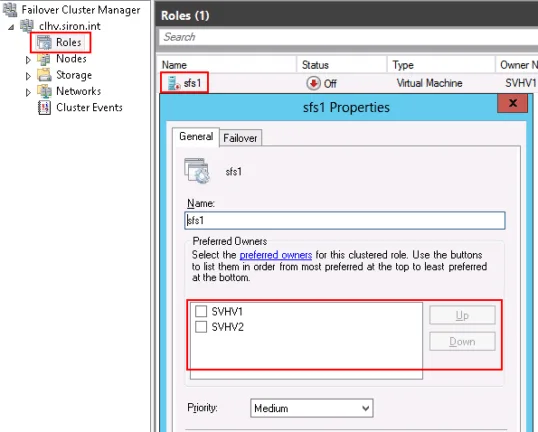
- Open Failover Cluster Manager. Expand your cluster.
- In 2008 R2, click on or expand “Services and applications” in the left pane. In 2012, click on “Roles” in the left pane.
- In the center-pane, right-click on the virtual machine to modify and click “Properties”. In 2008 R2, you can also right-click on the machine in the left pane.
- In the properties dialog, check the box(es) for hosts that you want this machine to prefer. You can use the Up and Down buttons on the right to sort your preferred hosts.
If you just want to establish the order that machines should try to run on and not exclude any, it’s perfectly to check off all of the hosts and then arrange them in the desired order. If you don’t select any at all (the default), then the clustering service will try to determine the best host to place the machine on.
Preferred Nodes via PowerShell
To start off, you need to have the Failover Clustering PowerShell modules ready. To save you from flipping back to the last post, here are the instructions again:
On 2008 R2, you have to import the module:
Import-Module FailoverClustersFor 2012, you just have to run the command on a system that has the Failover Clusters PowerShell module already installed. If you haven’t, run this:
DISM /ONLINE /ENABLE-FEATURE /FEATURENAME:FailoverCluster-PowerShellThe command for preference looks much like the command for the command for possible, but this time the noun is Group instead of Resource. If you’re not sure what the resource name is, first get a list of all of them:
# List preferred owners for all cluster group objects
Get-ClusterGroup
In most cases, it will be the simple name of the virtual machine, but notice that there will be other objects there as well:
Get-ClusterGroup

Name                       OwnerNode                  State
----                       ---------                  -----
Available Storage          SVHV1                      Offline
Cluster Group              SVHV1                      Online
sfs1                       SVHV1                      Offline
You can check the current preferred owners with:
# List the preferred hosts for all cluster groups
Get-ClusterGroup | Get-ClusterOwnerNode
Of course, you can add the name(s) of a virtual machine to narrow your results (2012 allows the use of wildcards as well):
# List the preferred owners for sfs1 and svdc1
Get-ClusterGroup sfs1,svdc1 | Get-ClusterOwnerNode
Now that you know the name(s) of the virtual machines you want to modify, all you have to do is pipe them back in to Set-ClusterOwnerNode:
# Set preferred owners for sfs1 to svhv2 first, svhv1 second, and leave svhv2 as unpreferred
Get-ClusterGroup sfs1 | Set-ClusterOwnerNode svhv2, svhv1
The order that you specify the hosts in indicates the preference order. Any hosts not included will not be preferred (their checkboxes will be cleared).
If you need to reset to defaults, just pass in an empty string:
# Clear preferred owners for sfs1
Get-ClusterGroup sfs1 | Set-ClusterOwnerNode ""
The pair of double-quotes is required. If you just use “Set-ClusterOwnerNode”, it will prompt you for a value. If you don’t supply one, the cmdlet will throw an error.
Anti-Affinity
Anti-affinity is a feature of the clustering service that works to keep certain resources from sharing a cluster node. It’s sort of like setting VMs to act the same pole of a set of magnets. They’ll repel each other when possible, but can be put together if necessary. The “magnetizing” process is done by setting the value of a text field on the properties of a cluster group. Every cluster group with the exact same text string in that field will try to stay away from every other cluster group with the same value.
This setting can be manipulated either with cluster.exe or with PowerShell, but not from within the GUI.
Anti-Affinity With Cluster.EXE
The original way is to user “cluster.exe”. You won’t run into any troubles getting that to run on any 2008 R2 computer with Failover Clustering or the Failover Cluster Manager tool installed, but it was deprecated in 2008 R2 so it’s no longer there by default in 2012 (and will probably be completely gone in the next iteration). You’ll need to make a special-case installation. In the GUI, just go through the “Add roles or features” wizard and on the features wizard, add the Failover Cluster Command Interface:
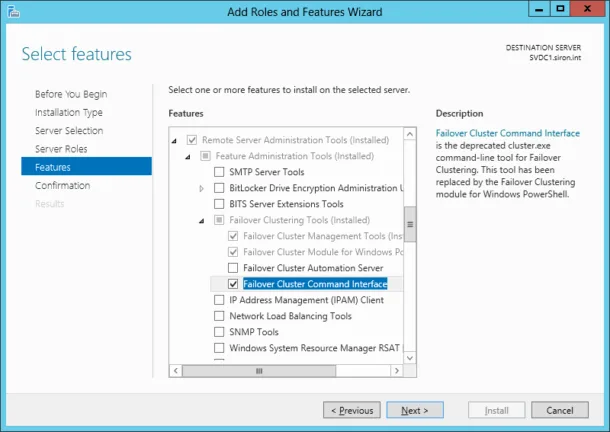
On Hyper-V 2012 or Server Core 2012, enter the following (only the feature name itself is case-sensitive):
DISM /ONLINE /ENABLE-FEATURE /FEATURENAME:FailoverCluster-CmdInterfaceTo set the anti-affinity property on a virtual machine (group) named sfs1 to “File Servers”:
cluster group sfs1 /prop AntiAffinityClassNames = "File Servers"A virtual machine can be in more than one anti-affinity class at a time. To put the above virtual machine into “File Servers” and “Critical Servers”, do the following:
cluster group sfs1 /prop AntiAffinityClassNames = "File Servers", "Critical Servers"Be aware that this is a set command only. If the virtual machine is in any anti-affinity classes, they are removed when you set this. Also, if the virtual machine’s group name has spaces, you’ll need to enclose it in double-quotes:
cluster group "SCVMM svmon1 Resources" /prop AntiAffinityClassNames = "Monitoring Servers"To reset to defaults:
cluster group sfs1 /prop AntiAffinityClassNames = ""Anti-Affinity With PowerShell
Proper attribution will follow the instructions.
You can see which classes a virtual machine is in:
(Get-ClusterGroup sfs1).AntiAffinityClassNamesBy default, this will just return you to the PowerShell prompt because there’s nothing there.
On 2012, you can just start adding classes:
(Get-ClusterGroup sfs1).AntiAffinityClassNames = "Critical Servers"Still on 2012, you can easily add more with the += operator:
(Get-ClusterGroup sfs1).AntiAffinityClassNames += "File Servers"To do it at all on 2008 R2 or to add several at once on 2012, you have to build a multi-string variable and pass that attach it:
# Create a multi-string variable called "antiaffinityclassnames"
$antiaffinityclassnames = New-Object System.Collections.Specialized.StringCollection
# The first class is "File Servers"
$antiaffinityclassnames.Add("File Servers")
# The second class is "Critical Systems"
$antiaffinityclassnames.Add("Critical Systems")
# The variable is ready, attach it to the virtual machine's AntiAffinityClassNames property
(Get-ClusterGroup sfs1).AntiAffinityClassNames = $antiaffinityclassnames
The source blog post for most of this latter PowerShell portion is on PowerShell.no. That post is definitely worth a read if you’ll be doing this often because the author has encapsulated this into an easier-to-use cmdlet.