What is Proxmox?
In this article you’ll get an introduction to Proxmox, the powerful open-source virtualization platform, how it works, how it differs from other hypervisors such as VMware and Hyper-V and how Proxmox users can now benefit from Hornetsecurity VM Backup.
Many businesses worldwide that are using VMware have found themselves in a sticky situation with Broadcom hiking licensing costs dramatically and recently following it up with legal cease and desist letters to companies continuing to use perpetual licenses, pushing them towards a subscription.
Fortunately, there are many alternatives to VMware for server and container virtualization, including Hyper-V, Nutanix, Citrix Xen server and the open-source platform, Proxmox VE.
proxmox vs. vmware
The hypervisor in VMware is loosely based on Linux but that’s not obvious to users, whereas Proxmox builds directly on two long time, integral parts of Linux, Kernel Virtual Machines (KVM) and Linux Containers (LXC).
You can simply use KVM to create virtual machines on top of a Linux physical host, but once you get beyond a few VMs or want High Availability (HA) it gets difficult to manage at scale.
Proxmox VE on the other hand provides a slick GUI, in-built clustering, support for various types of storage including Hyper Converged Infrastructure (HCI) where each host both provides storage for the cluster and runs VMs/containers.
There’s also Software-Defined Network (SDN) support, and a built-in Proxmox VE Firewall. On offer is a backup module, with some limitations.
For authentication there’s an integrated auth server, but Linux PAM, LDAP, OpenID Connect and Microsoft Active Directory are also supported.
On the guest side, everything that QEMU / KVM supports will run which includes old versions of Windows Server (2008 anyone?) and although not listed, up to modern versions of Windows Server and Client. Linux is of course also supported, in a plethora of distributions.
The platform itself is open-source, but most businesses like the comfort of having support on hand when things break, which Proxmox offers in the form of various Enterprise support plans on a per CPU socket basis. These plans also give access to an Enterprise repository with tested security updates to Proxmox VE for easy patching.
[Related]: Proxmox vs. VMWare – a detailed comparison
Set up: How to Install Proxmox
The first step to learning about Proxmox VE is spinning it up on a server to get a feel for the setup and user experience.
To install Proxmox VE on a physical server for the first time, follow these steps:
- Download Proxmox VE ISO: Visit the Proxmox website and download the latest Proxmox VE ISO image.
- Create a Bootable USB Drive: Use a tool such as Rufus or Etcher to create a bootable USB drive with the Proxmox VE ISO image.
- Boot from USB: Insert the USB drive into your server and boot from it. You may need to change the boot order in the BIOS settings.
- Start Installation: Once the server boots from the USB drive, you will see the Proxmox VE installer screen. Select the ‘Install Proxmox VE’ option.
- Agree to License: Read and accept the license agreement to proceed with the installation.
- Select Target Hard Disk: Choose the drive where you want to install Proxmox VE. Be aware that this will erase all data on the selected disk.
- Configure Country, Time Zone, and Keyboard Layout: Set your country, time zone, and keyboard layout according to your location and preference.
- Set Root Password and Email Address: Enter a strong password for the root account and provide an email address for system notifications.
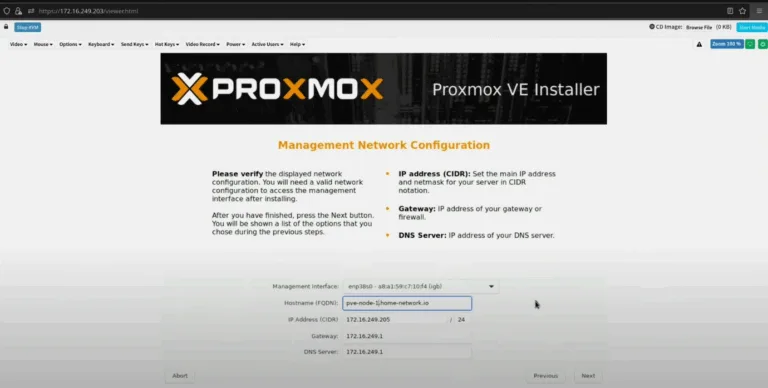
- Configure Network Settings: Set the network configuration for your Proxmox VE server. Assign a static IP address, netmask, gateway, and DNS servers.
- Complete Installation: Once the setup is complete, the installer will copy the necessary files to the hard disk and install Proxmox VE. This process may take several minutes.
- Reboot Server: After the installation is finished, reboot the server. Remove the USB drive to avoid booting from it again.
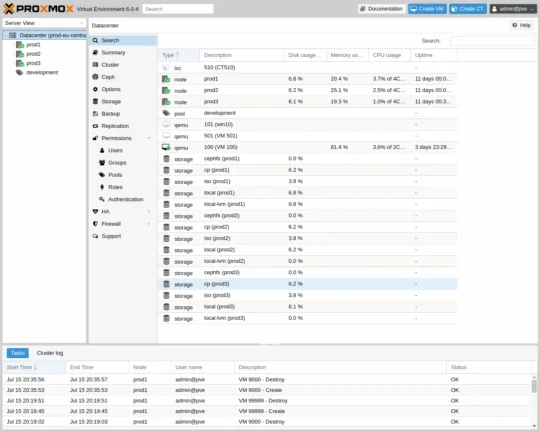
- Access Web Interface: Open a web browser and access the Proxmox VE web interface by entering the IP address of the server followed by port 8006.
- Login and Explore: Log in with the root account and password you set during the installation. Explore the web interface to familiarize yourself with Proxmox VE’s features and functionality.
System requirements are Intel or AMD 64-bit CPUs, plus Intel VT or AMD-V support (this matches other virtualization platforms). You’ll obviously want adequate amounts of memory for the number of VMs / containers you plan to run, and fast storage.
How to Create Virtual Machines on Proxmox
Once you have your first host up and running, the next step is creating a VM.
- Access Proxmox VE Web Interface:
- Open a web browser and navigate to the Proxmox VE IP host address followed by port 8006.
- Login:
- Enter the root account and password you configured during the installation.
- Create a New VM:
- Click on Datacenter in the left sidebar.
- Select Create VM from the top toolbar.
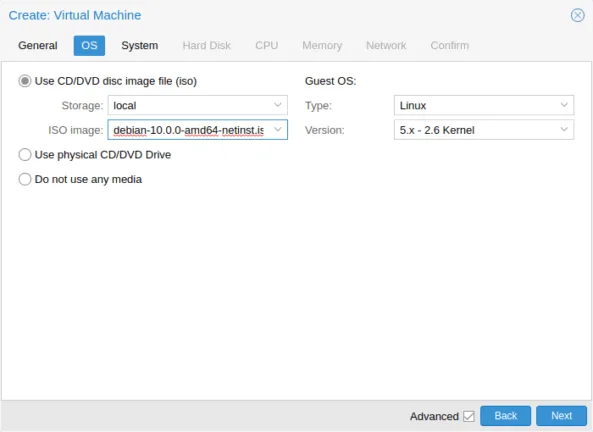
- Configure VM Settings:
- Enter a name for your VM.
- Select the necessary settings such as OS type and version.
- Upload ISO Image.
- Navigate to the Storage section.
- Upload the Windows Server ISO image to the appropriate storage location.
- Assign the ISO to the VM.
- After the ISO is uploaded, go back to the VM settings.
- Assign the ISO image to the CD/DVD drive of the VM.
- Configure Hardware:
- Set the CPU, memory, and disk settings according to your requirements.
- Configure network settings for the VM.
- Start VM:
- Click on the VM name in the sidebar.
- Select Start to power on the VM.
- Install Windows Server:
- Open the console for the VM.
- Follow the Windows Server installation process.
- Post-Installation Configuration:
- Install necessary drivers and updates.
- Configure network settings and join the server to your domain if required.
One thing to note is that Proxmox VE supports PCI passthrough, meaning you can allocate physical hardware in a host directly to a VM. Just like in VMware or Hyper-V this removes the hardware from use by any other VM and stops the ability to Live Migrate the VM.
Example use cases includes passing in a GPU. There’s even support for splitting up a larger physical GPU for use by several VMs simultaneously.
There’s the ability to add a virtual TPM chip to the configuration of a VM for operating systems that require it (Windows Server 2022 and Windows 11+), note that this virtual TPM chip is “for show only” and doesn’t actually provide any additional security.
Proxmox Features
1: Clustering & Hyper Converged Infrastructure
A single host isn’t going to suffice for a production environment (apart from in small businesses), so clustering will be required. Proxmox recommends a three-node cluster (each node has a vote in the quorum model).
You also need shared storage, either in the form of a storage array (NFS or iSCSI, SAN or NAS) or local storage when using HCI through the Ceph system (see below).
Proxmox VE comes with the Proxmox Cluster File System (pmxcfs) which uses the Corosync Cluster Engine to sync changes across the cluster network.
As mentioned, three nodes or more are recommended for the quorum votes to work, but the Corosync addition does offer the ability to have external votes for the cluster which is recommended for two nodes and larger clusters with an even number of nodes.
An interesting feature is the HA simulator that lets you “test drive” a cluster with three nodes and six VMs, using only a single node.
The most common deployment model for virtualization hosts today is HCI, at least in smaller deployments as it’s simpler to set up, and easier to maintain, and more cost effective.
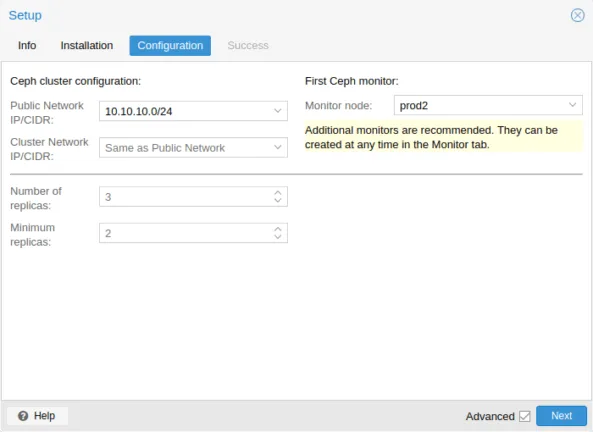
Proxmox VE relies on Ceph, an open-source Software Defined Storage (SDS) solution with easy setup in the GUI (CLI also works), bringing thin provisioning and snapshot support.
You can set up pools with different performance and redundancy settings, data is replicated between the nodes, and just as with similar systems in VMware and Hyper-V, RAID based storage is NOT supported.
2: Containers & Firewall
There is comprehensive support for running Linux containers on Proxmox VE, based on LXC, with a list of templates available. You can limit the number of visible CPU and the amount of memory in each container and provide permanent storage using Mount Points.
And of course, you can run Kubernetes on Proxmox VE if you really want to manage all of the infrastructure inhouse.
The Proxmox VE firewall lets you set up rules for incoming, outgoing or forwarded traffic for network segments or zones.
3: Backup and Restore
No production virtualization cluster is complete without comprehensive backup, and Proxmox VE has its own built-in offering.
However, if you have a larger environment you may find that a third party backup solution is easier to setup, manage and maintain such as Hornetsecurity’s VM Backup.
This supports Proxmox VE 8.2, 8.3 and 8.4 and lets you backup to offsite locations such as Azure, AWS S3, Backblaze and Wasabi, with inline deduplication, and gives you Full VM Restore to any Proxmox VE environment (handy in case of a total cluster loss).
Protect your Proxmox VMs Today with Hornetsecurity VM Backup
Don’t wait for a disaster to strike—take proactive steps to safeguard your virtual machines with our powerful backup solution! With Hornetsecurity VM Backup, you can easily backup and restore your Proxmox VE VMs with the industry’s leading data protection features.

Why Choose Us?
- Ransomware protection with Immutable Cloud Storage
- Massive savings with Augmented Inline Deduplication
- Quick recovery options and minimal downtime
Ready to experience the peace of mind that comes with reliable backups? Start your FREE 30-day trial today and see for yourself why Hornetsecurity is the top choice for data protection.
Protect your data and keep your business running smoothly—because your data deserves the best!
Conclusion
If you’re an experienced VMware administrator, there’s much that will feel familiar when using Proxmox VE. Most of the concepts are the same or similar, and while the configuration steps might be different, overall learning to administer Proxmox VE clusters shouldn’t be too hard.
Proxmox also offer courses, including Proxmox VE Deployment & Management which runs over two days, for a total of 14 hours, both in person and online.
Look out for our upcoming articles on migrating to Proxmox VE from VMware and comparing the two.
FAQ
What is Proxmox?
Proxmox is an open-source virtualization environment for managing VMs and containers. With its open-source nature, Proxmox allows users to customize the system according to their unique needs while providing various support options, including enterprise plans for businesses seeking guaranteed assistance.
Why are businesses moving from VMware?
Businesses are shifting due to VMware’s rising licensing costs and subscription model pressures. By switching to Proxmox, companies can maintain functionality while reducing their overall virtualization costs.
What technologies does Proxmox VE use?
Proxmox VE utilizes KVM for virtual machines and LXC for Linux containers.